Category Archives: Gear and Tools

Bike-packing with Brian – Part 1

The last time I bike-packed was in December 2019. Six of us, including Brian, rode to Port Dickson and back the next day.

Map courtesy of Ride With GPS

This time Brian and I went on a four-day trip. For the first time, I used two pieces of kit I had bought specifically for bike-packing.

Photographs courtesy of image delivery.net and QOUC.cc

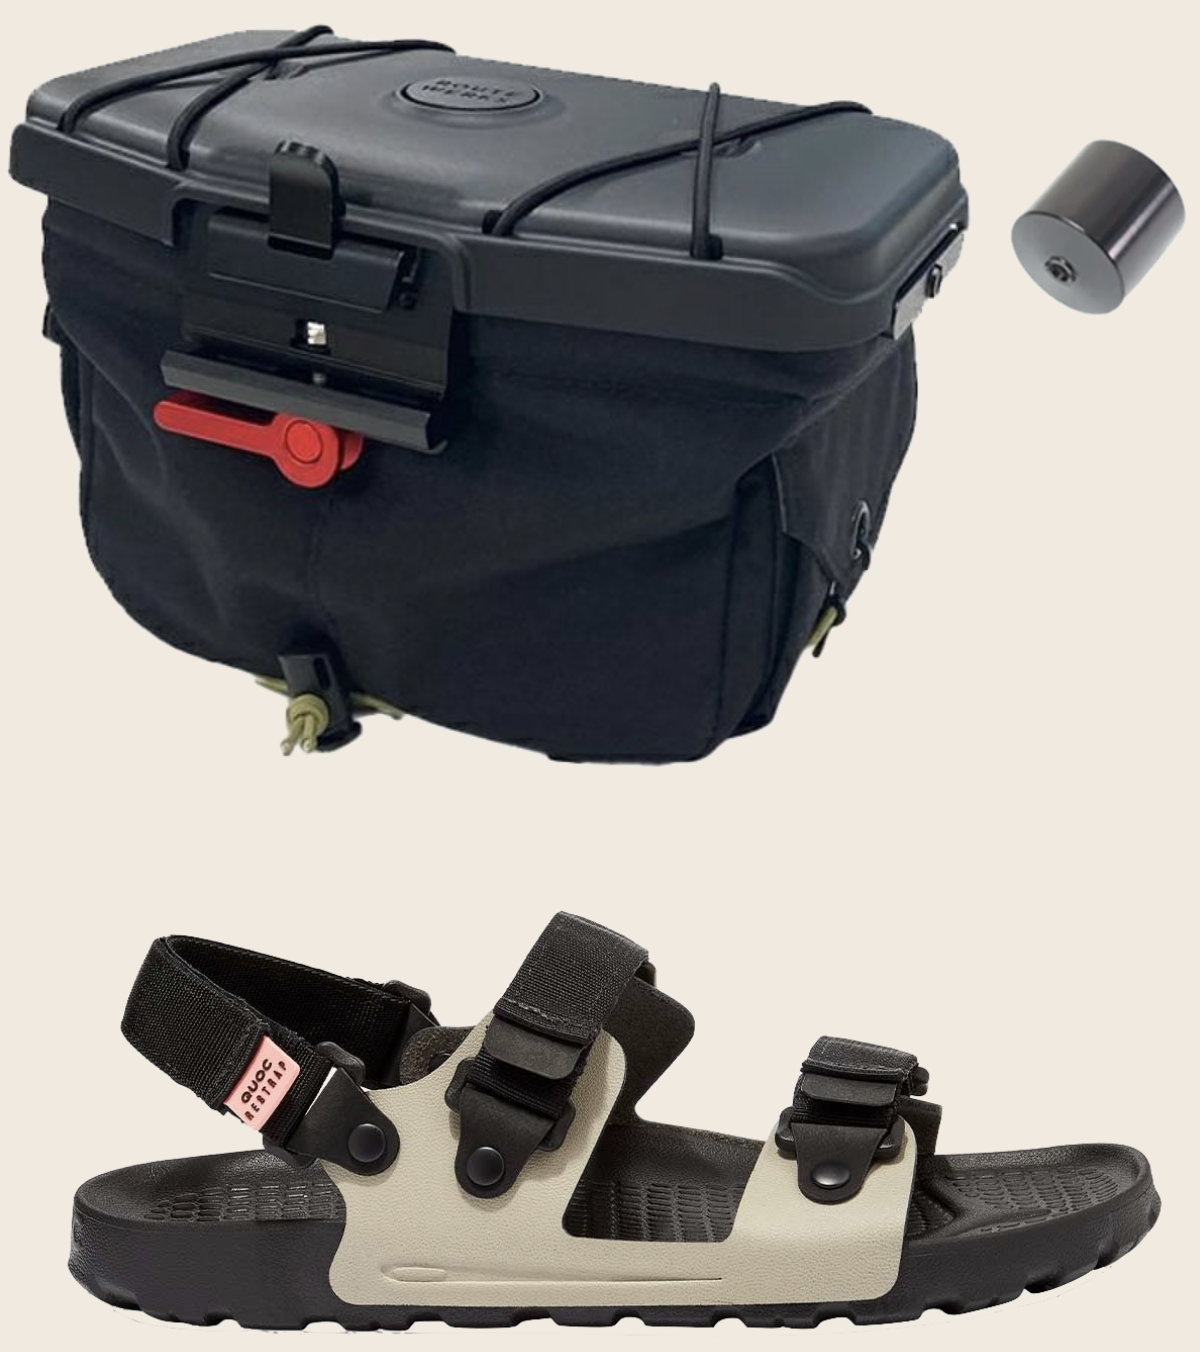
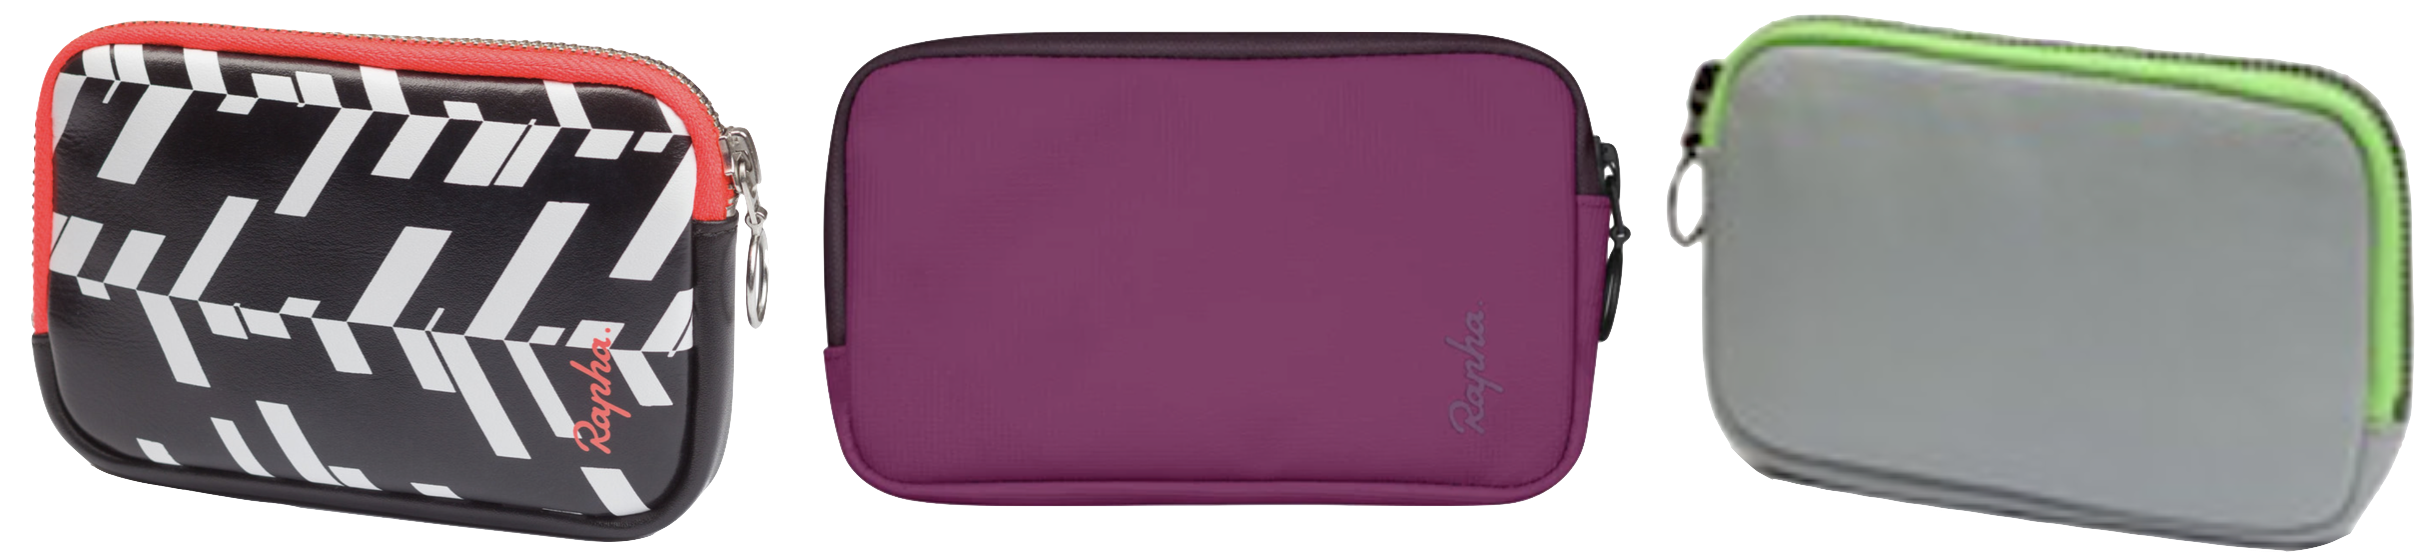
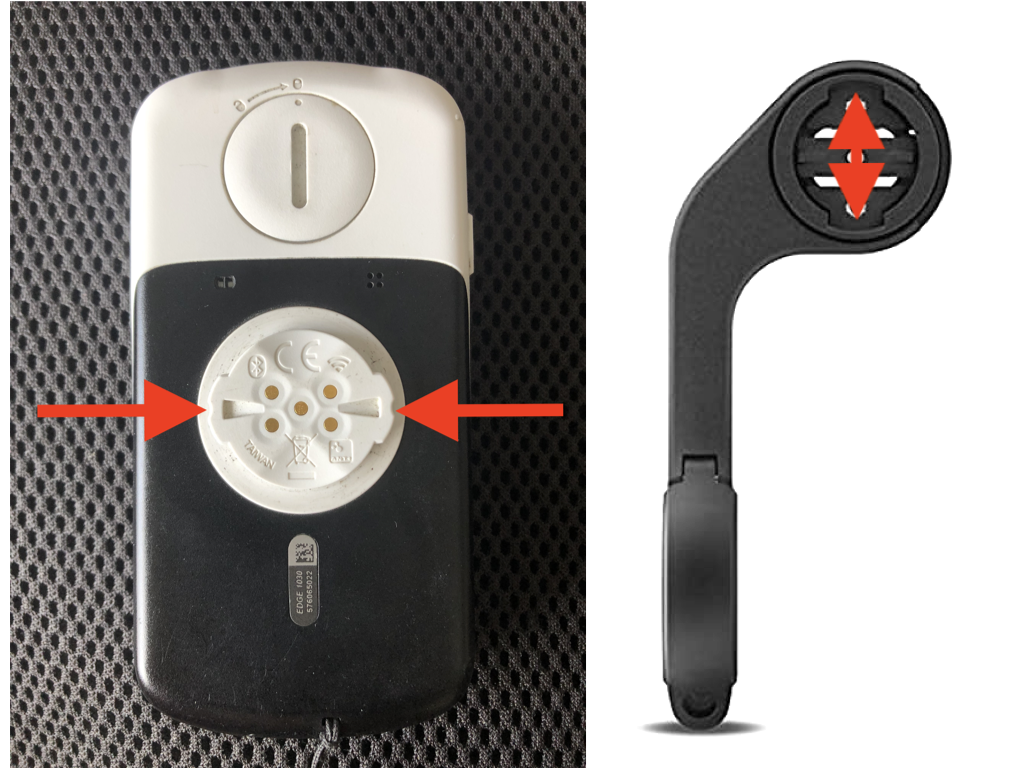
I bought the Route Werks Handlebar Bag in November 2020 and the QUOC x Restrap Sandals in May 2023. Most handlebar bags occupy the space on the handlebar where a Garmin Out-Front mount fits. The Handlebar Bag comes with an add-on stub (shown top right in the photograph above) that fits on the side of the bag. I can attach the Out-Front mount to the stub. That lets me use my UT800 headlight unimpeded. My Garmin Edge clicks into the mount on the lid of the bag.

The differentiator of the QUOC x Restrap sandals is that the centre straps can be reconfigured to hold the sandals on either side of a saddle pack.

You can see an Out-Front mount attached to a stub on the right side of the handlebar bag, my Garmin Edge on the lid, and the QUOC sandals strapped to my saddle pack.

The photograph above was taken on a KTM Komuter train. I caught the 6:54 am train at Putra station. The plan was to meet Brian at 7:20 am at Petaling station— five stations and twenty-six minutes away.

“The best-laid plans of mice and men often go awry” is a line from the 1785 Scots-language poem To a Mouse by Robert Burns. That is what happened to my plan. My train made two unscheduled stops between stations and a long stop at Sentral station. It took almost an hour to get to Petaling station.

It started to rain en route. Brian wisely decided to serve breakfast at his apartment, adjacent to Petaling station, while we waited for the rain to stop.

Photograph courtesy of Brian

We supplemented the bread, butter and jam with some excellent nasi lemak from a small stall outside his apartment building.

The rain had lightened to a drizzle by 9:00 am. Clad in rain gear, we headed out to cycle to Bagan Lalang.

Map courtesy of Ride With GPS

Thirty minutes later the drizzle had stopped and our rain gear had to come off. We were overheating. That was a harbinger of things to come.

By 10:30 am we had ridden through Kota Kemuning and were at the traffic light at the entrance to Rimbayu. The light turned green and I pedalled away. Seconds later a car bumper brushed against my right ankle. I looked over at a driver, focussed on the mobile phone he was holding up in front of him. He hadn’t realised that he had run into me. “Stop looking at your 💩🧨💥 phone while you are driving” is one of the more polite things I shouted at him. 

It was a good time to take a break. 7 km down the road we came upon the Toli-Toli Backyard Café. Like the other new buildings we passed after crossing the South Klang Valley Expressway, the café was not there the last time I cycled from Rimbayu to Jenjarom in January 2023. 

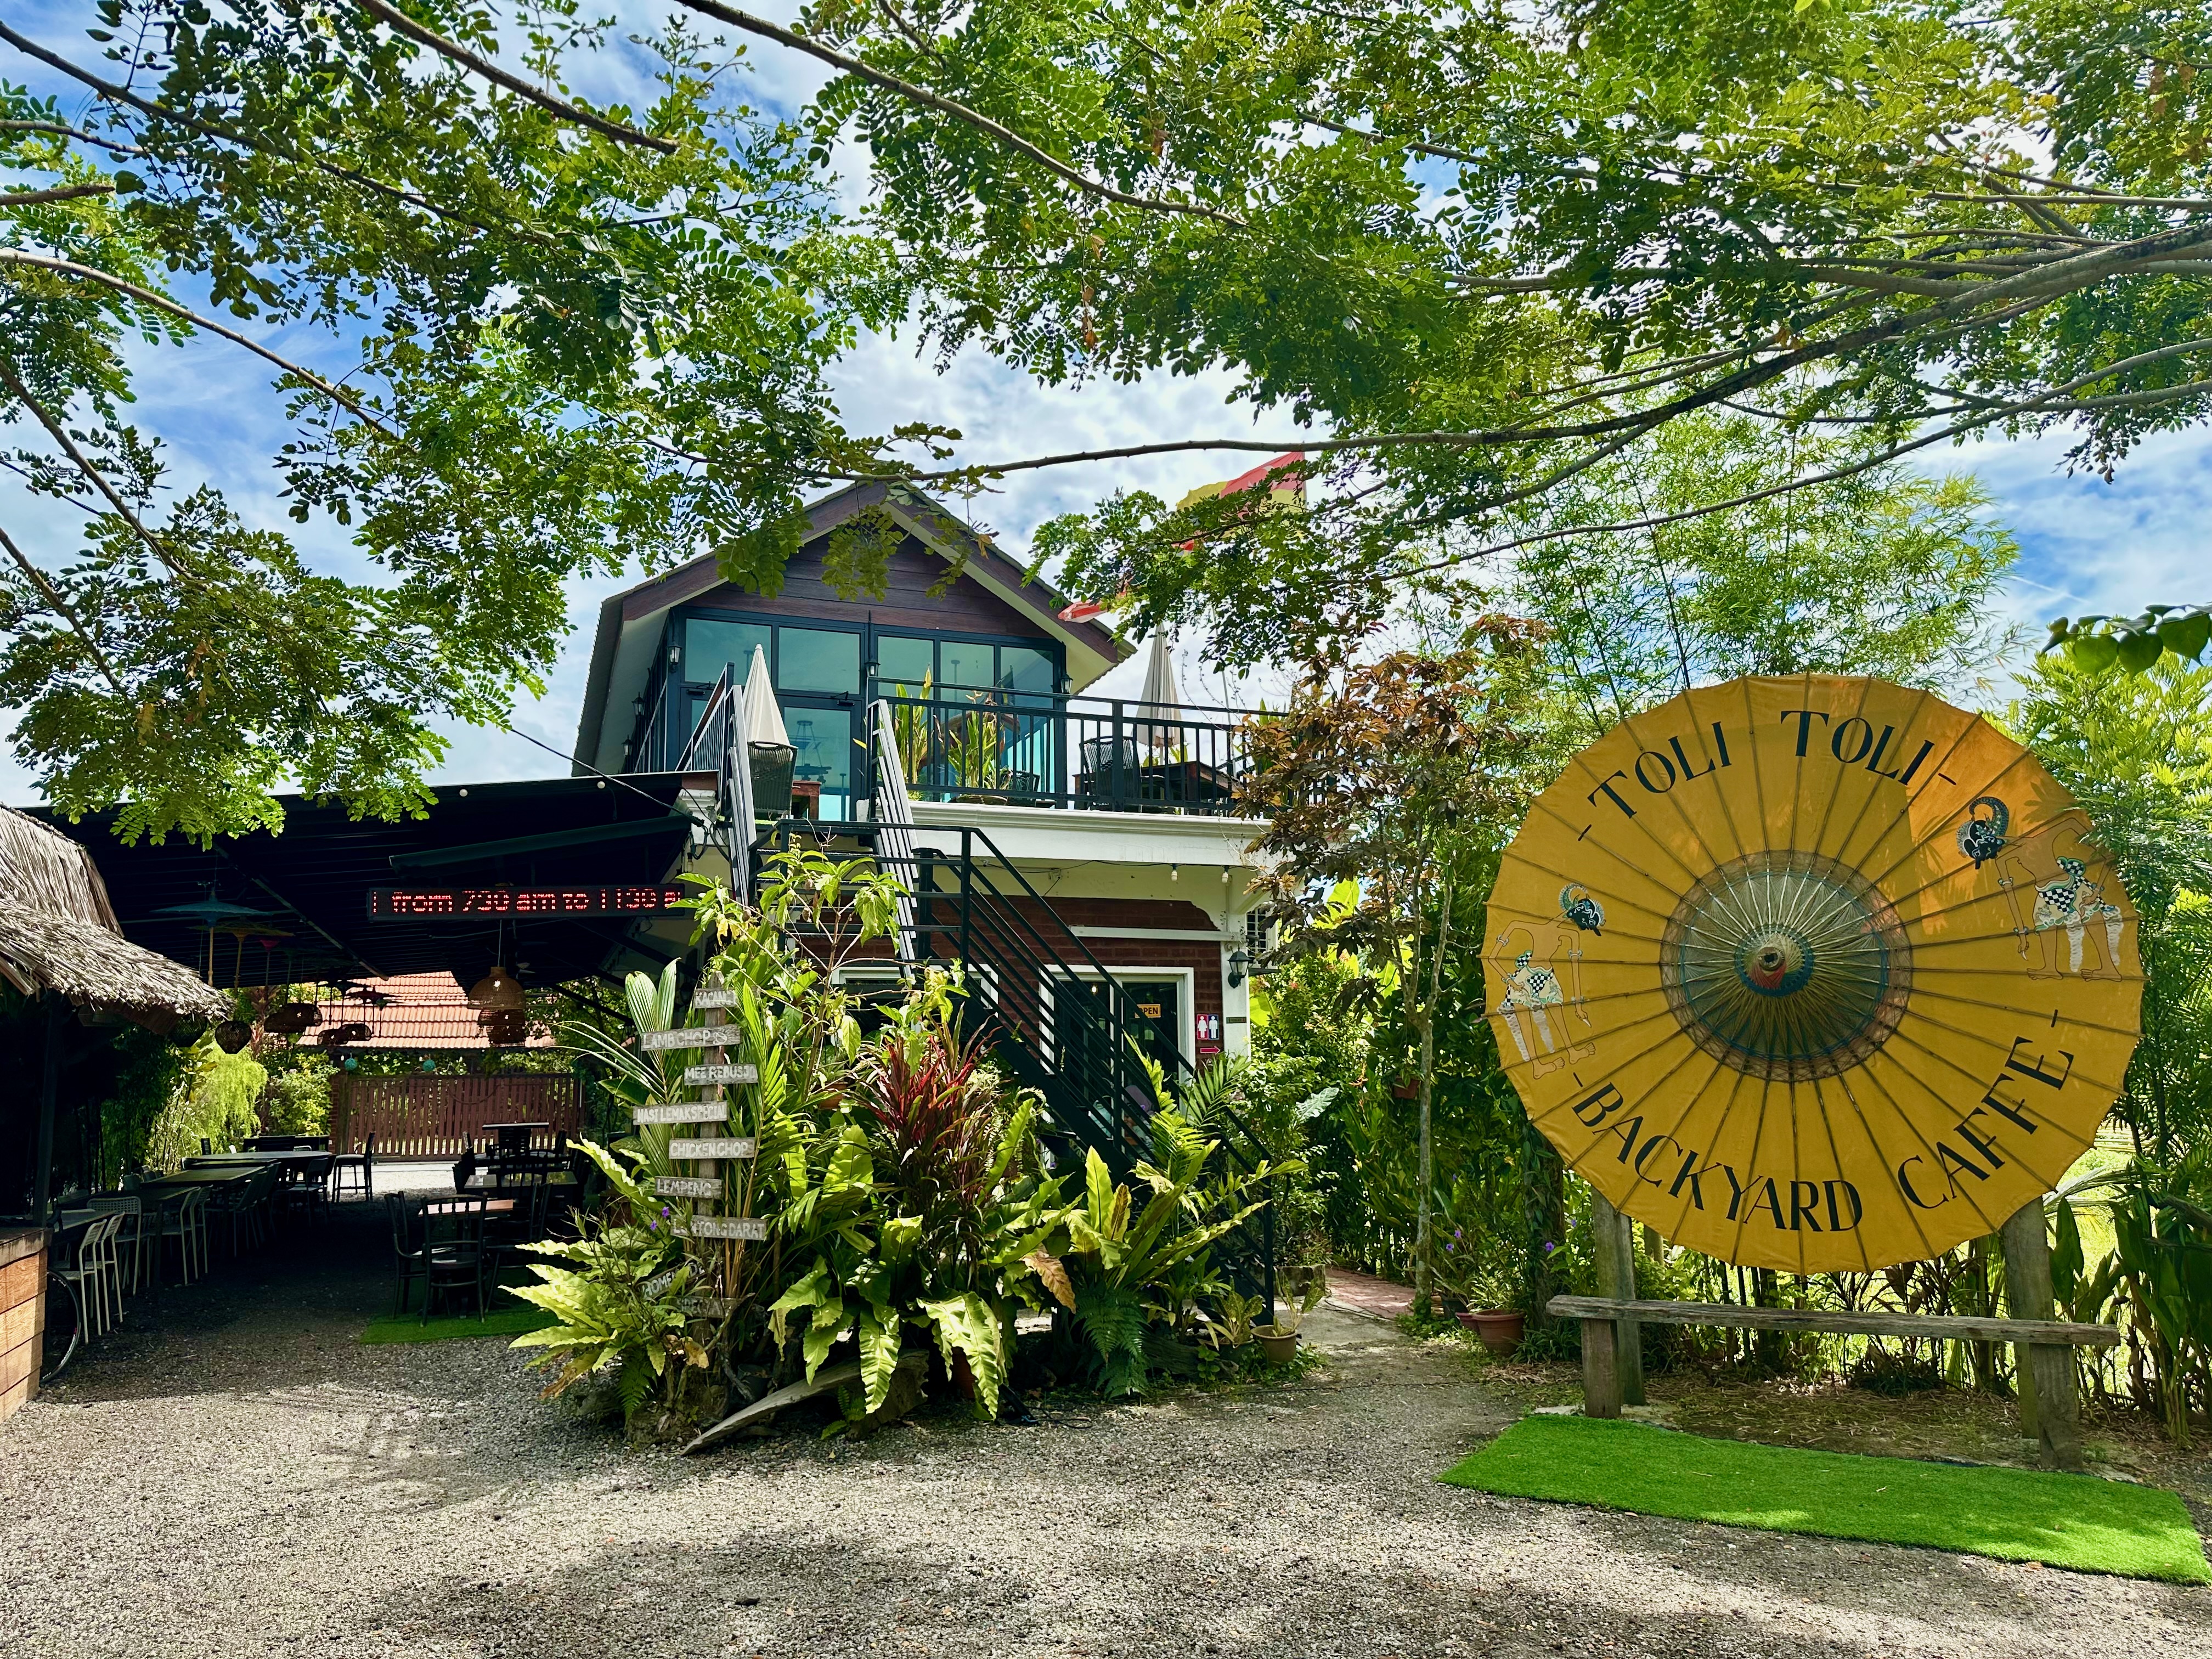
We enjoyed Toli-Toli’s teh tarik, kaya toast and air-conditioning. It was 11:45 am when we left Toli-Toli. It was already getting hot.

It got hotter as the afternoon wore on. Our route was along quieter rural roads so we didn’t have to deal with traffic. The downside was that we didn’t have much shade to deal with either. These were the temperatures for Tanjong Sepat and Bagan Lalang. That ‘Feels Max’ of 39ºC is 102ºF. It felt every degree that hot.

Graphic courtesy of visualcrossing.com

I was cooked when we got to the Seri Malaysia Hotel in Bagan Lalang. It was all I could do to down two large iced lychees and nap for an hour before I did anything else. Take a shower. And go for a swim. When I made the room reservation the hotel swimming pool was a selling point.

Photograph courtesy of Hotel Seri Malaysia

Refreshed, we took a walk to the beach.

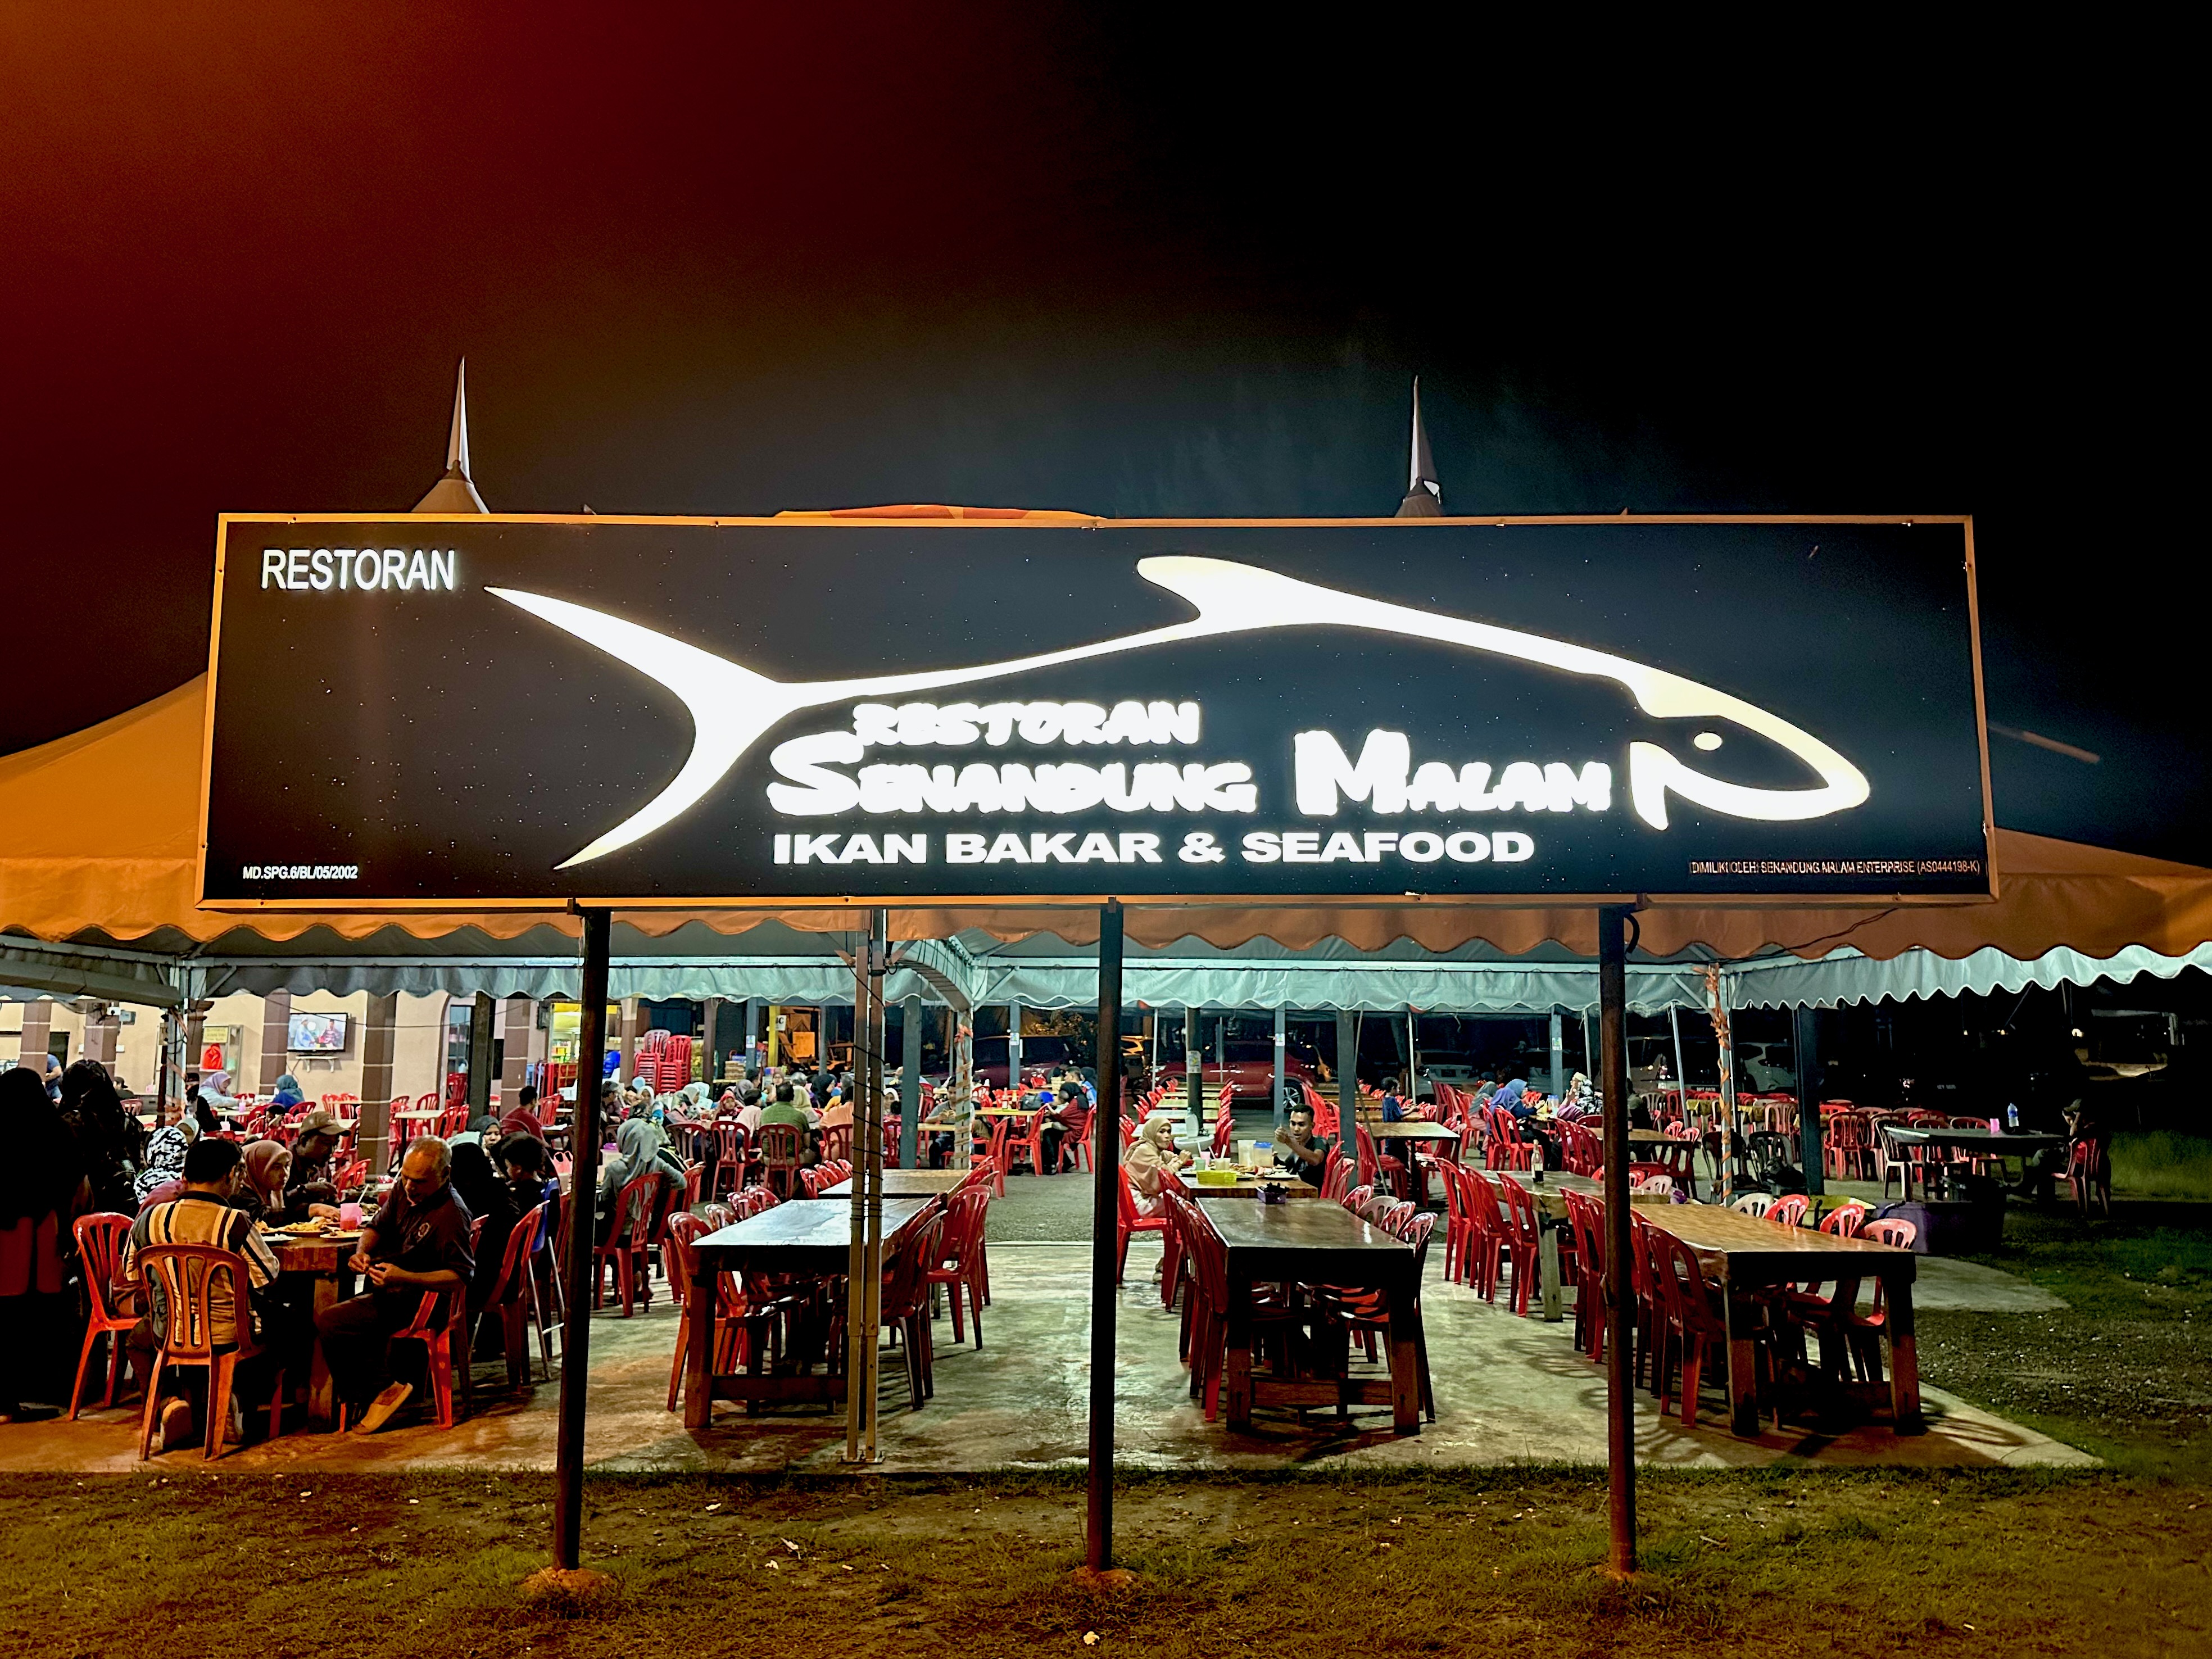
Dinner was at a ‘pick your own seafood’ restaurant. You fill a basket with your choice of freshly caught fish, prawns and squid and tell the staff how you want it cooked.

We ate well and we slept well that night.

There Goes Another Cassette

I wrote about chain and cassette wear in September 2013. You can read that post here: Chain Checkers Do No Good Just Sitting in Your Toolbox.

That post came after I had to replace a worn cassette on my Alchemy Eros. I replaced another worn cassette about four years ago and had to replace another this week.

Photograph courtesy of alchemybikes.com

As with the previous replacements, the need to replace this cassette came after installing a new chain. Chains with just 1% of wear should be replaced. My chain was well beyond 1% of wear. Anything more than 1% chain wear and the cassette is probably already damaged.

Chain wear is often called chain stretch, but this is a misnomer.  The side plates of a chain do not deform under pedalling forces.  Rather, it is wear to the pins, bushes and rollers that causes the distance between the pins to increase, thus giving the illusion of stretch.

This diagram shows A. pin/bushing wear and C. bushing/roller wear.  B shows an unworn chain. In short, chain wear is indicated by increasing spacing between pins. Note that roller wear does not affect pin spacing.

Illustration courtesy of pardo.net at http://pardo.net/bike/pic/fail-004/000.html

The guys at my LBS told me I would probably need to change the cassette. That need was confirmed during my short ride home when the chain started skipping over the teeth of my most-used sprockets. The rollers of the new chain were not meshing with the worn teeth on those sprockets.

The photographs below show a new cassette on the left and a worn cassette on the right. Both cassettes are SRAM Red OG-1090s.

Photographs courtesy of theprocloset.com (left) and blogspot.com (right)

The two teeth in the green circles labelled A show a normal tooth profile. The red circles labelled A on the right show a phenomenon called “Shark Finning,” where the leading edge of a cog tooth curves inwards, making it resemble a shark’s dorsal fin. In time, this erodes the top of the tooth and causes the chain to skip.

As mentioned above, wear to the pins, bushes and rollers causes the distance between the pins to increase. As the gap between the pins, bushes and rollers widens, the ongoing wear widens the space between teeth. You can see that the gap between the teeth, shown by the red arrow labelled B, is wider than the equivalent gap, shown by the green arrow B. The narrower gap between the pins, bushes and rollers on a new chain means that the new chain rides up the sides of each tooth. The chain has less grip on the teeth and skips.

The third sign of wear is the leading edge of teeth that are mushrooming out a little. That’s from the metal being rubbed down and compressed by the chain. Think of it like a roll of cookie dough. If you slap it down on the table, the bottom will spread out, but the top will remain intact. The metal of the cassette acts the same way.

I didn’t need to see these signs of wear to know I had to replace the cassette. The skipping on the two sprockets I used the most was all the evidence I needed to spend money.  

The strain on the wallet didn’t end there.  The LBS guys told me I also had to replace the chainrings. I should have seen that coming. The combination of putting almost 60,000 km on them with a succession of chains in varying states of wear would lead to eroded teeth.

The challenge was to find replacement parts. My 2015 Eros has a SRAM 11-speed groupset. Groupsets today have 12 or 13 speeds. SRAM 11-speed 11-32 tooth cassettes are getting harder to find. My LBS didn’t have SRAM 11-speed 52-tooth outer and 34-inner chainrings in stock either. Fortunately, I have a son living in Australia. I put him on the case, and he got all three parts for me.

Photographs courtesy of SRAM (chainrings), evobikes.co.za (cassette) and excelsports.com (chain)

The general rule of thumb is that a chain needs replacing after 3,200 km to 4,800 km. A cassette needs replacing after three chain replacements, i.e. after 9,600 km to 14,400 km. There is less of a consensus about chainring lifespan. 60,000 km seems a reasonable expectation.

I will pay more attention to chain wear than I have in the past 😄. In the meantime, I will enjoy the silent running of my brand-new drivetrain.

Decathlon Sells Pretty Good Cycling Gear

I first encountered a Decathlon store in France in 2002. I had not seen a store selling equipment for multiple sports before. An innovation that founder Michel Leclercq introduced to sports retailing at his first store in Lille in 1976. Today, Decathlon is the largest sporting goods retailer in the world, with 1,700 stores in 70 countries and regions.

Decathlon opened its first store in Malaysia in 2016. There are 16 Decathlon stores in the country today, including the largest Decathlon store in Southeast Asia. That store in Shah Alam has a 2-floor, 5,000 sqm sales area with 230,000 products from 60 sports.

Photographs courtesy of Decathlon Shah Alam

Decathlon was not a brand I associated with high-quality bicycles and cycling gear. I thought of Decathlon as a big-box retailer selling budget bikes. That changed in November 2023 when Decathlon was announced as the co-title sponsor of French WorldTour team AG2R in a five-year deal. The team will be called Decathlon–AG2R La Mondiale. Decathlon has also replaced BMC as the team’s bike supplier. The team uses Decathlon’s in-house designed and assembled Van Rysel bikes, the RCR Pro road bike and the XCR time-trial bike.

Photographs courtesy of vanryselcycling.com

Van Rysel developed three new helmets for the Decathlon–AG2R La Mondiale team. The RCR, the FCR, and the XCR. Complementing the helmets are the Perf 900 and Perf 900 Light sunglasses.

Photographs courtesy of vanryselcycling.com

I needed a replacement for a Knog Plus light. I clip these lights onto a jersey pocket and sock to make me more noticeable at night. The red one no longer holds a charge. These lights are sold on the KNOG website as a pair for USD34.95 / MYR167 at the current exchange rate.

Photograph courtesy of knog.com

There is a Decathlon store in the city centre. It occupies the entire first floor in Shoppes at Four Seasons Place. Despite the AG2R La Mondiale connection, Decathlon doesn’t immediately come to my mind as a place to buy cycling gear. But having had a good experience with the arm screens I found there, I went to look for reasonably priced clip-on lights.

The Decathlon Malaysia website lists 679 products in its Home > Sports > Cycling section. Among those products are 6 types of bicycles, tools, lubricants, apparel, reflective wear, components, lights, and panniers. The list goes on and on. I suspect most of those items are available in the extensive bicycle section at the Decathlon store in the Shoppes at Four Seasons Place.

The same website shows 24 bicycle lights. Most of those are on display in-store. I wanted a light with flashing patterns and a clip. The Elops LED Front/Rear USB Bike Light CL 900 ticked those boxes. Elops is one of Decathlon’s in-house cycling brands. Others include Btwin, Rockrider, Triban and, of course, Van Rysel.

Photograph courtesy of decathlon.my

The CL 900 has 3 white modes and 2 red modes. I will use the 17-lumen red flash mode. Battery life is a claimed 9 hours in red flash mode. The clip is sturdy and secure. The CL 900 also comes with an elastic fastener to attach the light to a handlebar or other item that needs a looped fastener.

At MYR79 / USD16.65, the CL 900 is a good value. It does what I want, and it does those things well.

I have a new-found respect for Decathlon as a purveyor of bicycles and cycling accessories. Certainly worth considering for clothing and accessories like base layers and jerseys. The prices are certainly competitive.

Photographs courtesy of decathlon.my

The price of this Van Rysel base layer is ¼ of what other cycling apparel brands are asking. The usual cost of this Van Rysel jersey is at least 50% cheaper than other premium brands. The sale price is a steal.

I’ll be checking out Decathlon’s cycling gear offerings from now on.

Have Bicycle Prices Shot Up?

Paradoxes abound in the cycling press these days. On the one hand, the last twelve months have seen the news about bike brands like WiggleCRC, Planet X, Orange Bikes, and Islabikes going to the wall. Brands, distributors and shops have piles of unsold stock and have resorted to deep discounting, sometimes as much as 50%, to move product.

On the other hand, questions like “Why are modern bikes so expensive?” and “Are bikes more expensive than they used to be?” are being discussed on cycling podcasts.

So which view is the right one? Everyone agrees that the bike industry is in turmoil. Manufacturers with new releases in the pipeline are striving to empty warehouses by selling old stock at cost or even below it. By the same token, as soon as manufacturers get new models, they will bring the prices to more stable levels so they can start making some money again.

One way to look at the price of bicycles over the past ten years or so is to see how closely aligned bike prices are with the inflation rate. In the UK, the inflation rate between 2012 and 2024 was 37%.

Over that period the Giant TCR price went up 50%, from £1,999 to £2,999. The Specialized Tarmac went up 62.5%, £2,000 to £3,250. The Trek Madone, however, went up a whopping 160%, from £3,000 to £10,200. If the price of the Madone had tracked the inflation rate, it would cost £4,106 in 2024.

The Giant TCR and the Specialized Tarmac cost more today than their inflation-adjusted price. Not by much, though. The 2024 price of the Trek Madone, on the other hand, is eye-watering.

Data courtesy of cycling weekly.com
Inflation Calculator courtesy of bankofengland.co.uk

My experience of price drift can be seen in what I paid for the two Ti frames I bought from Alchemy and what they charge for a Ti frame in 2024. I paid $2,400 for a Ti frame with carbon seat and chain stays and an EDGE 2.0 road fork in 2011. In 2015, a Ti frame and ENVE fork cost me $3,750. Alchemy sells its Atlas All Road Ti frame and carbon fork today for $5,500.

Like prices in the UK, Alchemy’s prices for these frames have increased faster than the US inflation rate. The US inflation rate between 2012 and 2024 was 35.2%.

Over that period, the Alchemy Ti frame went up 129%. If the price of the Alchemy Ti frame had tracked the inflation rate, it would cost $3,244 in 2024. It is selling at a premium of $2,256. Interestingly, a 56cm version of the Atlas All Road Ti frame is on sale on the Alchemy website for $3,500.

Inflation Calculator courtesy of usinflationcalculator.com

There is no doubt that bicycles are more expensive to manufacture today than they were in 2012. Raw material and labour costs have increased. Freight and insurance costs have increased. A frame with internal cabling is more expensive to manufacture. Disc brakes are more expensive than rim brakes. Bike components like electronic groupsets cost more than mechanical ones.

It is also clear that manufacturers have significantly increased the prices of their high-end bicycles. The Trek Madone referenced above is one example. These bikes are skilfully marketed. “You too can ride the exact bikes that the best riders in the world use at races like the Tour de France.” These superbikes grab the lion’s share of media coverage. Much more so than lower-spec bikes.

It stands to reason that the average cyclist feels that bike prices are getting out of hand. That is certainly true of the type of bicycle most prominent in the cycling press. The bicycles that Tadej Pogačar, Mathieu van der Poel and Jonas Vingegaard race on.

A closer look at the full range of bikes from big manufacturers reveals cost-effective options for cyclists who do not want the lightest frames and the latest components. The chart below shows the cheapest offering within each model family. The cheapest bicycle in the Trek Emonda line, for example. There are, of course, better-specced and thus more expensive bikes within each model range.

Price data courtesy of the respective manufacturer’s website

The Giant Contend and the Trek Domane AL 2 Rim are on sale for less than $1,000. These 8-speed bikes are likely to appeal to beginner cyclists only.

The reasonably specced bikes, by which I mean sold with Shimano 105 group sets, start at $1,800 for the Giant TCR Advanced 2 Pro Compact 2 (discounted online from $2,500). At $5,400, you start moving into composite frames, like the Giant Propel Advanced. This bike comes with a SRAM Rival eTap groupset, which makes it a good value.

Of course, the sky is the limit when it comes to superbikes. The Specialized S-Works Tarmac SL8, and $21,900, is a case in point. You can buy a new car for less than that.

The paradox of deep discounting, including two-for-one offers, existing side-by-side with superbikes costing tens of thousands of dollars, looks to continue. It remains to be seen how long the bike industry will struggle with the post-COVID downturn in demand. It also remains to be seen how long consumers will continue to support ever-increasing prices.

In the meantime, there are bicycles for all budgets.

BOA® Fit System Lifetime Guarantee

The BOA® Fit System was developed in 2001 to improve the fit and performance of snowboard lacing systems. BOA® micro-adjustable dial and cable fastening systems have since found a place on sports and work footwear, cycling helmets and bags, motorsports gloves and pants, and even as lumbar support adjustment on fishing kayaks.

I own several items that have BOA® dials on them. The ones that get the most use are my Shimano S-Phyre shoes. I gave no thought to the durability of the BOA® dials and cables until the cover of one dial came away in my hand as I was loosening the fastening.

With a bit of super glue, the dial was functional again. A few months later, the entire dial, including the cable reel, separated from its base. This looked like a more complicated repair, so I took the shoe to my LBS, The Bike Artisans. I bought the shoes there. The shop mechanic told me that the dials cannot be replaced because they are stitched into the uppers.

I was disappointed to hear that. The shoes are in good condition.

I assume that after four years of regular use, the plastic within the dial had deteriorated to the point of failure. I convinced Melvin to try super glueing the cable reel back onto its base. He was dubious, but he gave it a go.

The super glue worked. The dial spins and ratchets, tightening and loosening the cable. Melvin told me not to pull up on the dial. This means I have lost the quick-release function, but that is a small price to pay to have usable shoes. This is the shoe. The repaired dial is the one on the strap.

Something bothers me about the irreplaceability of the BOA® dials on my shoes. I don’t know how long the repaired dial will last. The other dials will likely fail. I took a look at the BOA® website. BOA offers a lifetime guarantee. There is even a photograph of a broken dial with the base sewn into the upper.

Photograph courtesy of @brenttaylorphoto

The on-line support is extensive. Including a Redeem Repair Kit option.

Screenshot courtesy of boafit.com

According to the website, I need 5 to 10 minutes, a photo of the broken gear and the gear on hand to identify the parts required. It took less than 10 minutes for me to answer the questions, upload a photograph, and for the system to determine the correct parts for my shoe.

BOA® has just confirmed receipt of my order. A free repair kit with one right-side and one left-side dial should reach me in seven days. The downside is the replacement dials are black.

I can order dials that match the ones on my shoes online from a local supplier. The cost is MYR144 (USD31) for a pair of right-side or left-side dials. I can live with a free black dial.

Update

The warranty replacement dial kit has arrived from BOA®. The blue set is for the left shoe, and the red set is for the right. Included is a small torx screwdriver for the screw that holds the cable reel to the dial base.

The glue repair is still holding. I am ready for when it fails.

How Many Road Bikes Do You Own?

I subscribe to a weekly e-newsletter from Road Bike Rider. Each issue closes with a Question of the Week. These were the options for a recent poll:

  • Just my one road bike
  • 2 road bikes
  • 3 road bikes
  • 4 road bikes
  • 5 or more road bikes because you can never have too many

This is the result of that poll:

I am among the 26.81% of 1,854 respondents who own three road bikes. Over 85% own more than one road bike. Perhaps not surprising given that the respondents are readers of a cycling publication.

How did I come to own three bicycles?

I bought my first road bike in 2010. My steel Alchemy

By 2011 I was living in The Netherlands, riding a lot, and wanting a frame that was stiffer than my steel frame. Alchemy built a titanium + carbon bike for me. These two bikes came home with me to Kuala Lumpur in 2012.

In 2013, I made plans to ride the BP MS150 and the TD 5 Boro Bike Tour in Texas and New York, respectively. I needed a bike that was easy to travel with. I bought a Ti Ritchey Break-Away.

I made another trip to the US in 2015 for a cycling vacation. Alchemy Bicycle Company had by then relocated from Austin, Texas, to Golden, Colorado. My cycling vacation was based 40 km away from Golden, in Boulder. Convenient, as I could order another bike from Alchemy, pick it up when I arrived and ride it on my Cognoscenti adventure. That would be much more fun than travelling with my Break-Away.

To make room for my new Alchemy Eros, I sold my two other Alchemy bikes. The steel bike went to a friend in KL, and the Ti bike went to a colleague who took it with him when he returned to Canada.

I bought the steel bike back in 2019. The friend I sold it to only rode it a few times in five years. After a conversation with my Biker Chick, we agreed that I should buy it back for sentimental reasons if nothing else. 

I ride all three bikes. To get a view of use over the bicycles’ lifetimes, I dug into my Strava data, and this is the result: 

The graph shows the three road bikes I own now and the Ti bike I sold in 2015.

The Eros is by far the bike I ride the most. It is the one that is most comfortable for any ride longer than 50 kilometres. 

That historical 1:1 ratio of the number of rides on the Eros versus the total number of rides on the steel and Break-Away bikes holds today. So far in 2024, I have ridden the Eros sixteen times and the steel bike and the Break-Away a combined total of seventeen times. I do enjoy alternating between them all.

There is an old joke among cyclists. Ask the question, “How many bikes do you need?” and the answer is, “Well, if N is the number of bikes you have, N+1 is the number of bikes you need.”

I don’t need three bicycles, let alone four or more. I can do without the Break-Away. The last time I packed that bike into its case for travel was in 2018. Despite its sentimental value, I could part with the steel bike. 

I do like the three bikes that I own, though. I will keep them for as long as I can.

The Evolution of How I Carry Things on My Bike

Soon after I bought my first bicycle in 2009, I had my first flat. This was when I learned that every cyclist must carry tyre levers, a spare tube and a pump or CO2 inflator whenever they ride. I put those items into a saddlebag, along with house and car keys. I don’t remember how I carried cash.

I went through a variety of saddlebags over the years. All were like these examples from Topeak and Lezyne.

By 2010 I was using a Rapha Tool Roll.

I liked this tool roll because I could cinch it tight under my saddle. This stopped items in the roll from rattling.

The white leather strap was held tight by teeth in the buckle. This worked well until the teeth lost their sharpness due to use and rust, and the leather strap began to fray. After one too many instances of the strap loosening and an inner tube and tools dropping onto the road while riding, I swapped the Rapha for a Silca Seat Roll Premio.

The advantage of the Premio was its BOA closure system. This was a more secure attachment method than the buckle and strap of the Rapha Tool Roll. I used the Premio from 2016 until 2018.

The reason for switching from the Premio to a Specialized KEG Storage Vessel is in this post from February 2018.

I still use the KEG to hold a spare tube, tyre levers, keys, etc.

As I said at the top of this post, I don’t remember how I carried cash and a credit card in my early days of cycling. It would not have been long before I bought my first Rapha Rainproof Essentials case.

Over the next decade, that first Essentials Case was augmented by some others in different colours.

In 2018, I bought a Silca Phone Wallet. I had started doing multi-day credit card touring rides. I needed a waterproof rather than just a water-resistant wallet.

The Phone Wallet had an internal dry bag, making it ideal for protecting my mobile phone and cash. The downside was that the phone wallet was bulky. It only saw use on multi-day rides.

I stopped carrying my Essentials Case in a jersey pocket in 2018. That is when I discovered Cargo Bib Shorts with mesh pockets on the legs. No more struggling to take my wallet out of a jersey pocket while pedalling. And no more unloading a jersey pocket before settling into a chair.

The Rapha Rainproof Essentials cases were my go-to cycling wallets until the end of 2022. That is when I got an iPhone 14. The iPhone 14 was just a tad too long for the Essentials Case. So I ordered a Rainproof Essentials Case – Large. And broke out the Silca Phone Wallet, which is big enough to hold an iPhone 14, while waiting for delivery of the large Essentials Case.

Early this year, I did the Audax Pink Ride 7.0. Each participant was given a clear plastic Cycling Wallet to stop their brevet cards from getting wet.

The pouch is big enough to hold my iPhone 14. I left my large Essentials Case at home and did the Pink Ride with my mobile phone, brevet card, cash and credit card in the Cycling Wallet.

I like not just being able to see my mobile phone screen through the wallet. I can also operate the touch screen through the wallet. No need to take the mobile phone out to use it.

The Audax Randonneurs Malaysia Cycling Wallet has become my method of choice for carrying whatever doesn’t go into my Specialized KEG Storage Vessel.

A new way to carry things on my bike might be around the corner. Evolution never stops.

Graphic courtesy of wildpixel

A 14-Year Cycling Summary

Strava and other activity tracking apps send out personalised annual activity summaries. My 2023 Strava cycling summary shows a bit of an uptick since a steady decline starting in 2018.

I took a look back at my cycling history as recorded on Strava. The chart below shows the year-on-year increase or decrease for total distance, total elevation, number of rides and average distance per ride for each year from 2010 to 2023.

The numbers show overall high and low totals in the relevant year.

Data courtesy of Strava, RWGPS and VeloViewer

I started cycling in September 2009. Just after starting a new job in Houston. This post explains why I started cycling:  

The first ride I recorded on Strava was in Houston on 31st January 2010. By then I had graduated from my first bike, a Trek 7.5 FX hybrid, to a custom-built steel road bike from Alchemy Bicycle Company.

This post is about the process of getting that road bike: 

My last ride in Houston was in April 2010. My next ride was in June 2010, on a rental bike while I was waiting for my Alchemy to arrive in my new home in The Netherlands.

This post describes that first Dutch ride: 

The Netherlands now has 33,000km of dedicated cycling paths. I covered 9,787km exploring those paths in 2012. It helped that I had a lot of time to cycle because I wasn’t working while I was in the Netherlands.

This post describes some of the aids to navigating that vast network of bike paths: 

I miss those bike paths to this day.

My last Dutch ride was in September 2012. I had my first ride in Malaysia two weeks later, thanks to having air-freighted my bicycles home to Kuala Lumpur.

That ride was courtesy of a former colleague who introduced me to her cyclist brother. He linked me up with the Racun Cycling Gang:  

I started working full-time again in 2013, so I couldn’t ride whenever I wanted. What my new Malaysian riding buddies and I were doing was cycling on Tuesday and Thursday nights. Nevertheless, I rode less in 2013 than I had in 2012. What did increase that year was the metres climbed. There are more hills around Kuala Lumpur than around Houston and Den Haag!

2014 saw my mileage fall to 3,198km. I did 59 rides, a third of what I did in 2012. I don’t remember why, but we did fewer Tuesday and Thursday night rides. I think marriages and births had something to do with it.

The major reason for the decline in 2014 was my crash in May:  

That kept me off my bike for more than three months.

Regular service resumed in 2015. I rode 10,096km, including five imperial century (160km or more) rides and twenty-one other rides of more than 100km. That started a five-year streak of cycling 10,000km or more per year.

2015 was also the year when I did my first cycling vacation:  

There are seven posts about my Cognoscenti adventure. You can read the following posts by clicking on the link or the arrow above and to the right of the post title.

The upward trend continued in 2016 and 2017. 2016 was when I had my longest ride. 445km in 27 hours:

2017 was the year I rode the furthest, the most often, and climbed the most. The year began with a 301km ride on New Year’s Day. By the end of the year, I had completed sixty metric century (100km or more) rides.

I rode more than 10,000km in 2018 and 2019. Including completing the Rapha Festive 500. A streak of Festive 500s that started in 2016.

2020 marks the start of the COVID-19 Restricted Movement Orders in Malaysia. Despite only doing 24 rides in five months, I rode enough in the other months to rack up 152 rides for the year. That included an Audax 300 ride in August.

Map courtesy of RWGPS

But 2020 was the start of a decline in annual mileage.

As you can see from the graph at the top of this post, my mileage fell in 2021 and 2022. I did 151 rides in 2021, which is a surprise as I had seven weeks off the bike after knee surgery. Despite doing just one less ride than I did the previous year, the average distance per ride fell. I covered 1,763km less than in 2020.

There were 99 rides in 2022. I was in Colombia for six months, where I cycled once.

I did manage to complete another Rapha Festive 500, though.

2023 started with the 115km Audax Pink Ride 6.0.

Photograph courtesy of Audax Randonneurs Malaysia

I had 41 more rides in 2023 than I had in 2022. But again, the average distance per ride was lower. This time by 10km. Despite riding more often, my total distance was just 650km more than my 2022 distance.

Hopefully, 2024 will bring another uptick in the total distance covered. The 120km Audax Pink Ride 7.0 is on the cards!

Image courtesy of Audax Randonneurs Malaysia

That will be my first metric century ride since the Pink Ride 6.0.

Product Review: Knog Scout Bike Alarm & Finder

My riding buddies are always worried that their bikes will be stolen while we are inside a coffee shop or restaurant mid-ride. Which means trying to have our bikes within sight while we are eating and drinking. That is not always possible.

When Knog sent me an announcement about their Scout Bike Alarm & Finder, I was intrigued.

Photograph courtesy of road.cc

That announcement had a link to a DC Rainmaker review of the Scout. As with all of Ray’s reviews, this one is worth reading. When I saw that he wrote “As soon as the Knog site opens for ordering, I’m ordering a slate of these”, I was sold.

This is what is inside the cardboard packaging.

Photograph courtesy of Knog

From the left:

  1. A silicone cover
  2. The Scout unit
  3. Anti-tamper screws
  4. Spacers for use when mounting the unit under a bottle cage
  5. A tool for tightening and loosening the anti-tamper screws

The Scout combines an 85dB alarm and a bike finder function. The finder function uses Apple’s Find My app. The Scout has a water resistant IP66 rating, which means it is rain and wash-proof.

I mounted the Scout under a bottle cage.

The Scout is 10.5mm thick, so it is fits unobtrusively under my bottle cage. The neon yellow silicone cover, which is designed to advertise the presence of this security device (if desired), can only be used if the Scout is mounted without a bottle cage over it.

Control of the Scout is via the Knog Mobile app. Unfortunately for non-iPhone users, there is no Android version of the Knog Mobile app.

Icon courtesy of Knog

Once the Knog Mobile app is installed and the Scout is paired to the app (pairing is done via the app and not via the iOS Bluetooth settings), the Scout can be customised, armed and disarmed from your mobile phone.

Image courtesy of Knog

Customisation options include:

  1. Renaming the device, which is useful if you have more than one Scout paired to the Knog Mobile app.
  2. Setting the movement sensitivity of the Scout
  3. Adjusting the alarm volume
  4. Choosing from eight alarm tones

Pressing the red arrow at the bottom of the Knog Mobile app screen opens the Apple Find My app.

Icon courtesy of Apple

Once you add a Scout to the Find My app, the app will display the Scout’s location on a map. You can connect multiple Scouts to the Find My app.

Claimed battery life for the Scout is six months. Charging is via USB-C. I haven’t decided if I will remove the Scout from my bike to charge it, or leave the Scout on the bike and recharge via a power bank. I have six months to think about it 😄.

My initial impressions of the Knog Scout are good.

Setting up the Scout via the Knog Mobile app, and mounting the Scout underneath a bottle cage were both straightforward tasks.

The alarm is certainly loud enough to deter a thief.

The Find My function works exactly the same way as it does for Apple AirTags. I should be able to find by bicycle if it is taken.

Of course, I hope no one will try to steal my bicycle. With the Scout on my bike, I will hear if someone tries to take it.

I can relax during our mid-ride stops. No need for me to be able to see my bicycle at all times now.

Things you don’t notice. Until you do!

Emoticon courtesy of vectorstock.com

To many cyclists, “bicycle parts” means components like bars, saddles, cassettes, chainrings and wheels. Small parts do not tend to come to mind. Until something goes wrong with one.

Cable end caps are a good example. These ferrules are usually aluminium and crimped into place over the ends of shifter and brake cables. Their purpose is to keep the individual wires that make up a cable from fraying. Frayed cables can impair shifting and braking performance. The sharp wires can also give a cyclist a nasty scratch.

Cable end caps can add a little extra flair to your ride. Cable ends caps come in a multitude of colours to match any paint scheme.

Cable end caps rarely fall off. One may get knocked off in a crash. Not having cable end caps installed is more likely the fault of an inattentive mechanic who forgot to crimp them on after replacing cables.

Photograph courtesy of wolftoothcomponents.com

Bar-end plugs fit into the open ends of handlebars. These plugs are installed to prevent serious injury in the case of a fall. Open-ended handlebars can puncture the abdomen in a crash, with deadly results.

Bar-end plugs fix the ends of bar tape to the bar. Bar-end plugs are usually replaced every time new bar tape is installed. Cheaper bar tape usually comes with friction fit plugs. These are held in place by a series of ribs.

Friction fit plugs can be dislodged when bars rub against something. For example, when bikes are moved into and out of car boots.

More expensive bar tapes come with expanding plugs. These are locked into place by tightening the screw on the face of the plugs. This makes them more secure.

Custom bar-end plugs are available in many colours and with any graphic imaginable to personalise your ride.

Photograph courtesy of mtbdirct.com.au

You could ride with frayed cables and no bar-end plugs. You wouldn’t want to cycle far without at last one bottle of water or other drink on your bike. Bottle cages are held onto the bike by M5 bolts. These are 5 mm in diameter.

These bolts do loosen over time, so they are worth checking occasionally. You will probably notice a loose bottle cage mid-ride. Hopefully, before one or more bolts have fallen out.

Loose or missing bottle cage bolts won’t hurt you. The rattling may bother you, though. As might carrying a bidon in your jersey pocket if a bottle cage falls off.

Bottle cages do not come with bolts. The M5 bolts are usually pre-installed when you buy a frame.

Bottle cage bolts can be another source of bling. They come in many colours and bolt head shapes. There are even Ti versions for the weight-obsessed.

Photograph courtesy of sram.com

Finding replacement cable end caps, bar-end plugs, and bottle cage bolts is easy. Much more difficult to replace are the quick-release levers on SRAM Red Aero Link brakes. These levers open the brake calipers, so the wheel can be removed. I gave no thought to these levers until I snapped one in a crash.

I needed a replacement because that brake caliper was almost impossible to open without the lever.

A brake quick-release lever comes in a set identified as SRAM part number 11.5118.000.000. The set has all the parts needed to replace the barrel adjustment assembly. And impossible to find in Malaysia. To my eternal gratitude, my good friend HCP was able to get a set from Taiwan.

The following two items on my list are not bicycle parts per se. They are parts of accessories essential to me, though.

This is the Garmin Varia 500 front light. It put out up to 600 lumens and was controllable by my Garmin Edge bike computer. I was happy with this light until a design flaw came to light (I couldn’t resist!)

The on/off switch was covered with a rubbery material that deteriorated over time. Once that cracked off, it became difficult to turn the light on and off. My light was, Sod’s Law, out of warranty and discontinued. Not that it mattered. The local Garmin distributor did not stock the replacement black case section.

I now use a Garmin UT800. This light puts out up to 800 lumens, is controlled from my Garmin Edge, and has a redesigned on/off switch, which looks much more robust.

More bad press for Garmin. I have not experienced this failure – yet – but it has happened to a friend. One or both of the tabs on the back of the Edge 100 and Edge 1030 cycling computers can snap off. These tabs engage with the notches on the bike mount and lock the device into place. If a tab snaps during a ride, an expensive cycling computer can fall and be damaged or lost.

Fortunately this is a part the can be replaced by the local distributor.

Photograph courtesy of roadbikeaction.com

Back to SRAM for my last entry. I like their electronic Red eTap shifting system a lot. Including the convenience of easily swappable batteries.

Those batteries have a tab that fits into a slot on each derailleur body. A latch at the top then snaps into place to lock the battery onto the derailleur body.

Until the tab on the battery snaps, as has happened to me. I suspect this happens because of a combination of the plastic becoming brittle and not lifting the tab clear of the slot before tilting the battery away from the derailleur.

These are not ride-ending issues like a snapped derailleur hanger or a cracked rim is. Nevertheless, they are annoying when they happen.

You may have heard the phrase, “Don’t sweat the small stuff.” In this case, the small stuff may make you sweat.

Emoticon courtesy of vectorstock.com