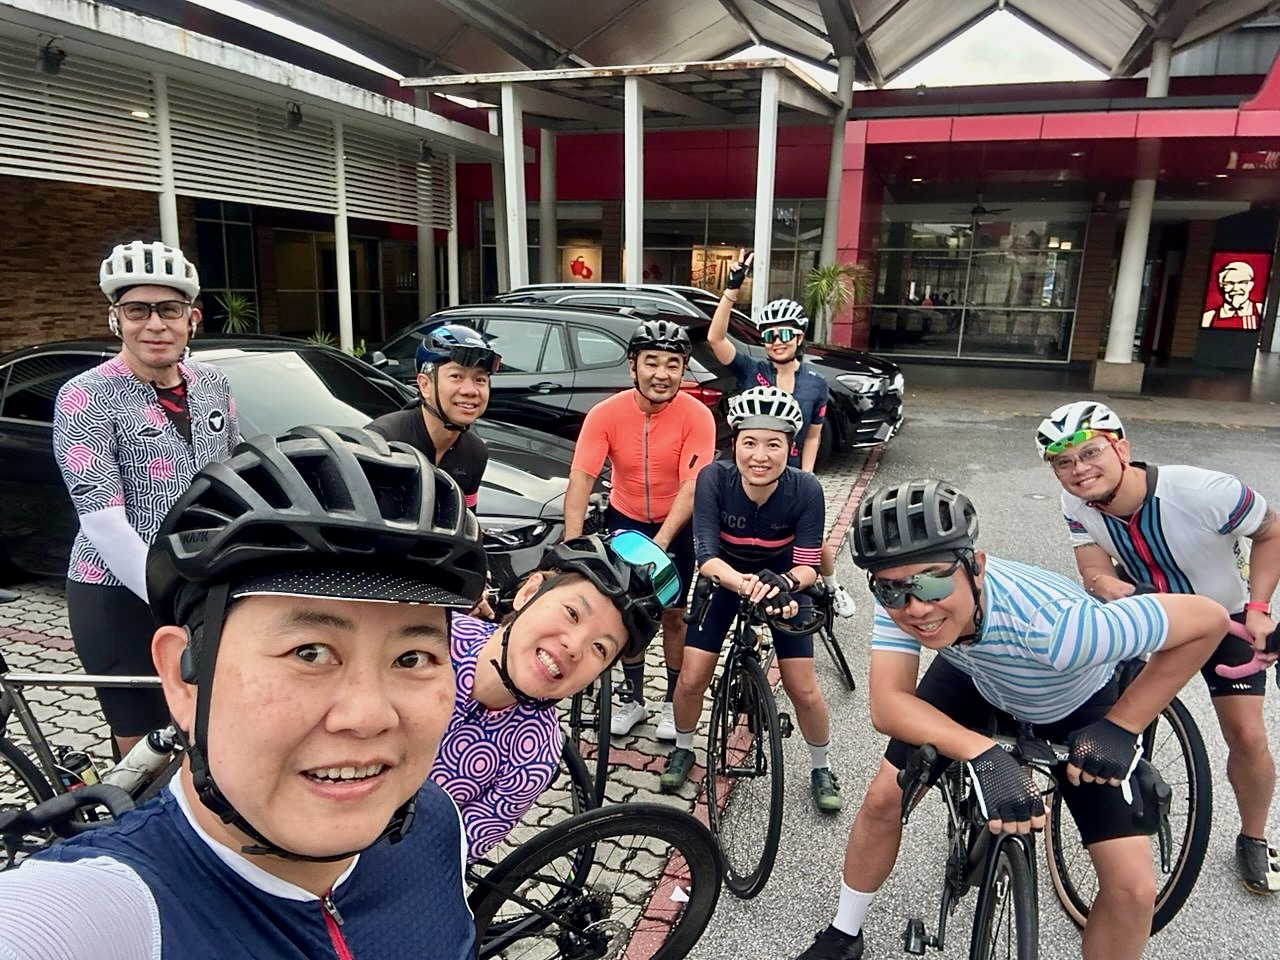
This group hadn’t cycled together in a long time. I was excited to join them on a ride to Kundang.
Photograph courtesy of KBS
A few kilometres into the ride my left foot started wobbling. It felt like either the Speedplay cleat was loose on my shoe or a float adjustment screw had unwound.
At 6 km my left crank arm, attached to my shoe by the pedal, came off the axle. I spent a minute trying to reattach the crank arm, to no avail. Not having the tool I needed, a 10mm hex key, didn’t help.
Later I realised that having the right-sized hex key would not have helped. The self-extracting bolt on my SRAM crankset had snapped.
Photograph courtesy of singletrackworld.com
I had a single-leg workout to get back to the car park. Left crank arm in hand. With the additional need to apply an inward force to stop the chainring from moving outward and disengaging from the chain.
Photograph courtesy of ML
Fortunately, the 6 km back to the start was mostly downhill. ML was with me and provided a very helpful push on the inclines. I did have to walk up the hill at the 9 km point.
Map courtesy of Ride With GPS
It was lucky we were only 6 km from the start when the crank arm came off.
Over to my LBS to get a replacement self-extracting crank bolt.
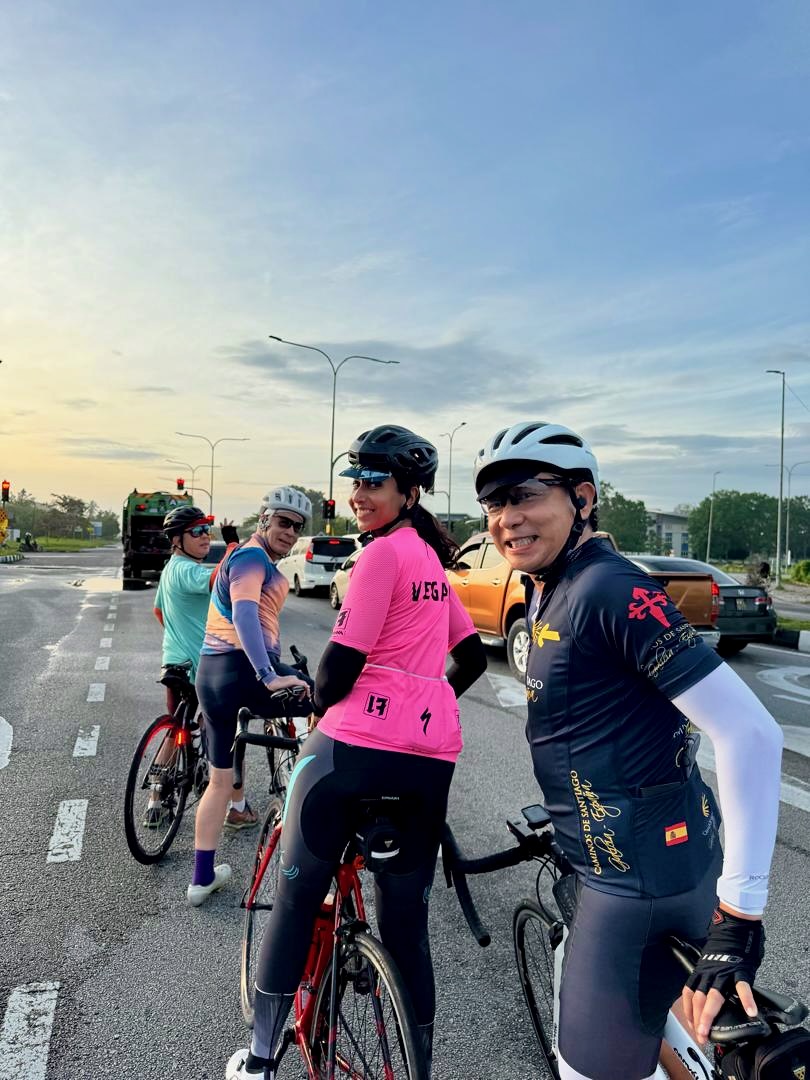
Everyone who wanted breakfast was at Kedai Kopi Jalan Pasar, across the road from the hotel, at 6:45 am.
Photograph courtesy of Google Maps
Not only is the location convenient, but the wan tan noodles are good too.
Photograph courtesy of ML
We loaded our bags into the Ativa, took a “Ready to Roll” photograph, and headed out to ride in reverse the roads we came in on yesterday.
Photograph courtesy of THL
The sky was relatively clear as we rode out of Teluk Intan. I don’t think I was the only one hoping more clouds would roll in.
Photograph courtesy of VV
There was more cloud cover an hour later but it was still sunny enough for us to need a stop in the shade at the fruit stalls and Kuala Bikam.
Photograph courtesy of VV
The humidity was 95%. I was sweating profusely. I was not the only one. Everyone was happy to stop at the first roadside restaurant we saw after riding through Sungkai. Kedai Makan Sri Bakti was out of roti canai. An unexpected breakfast crowd heading to an event at a nearby school ate them all. Nasi lemak and fried eggs were still available.
Photograph courtesy of GK
We were at the Slim River Petronas station at 10:50 am. We spent twenty minutes sitting at the small table in air-conditioned comfort, sipping our drinks. We were 23 km from the Tanjung Malim KTM station. We had plenty of time before the 12:40 pm train.
We were lucky with the weather on both days. The sky was overcast most of the time. When the sun broke through the clouds, the temperature never exceeded 32º C. The humidity and the increasingly rolling terrain still pushed my heart rate from 88 bpm when we left Slim River to 148 bpm six kilometres later. The others were feeling it too. We were happy for another break in a Tea Live at Behrang Residen.
Photograph courtesy of GK
I needed that large Signature Brown Sugar Pearl Milk Tea.
Photograph courtesy of tealive.com.my
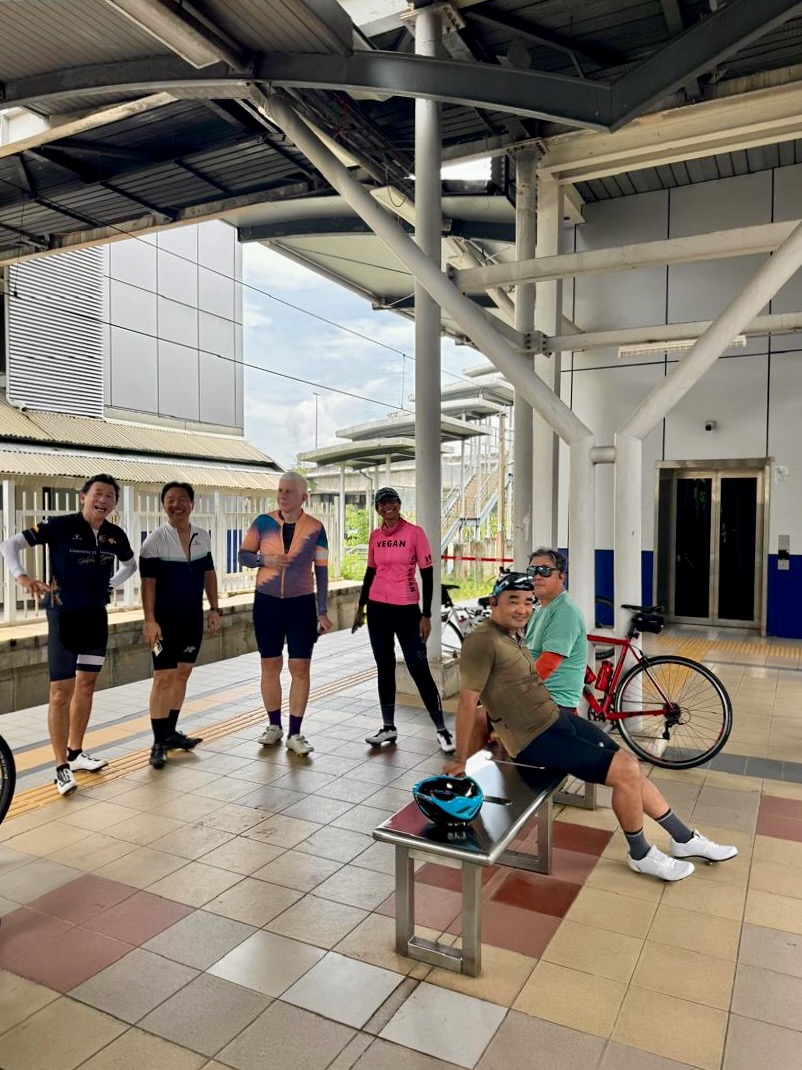
We arrived at the KTM station at 12:32 pm. The 12:40 pm train was delayed so we had time to cool down and relax.
Photograph courtesy of VV
When the train did pull into the station I realised that we were at the wrong end of the platform to board car 6, the rearmost carriage on the train. A security officer and the train’s conductor told me off for riding my bike to the other end of the platform. The upside was that the conductor assured us that trains would wait for us to board before the carriage doors were closed. That is good to know.
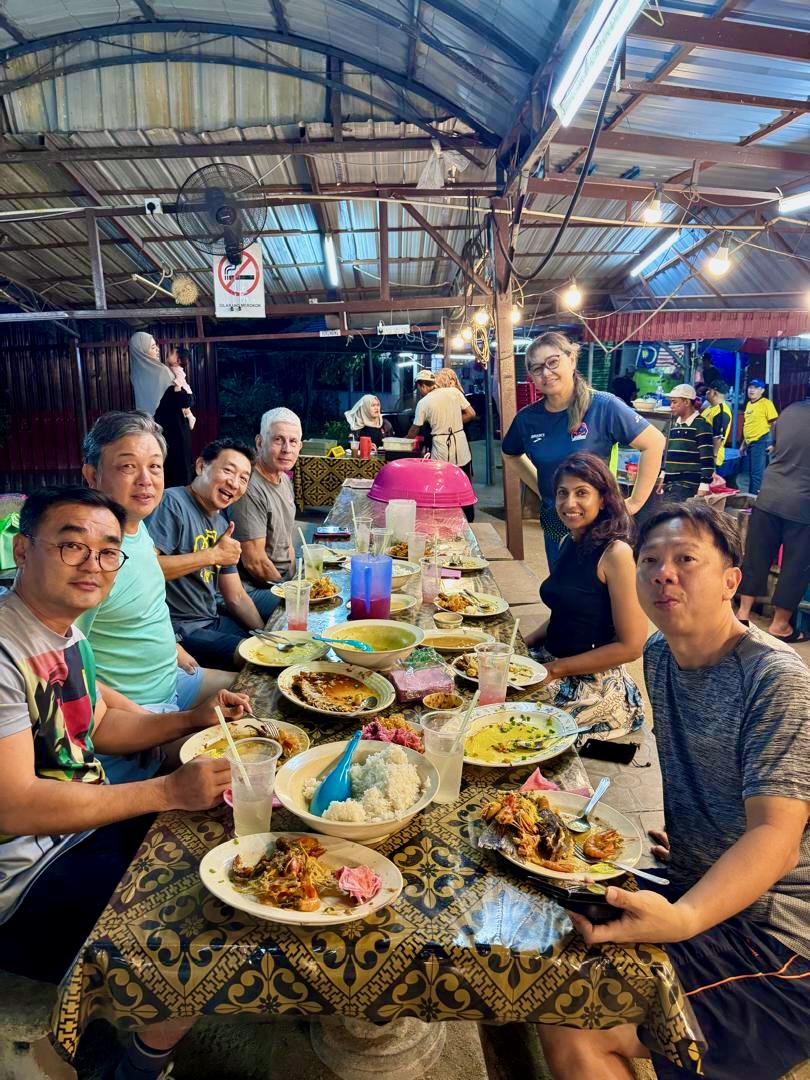
The last five rides have been with the R@SKLs, most recently in January 2022. It was time for another udang galah dinner (giant river prawn) ride.
We chose the weekend of 5th and 6th September. I later learned that this was KL Standard Chartered Marathon weekend. The 10 km route circled where I live. My greatest challenge was crossing Jalan Sultan Ismail through a sea of runners.
Photograph courtesy of Kuala Lumpur Standard Chartered Marathon
The decision to have a water station at the Medan Tuanku monorail station made it impossible for me to cross the road there. I rode along the pavement and on the parallel Jalan Medan Tuanku 1 until there was nothing else to do but jog along with the runners, edging myself and my bike through the crowd and across Jalan Sultan Ismail.
Map courtesy of Ride With GPS
This message greeted me at the entrance to Putra KTM station. Point taken.
Photograph courtesy of GK
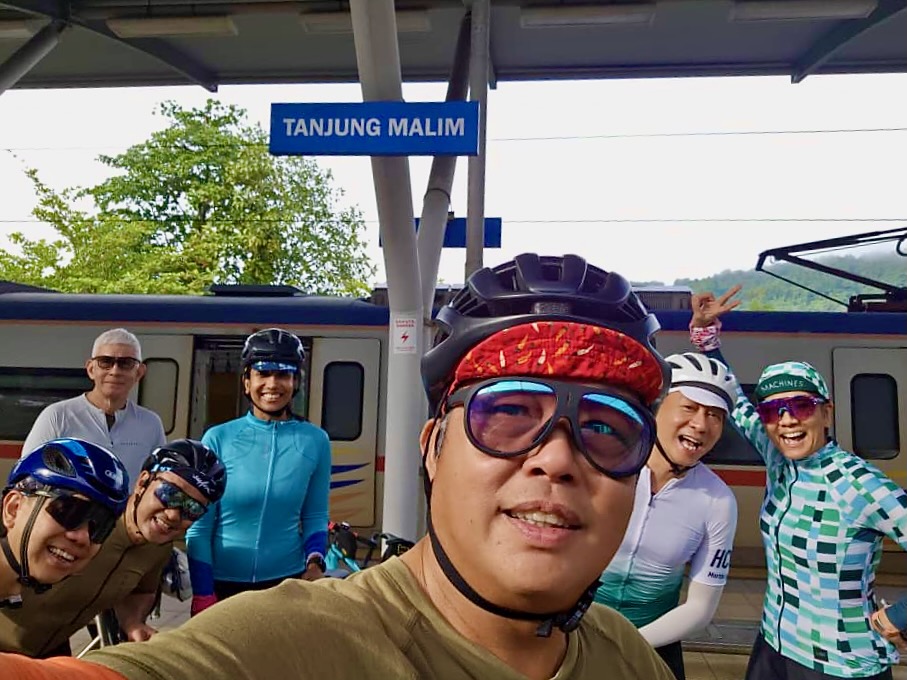
All present.
Photograph courtesy of THL
Train number 2023 arrived on time and we were on our way. The two cyclists behind us boarded at Rawang. They would get off at Kuala Kubu Bharu station to ride up Fraser’s Hill.
Photograph courtesy of WWK
We were at Tanjung Malim station 73 minutes after leaving Putra station.
Photograph courtesy of THL
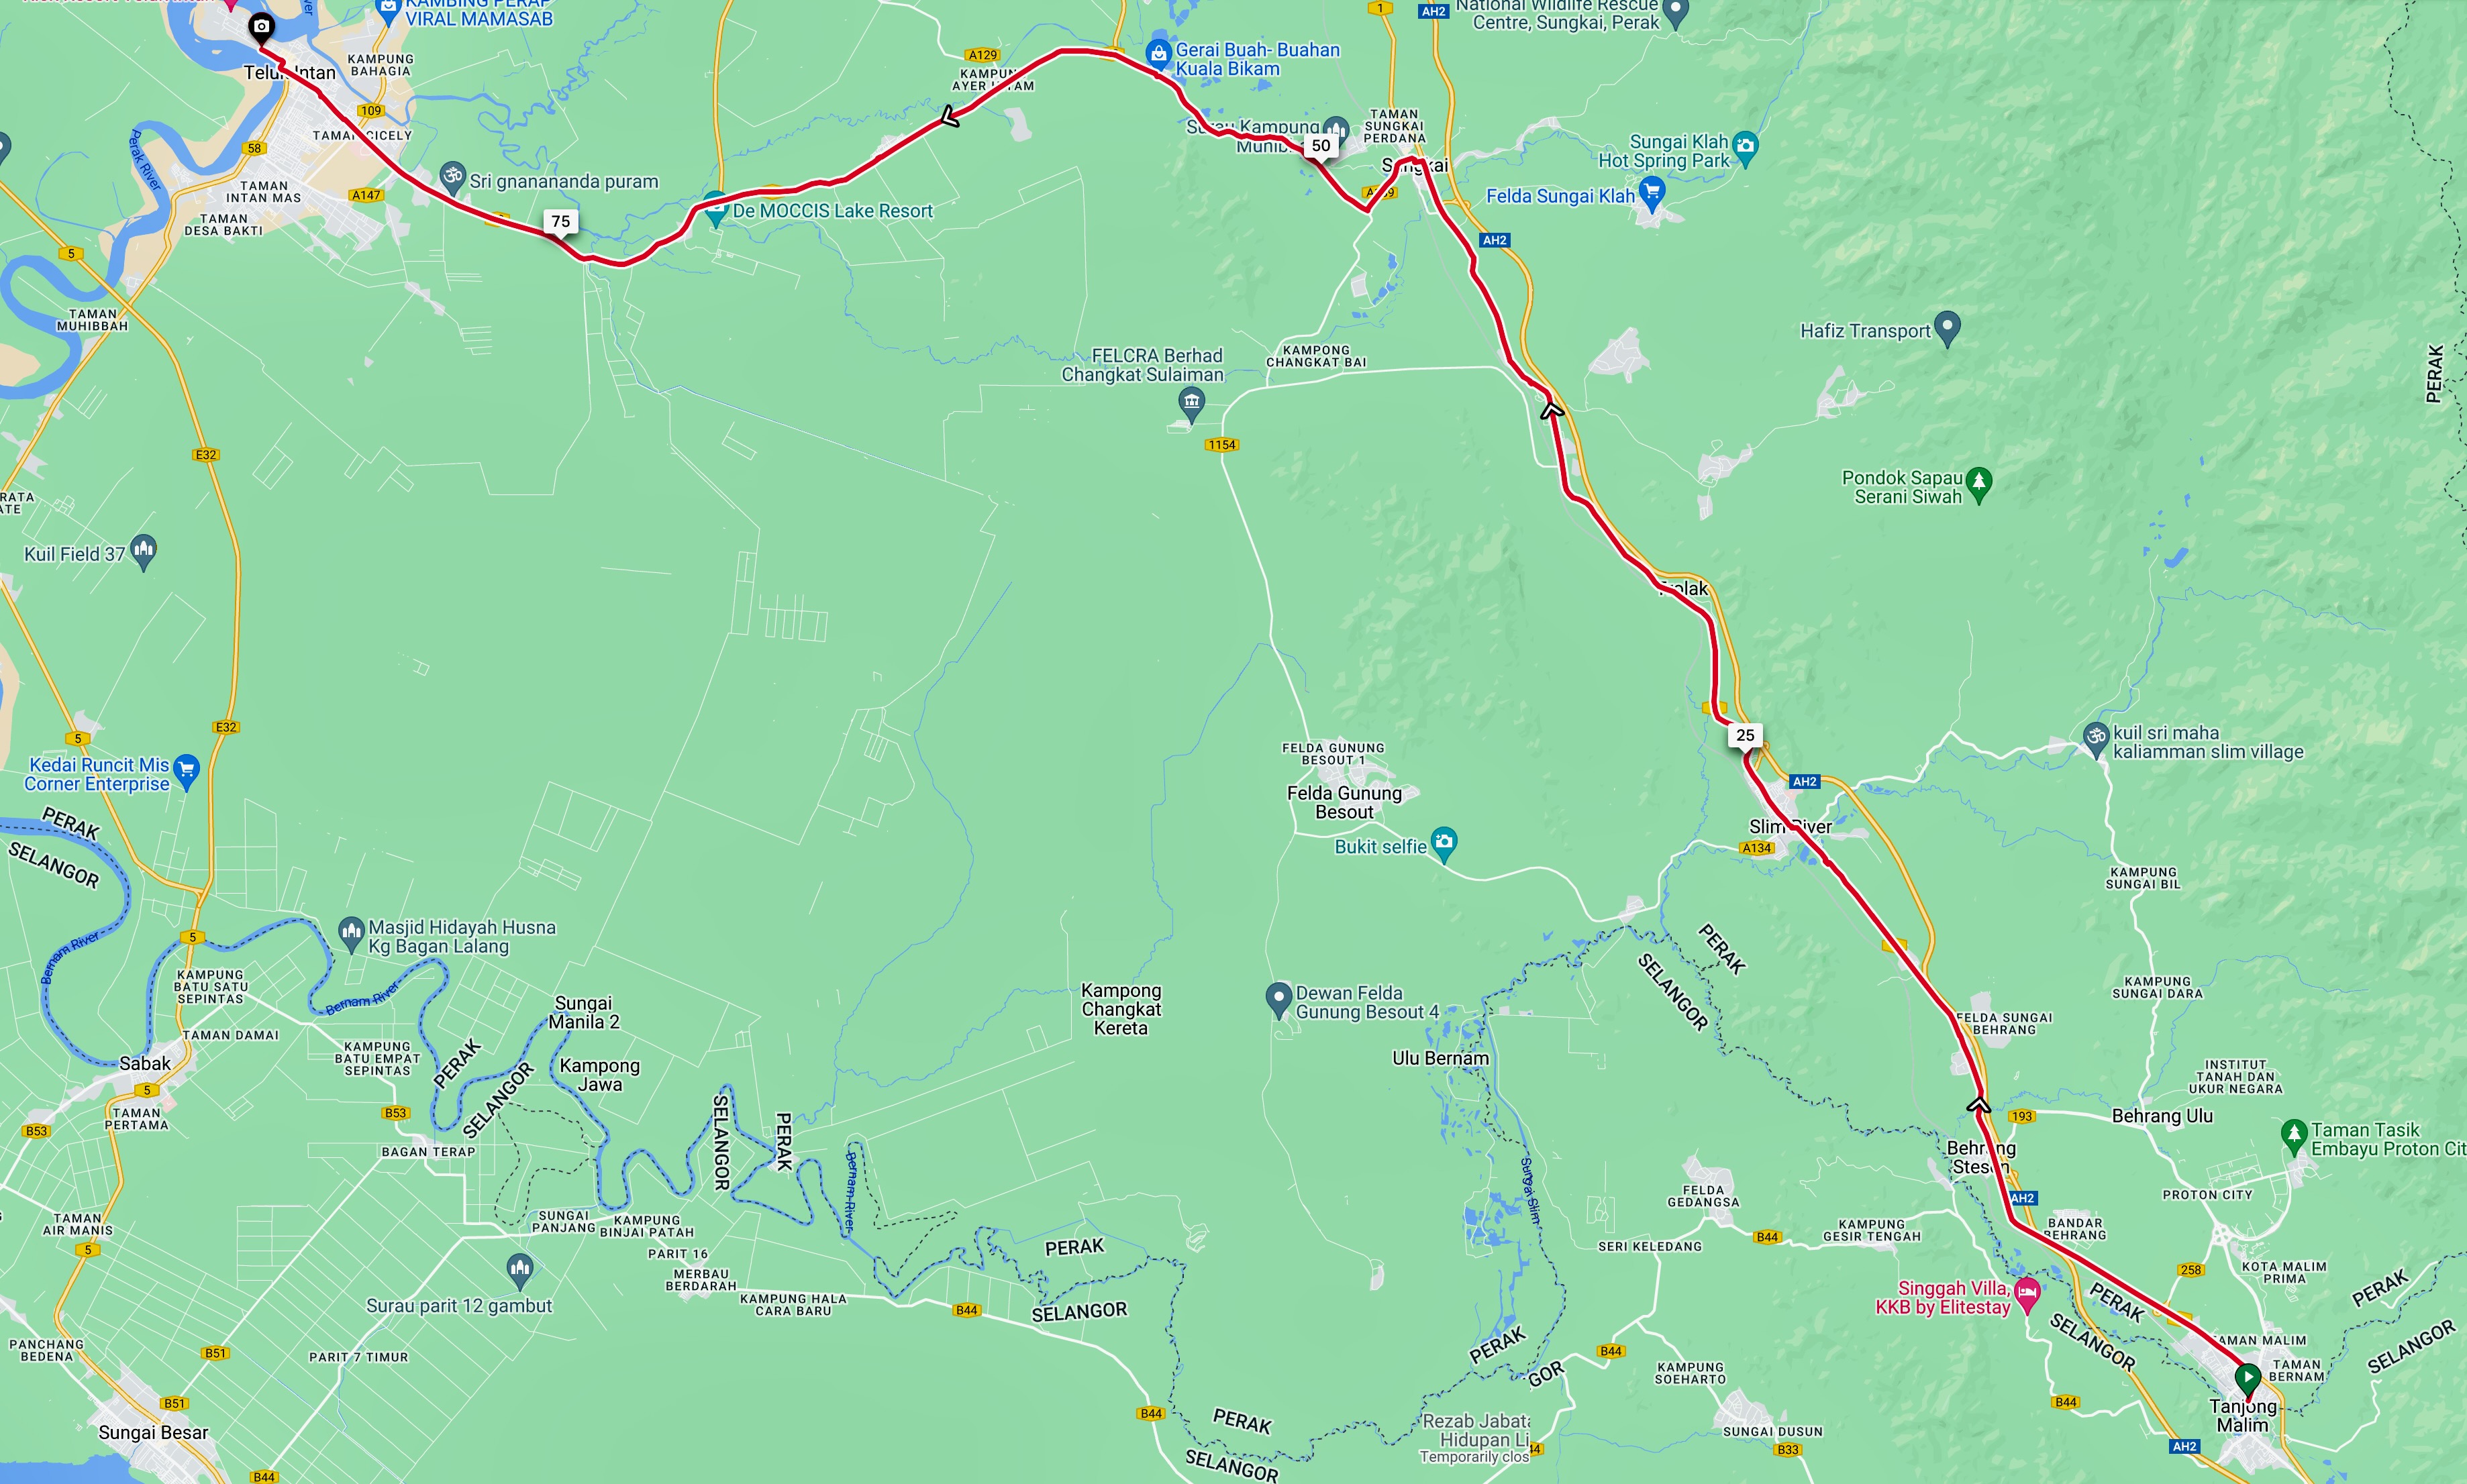
We were on our way after some food and drink at Restoran Hijas. About 85 km lay between us and Teluk Intan.
Map courtesy of Ride With GPS
After 12 km we rode up to a group of RELA (Malaysia Volunteers Corps) personnel directing traffic. We were not sure about what was going on at first. Then we saw the finisher’s gantry ahead. Complete with cameramen, videographers, and people waving flags and cheering. All expecting that we were the lead group of bike racers. I am sure they were all disappointed. TH and I made the best of it by crossing the line with arms aloft!
G looked online and found out what the event was.
Image courtesy of Politeknik Sultan Azlan Shah
At most one kilometre later TH had a puncture. The only flat tire over the two days.
Photograph courtesy of VV
Three of us helped with the inner tube replacement while the rest of us admired this traditional kampung house.
Photograph courtesy of VV
It was cloudy and cool, but very humid. We needed regular stops to take on fluid. Which meant frequent restroom stops as well. The Petron station in Slim River is distinguished by the painted wall on the building behind the station. We can count on V to notice these things.
Photograph courtesy of VV
We also stopped at the larger Petron station in Trolak to buy more drinks.
Photograph courtesy of VV
56 km into the ride is Kuala Bikam. Noted for a group of stalls selling fruit from the orchards surrounding the village. Pomelos, papayas, mangoes, bananas, watermelons, pineapples, jambu air (rose apples), guavas, mangosteens, durians, dragonfruit, soursop. The list goes on.
Photograph courtesy of ML
The sun broke through the clouds and the temperature jumped by 2º C. Ice creams at the 99 Speedmart in Taman Okid provided a welcome relief. The cloud cover rolled in again too.
Photograph courtesy of VV
We made one more restroom stop before we got to the Yew Boutique Hotel. Seconds before it started raining.
Photograph courtesy of VV
We hung out in the hotel lounge drinking our complimentary drinks while waiting for my Biker Chick to arrive with our bags. We had our bags ten minutes later. Everyone stayed while J walked in the rain to buy that famous Teluk Intan chee cheong fun. He came back with the last two pieces available. We supplemented that with orders from the hotel café. They have expanded their menu since the last time I stayed there. Just a snack though.
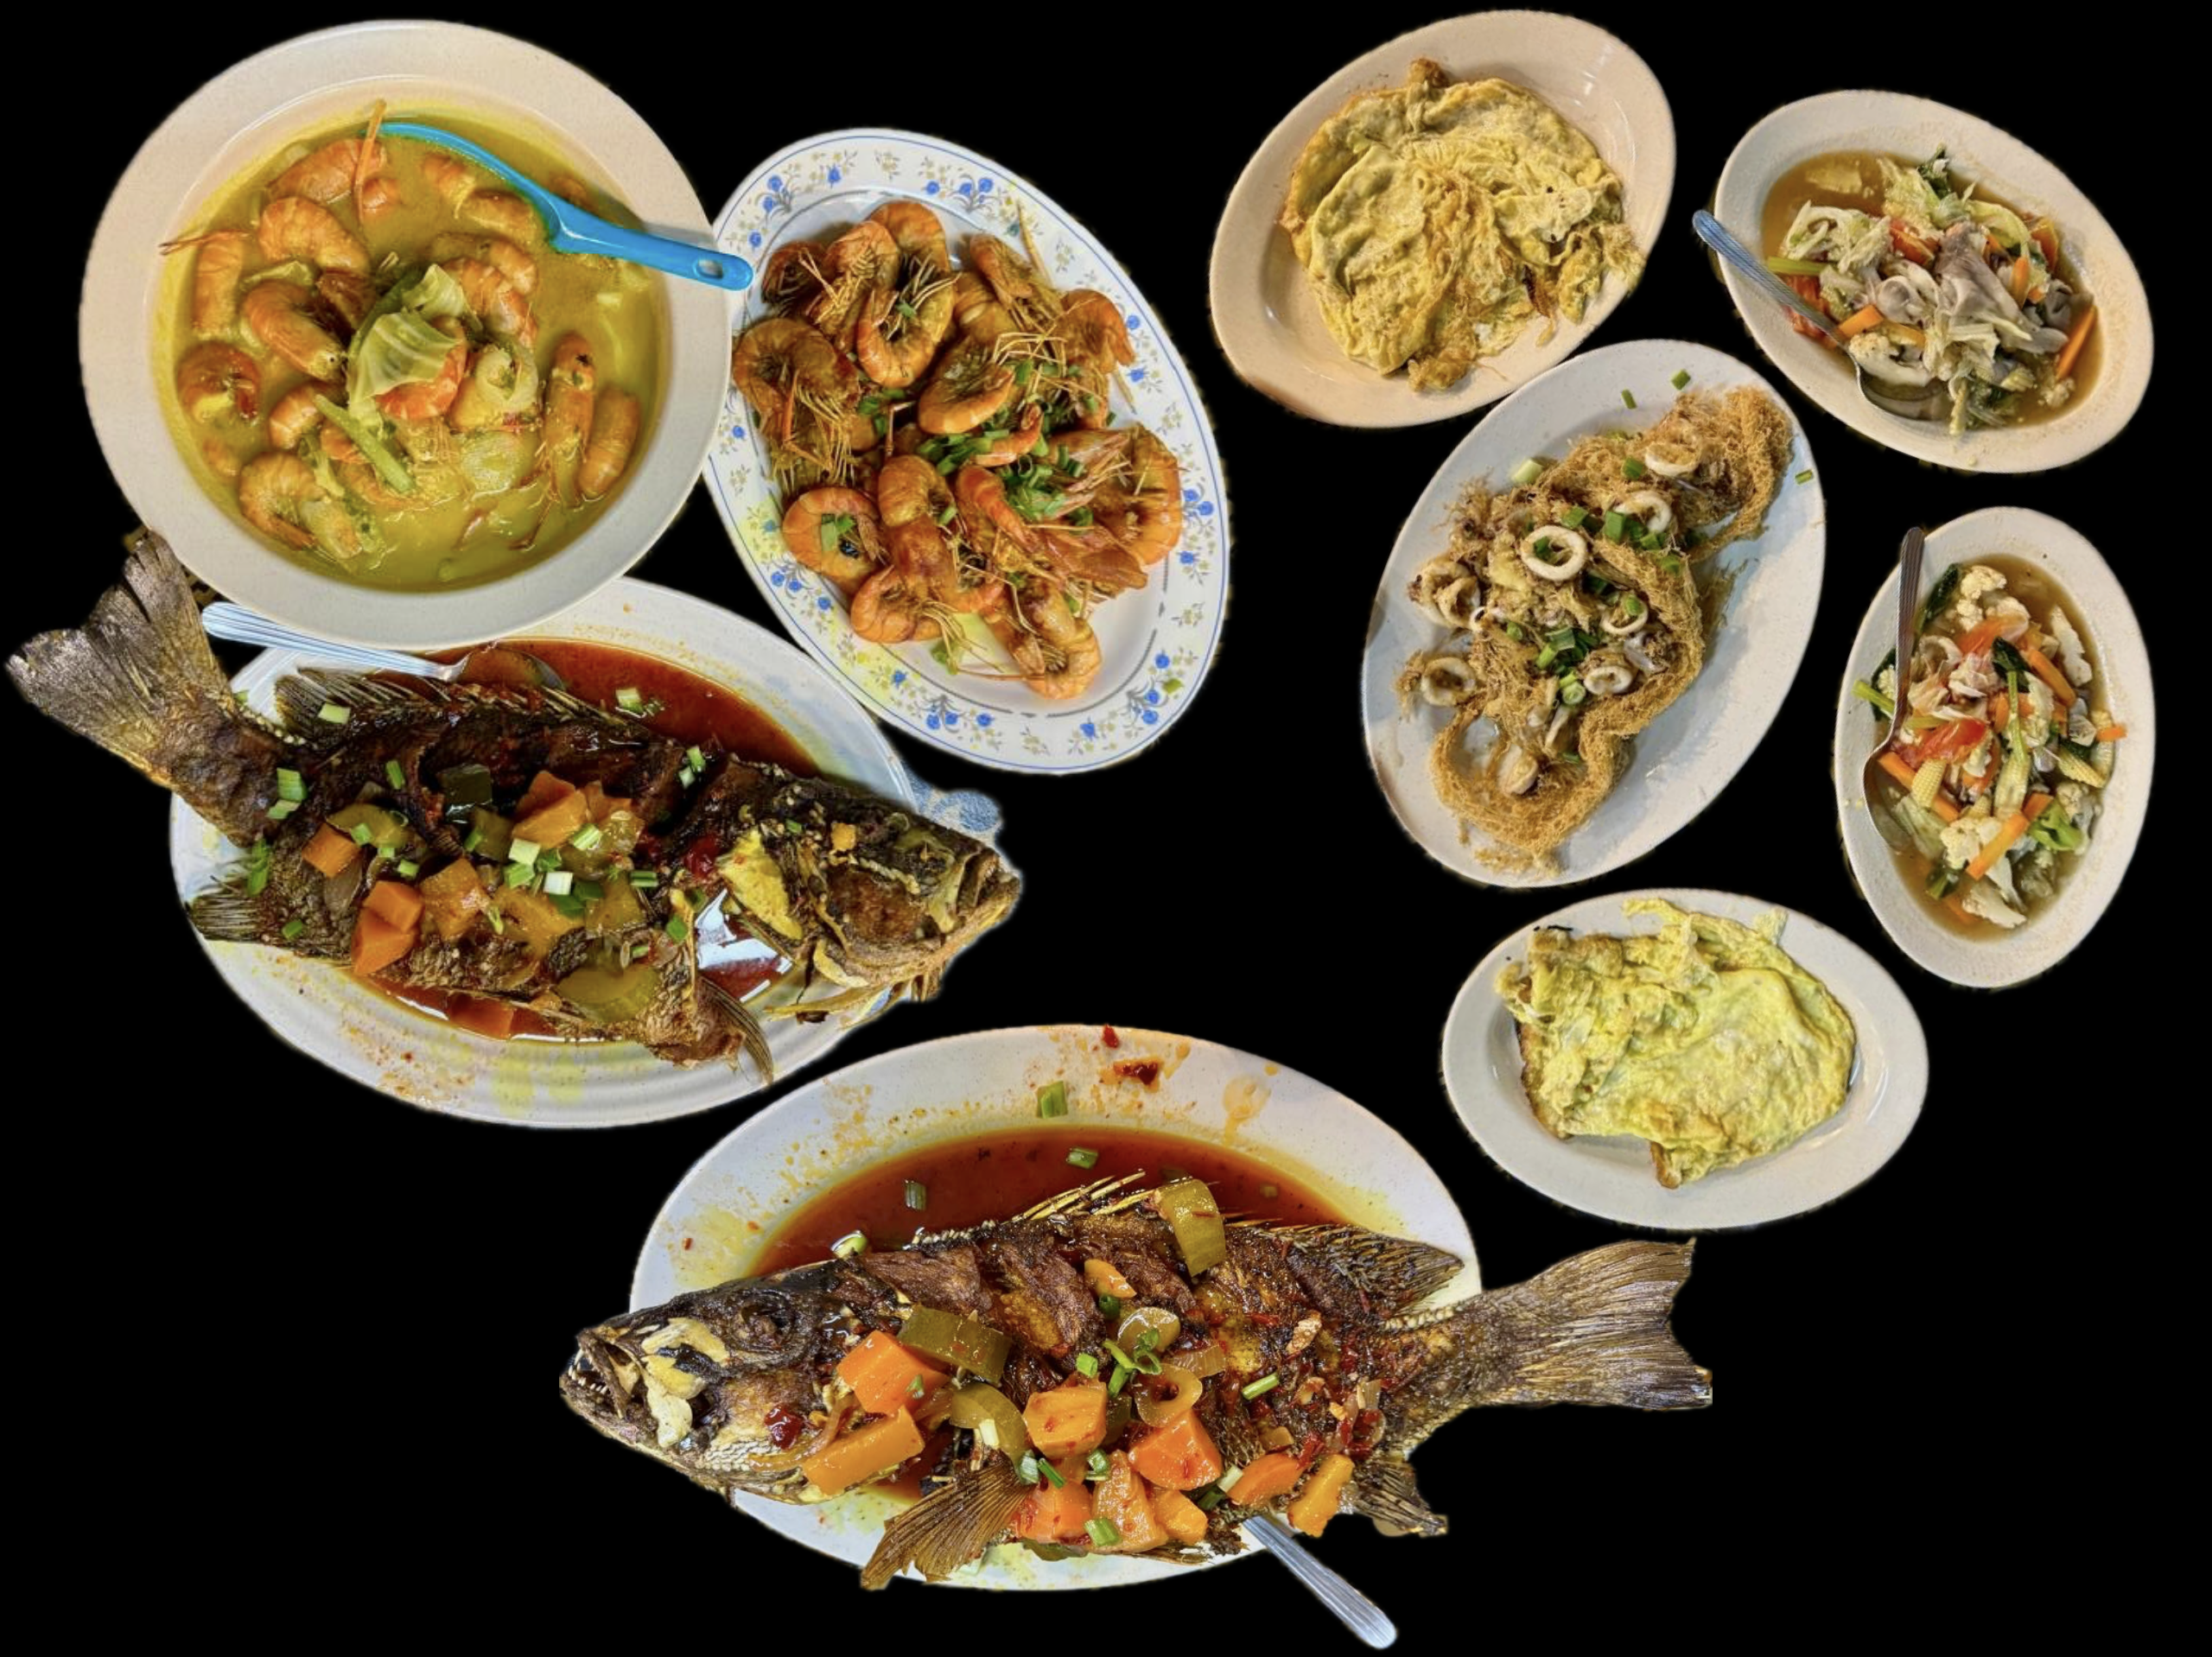
Then it was showers, naps and massages before meeting at 6:30 pm for dinner. It was still raining, so six of us squeezed into the Ativa for the short drive to Restoran d’Tepian Sungai. The two others met us at the restaurant.
Our food had been pre-ordered. Two udang galah dishes, sweet and sour fish, fried squid, omelette and mixed fried vegetables.
We made short work of the dishes before us. When the dust settled, there was nothing but rice left.
Photograph courtesy of VV
The rain was still falling after we finished eating. We grabbed umbrellas from the car, took this photograph on the bank of the Perak River, and walked through the night market to Teluk Intan’s landmark building.
Photograph courtesy of VV
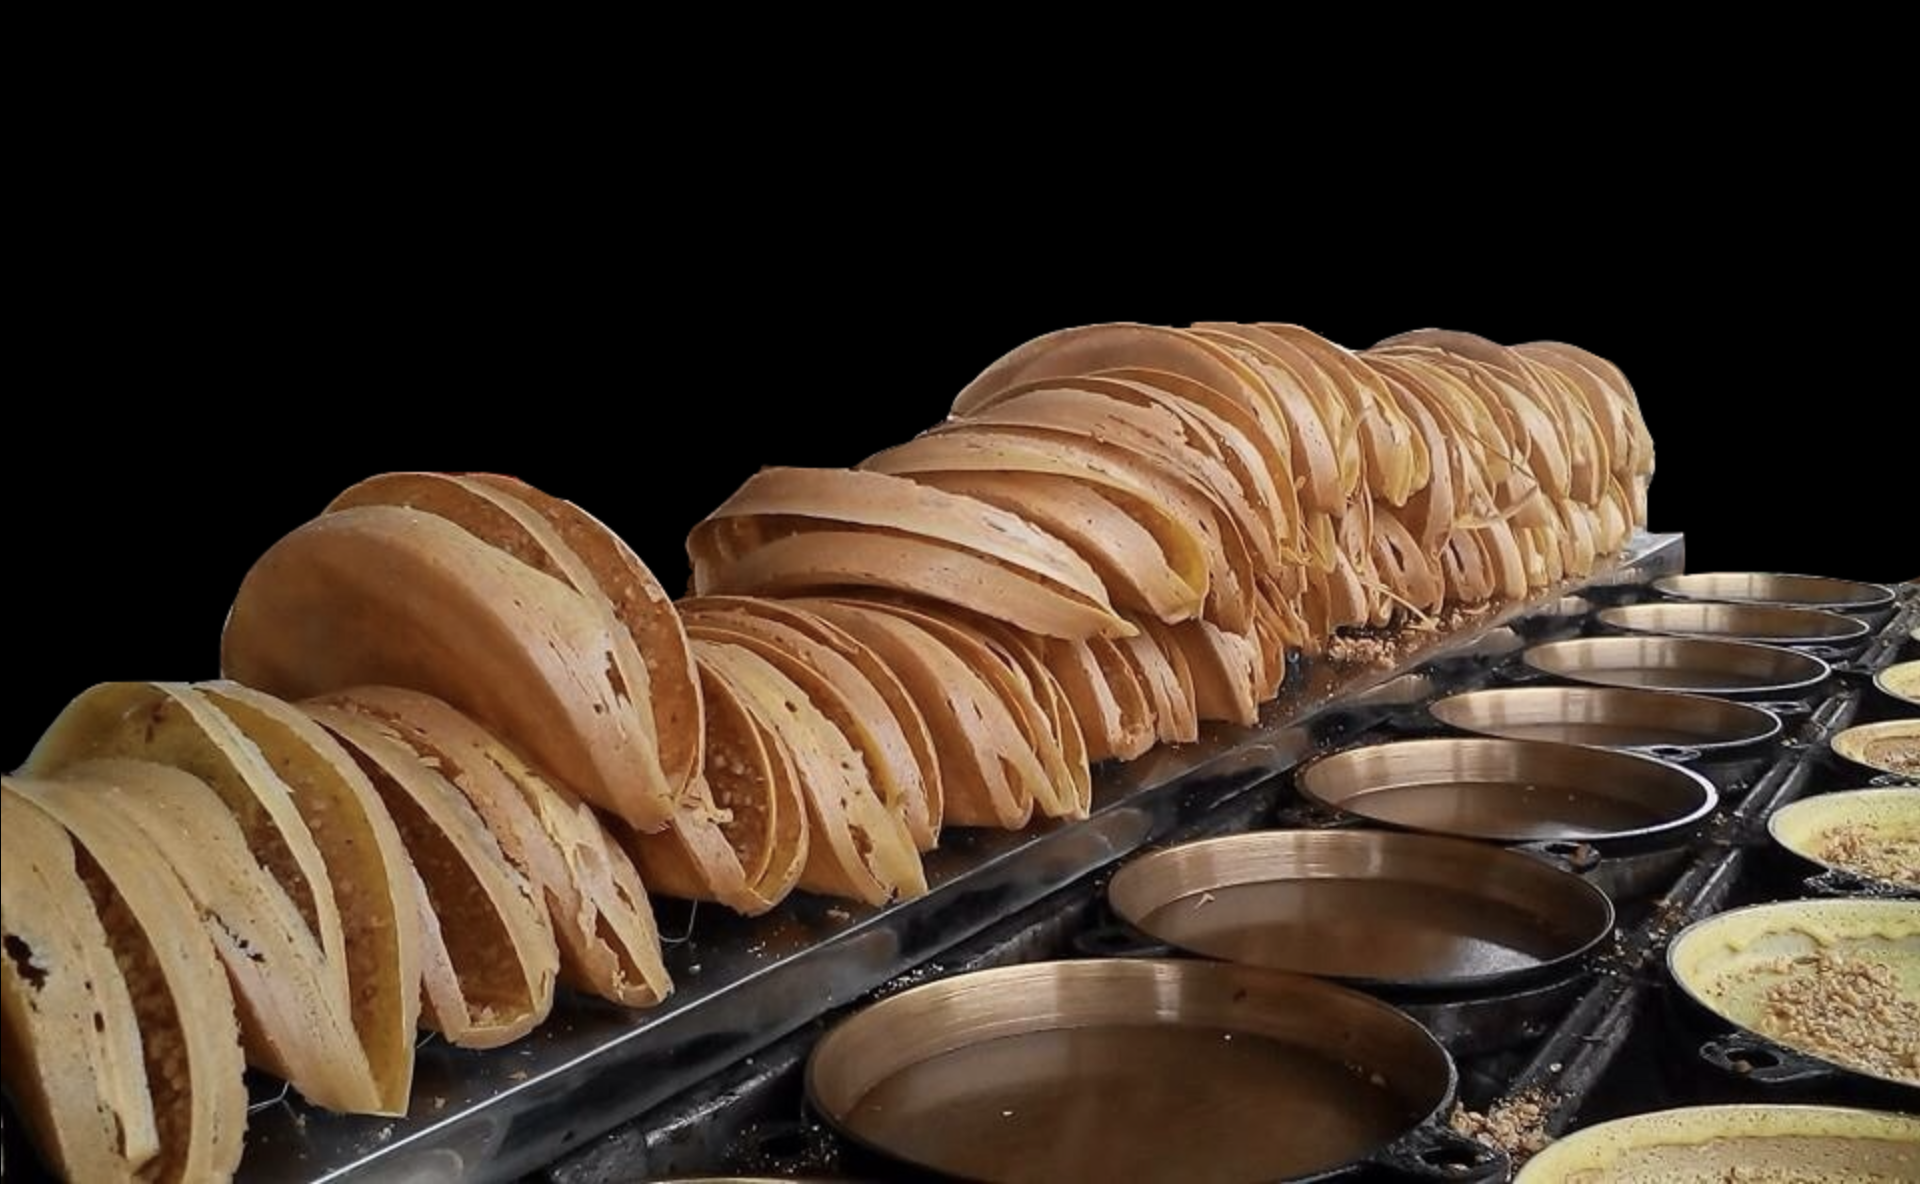
The night market was filled with food vendors. V bought us all crispy apam balik (peanut-filled pancakes).
Photograph courtesy of Apam Balik Crispy Sepang
The Menara Chondong (Leaning Tower) was built in 1885 to store water and to display the time. The soft ground on which it was built as well as the weight of the water in the water tank caused it to lean towards the southwest.
Photograph courtesy of ML
We strolled back to the hotel, chatted for a while in the lounge, and then hit our beds. We planned a 6:45 am meet up for breakfast.
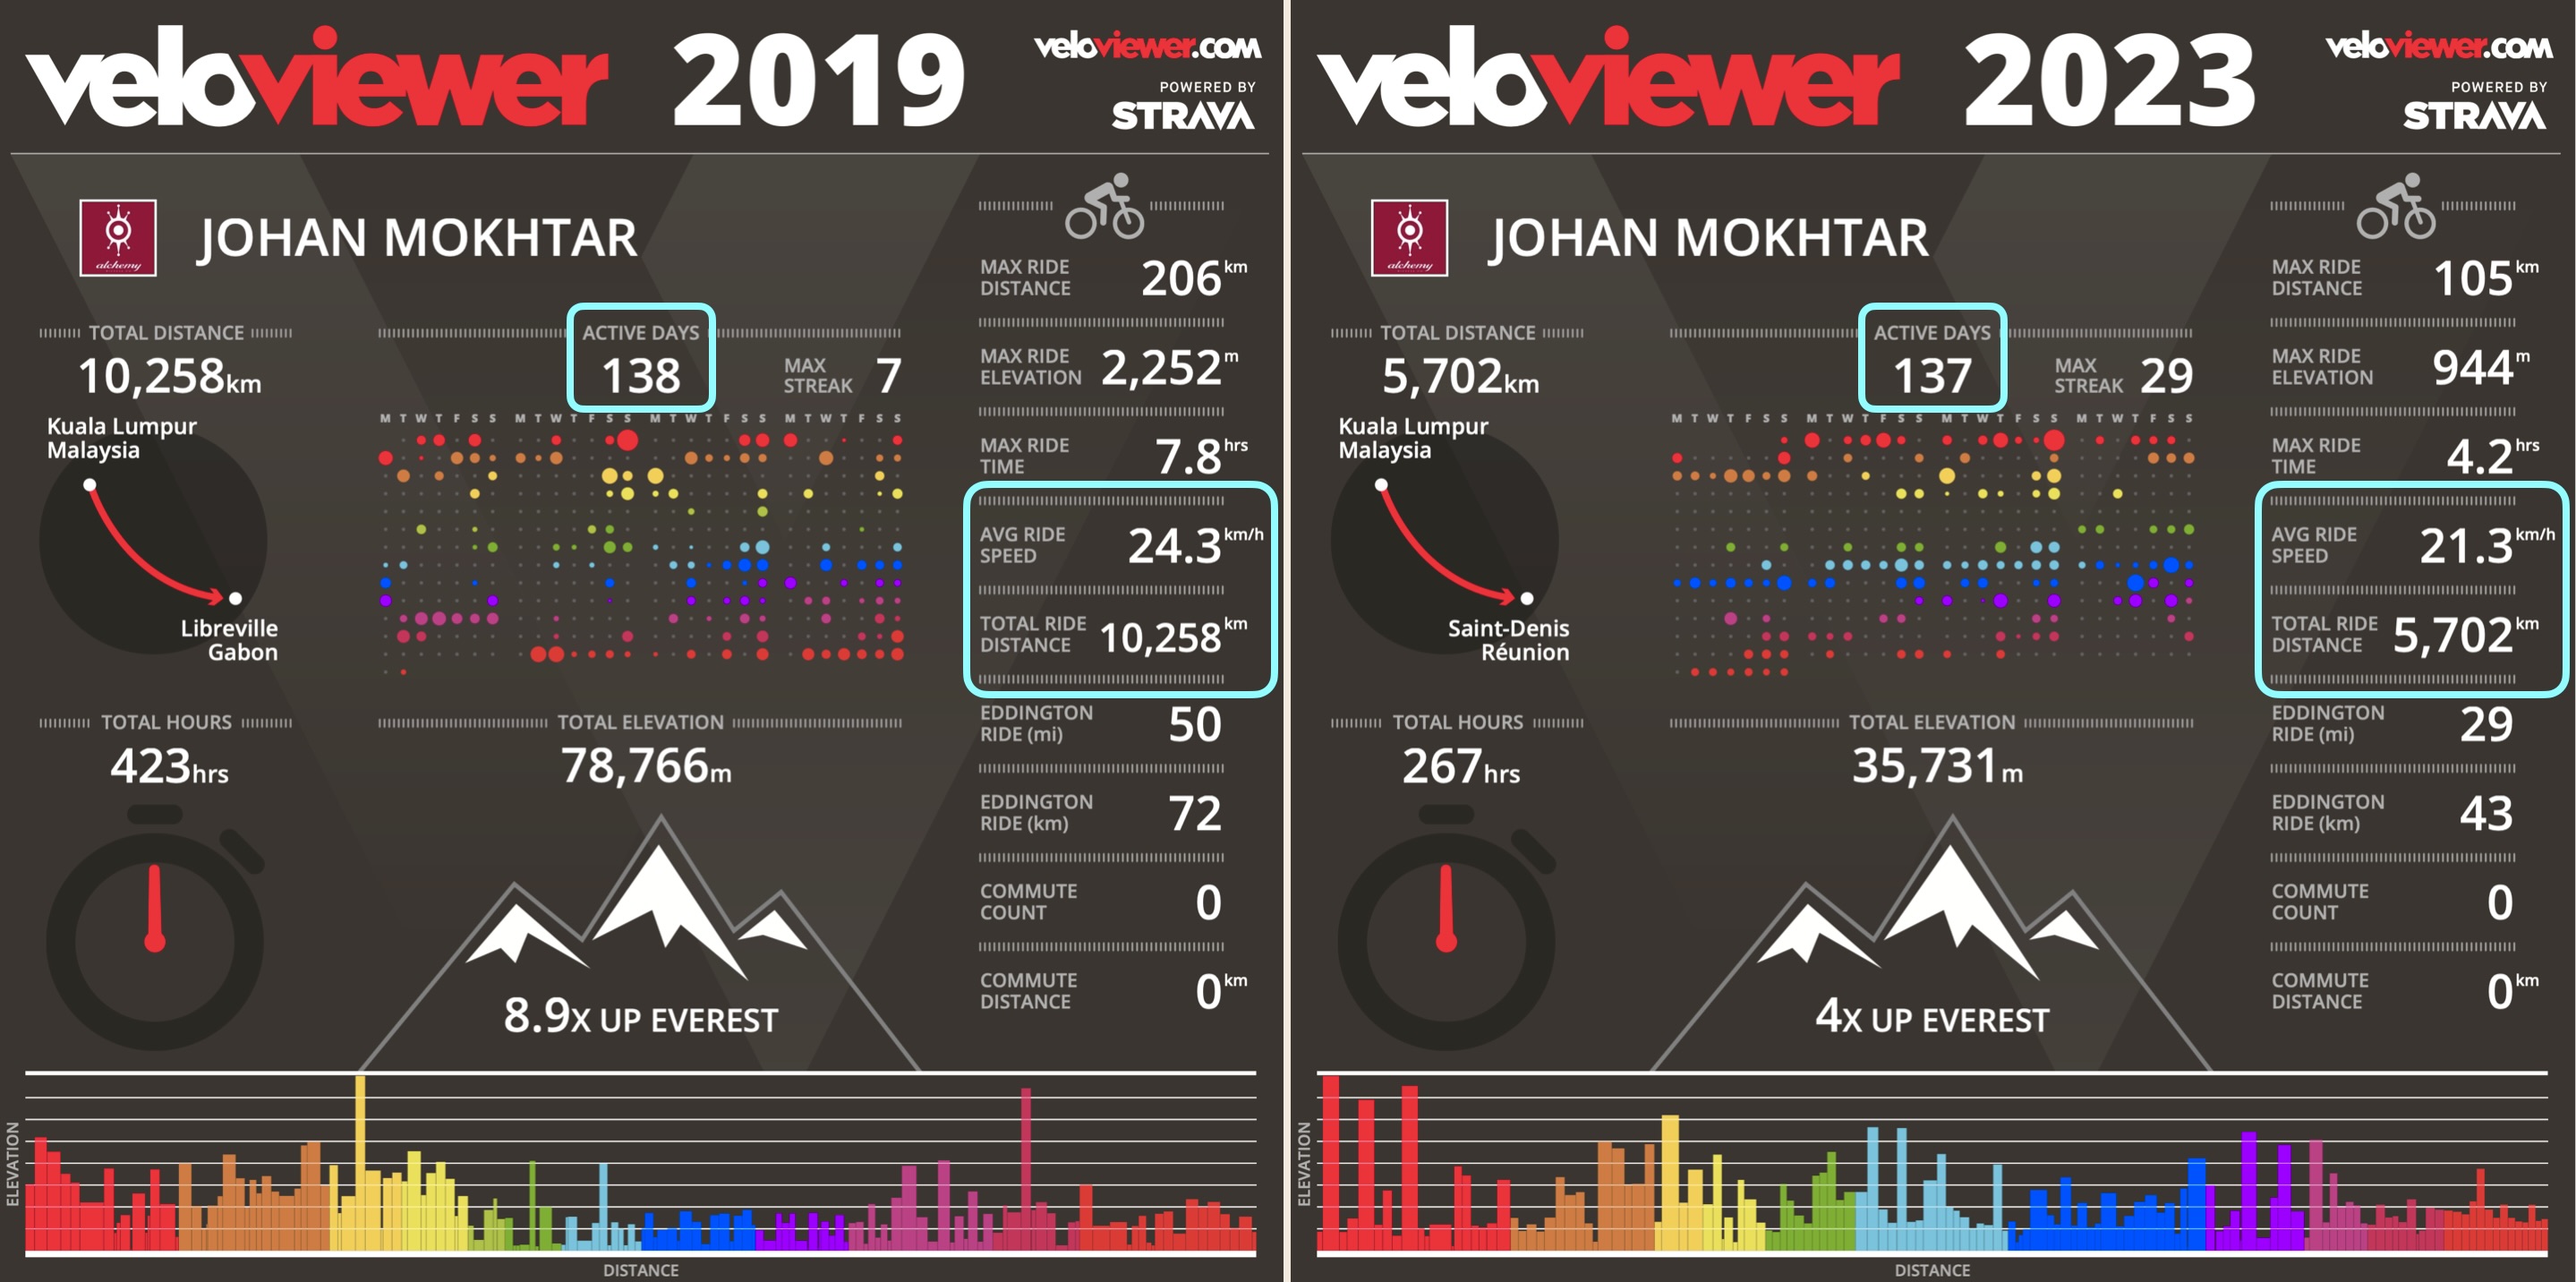
A Bicycling Magazine article titled The Average Cycling Distance By Age, According to Popular Cycling Apps popped up in one of my newsfeeds the other day. The article lists, among other things, how far users of Ride with GPS have cycled per ride over the past five years. Articles like this are catnip for me. I have to look up my average distance per ride data to see how I compare.
I use a Garmin cycling computer to record my ride data. The Garmin Connect software sends that data to Strava. Apparently, if it is not on Strava, the ride didn’t happen! Strava is an excellent social-purpose app, but extracting data from Strava for analysis is not straightforward. I use VeloViewer for a month-by-month or annual view of my ride data.
Veloviewer presents summary data in several ways. This Infographic shows the Total Ride Distance for a chosen year. I use Active Days as the proxy for the number of rides I did that year. You can see how much less I cycled last year compared to 2019.
This chart combines the average distance data from the Bicycling Magazine article and the average speed data from the TrainerRoad article.
I compare well to the average distance for my age group. I was 62 in 2109 so I have been in the 60-69 bracket for the past five years. My five-year average distance per ride is 55.10 km
My average distance per ride is dropping by the year though. That figure so far in 2024 is 40.98 km. Still reasonably above the 35.20 km average distance per ride for my age group in the Ride with GPS data.
I don’t compare so well against the Trainer Road average speed per ride data. My age group averaged 22.6 kph per ride in 2023. I averaged 21.3 kph. Like my average distance, my average speed has been falling since 2019.
My five-year average speed per ride is 22.7 kph. A whisker above the 2023 Trainer Road speed-per-ride average for my age group. I suspect the Trainer Road data has stayed consistent over the years. I have fallen behind that average since 2021.
I get an ego boost when I equal or exceed performance statistics like these.
I am also reminded that I have a lot to be grateful for. Being healthy and fit enough to ride my bicycle is a blessing. In an average way or otherwise.
In the Strava report the age groups are separated by generation rather than by ten-year periods. I look quite good against the other Boomers in that Strava report.
A grimpeur is a climbing specialist. A lightweight cyclist who can ride especially well up inclines. I am not one of those. I am more Magnus Backstedt, a retired professional cyclist who raced weighing 95 kg (209 lb), than Tadej Pogačar, who won this year’s Tour de France weighing 66 kg (146 lb).
Perhaps fortuitously, I started road cycling in Houston. A city where the only climbs are on overpasses.
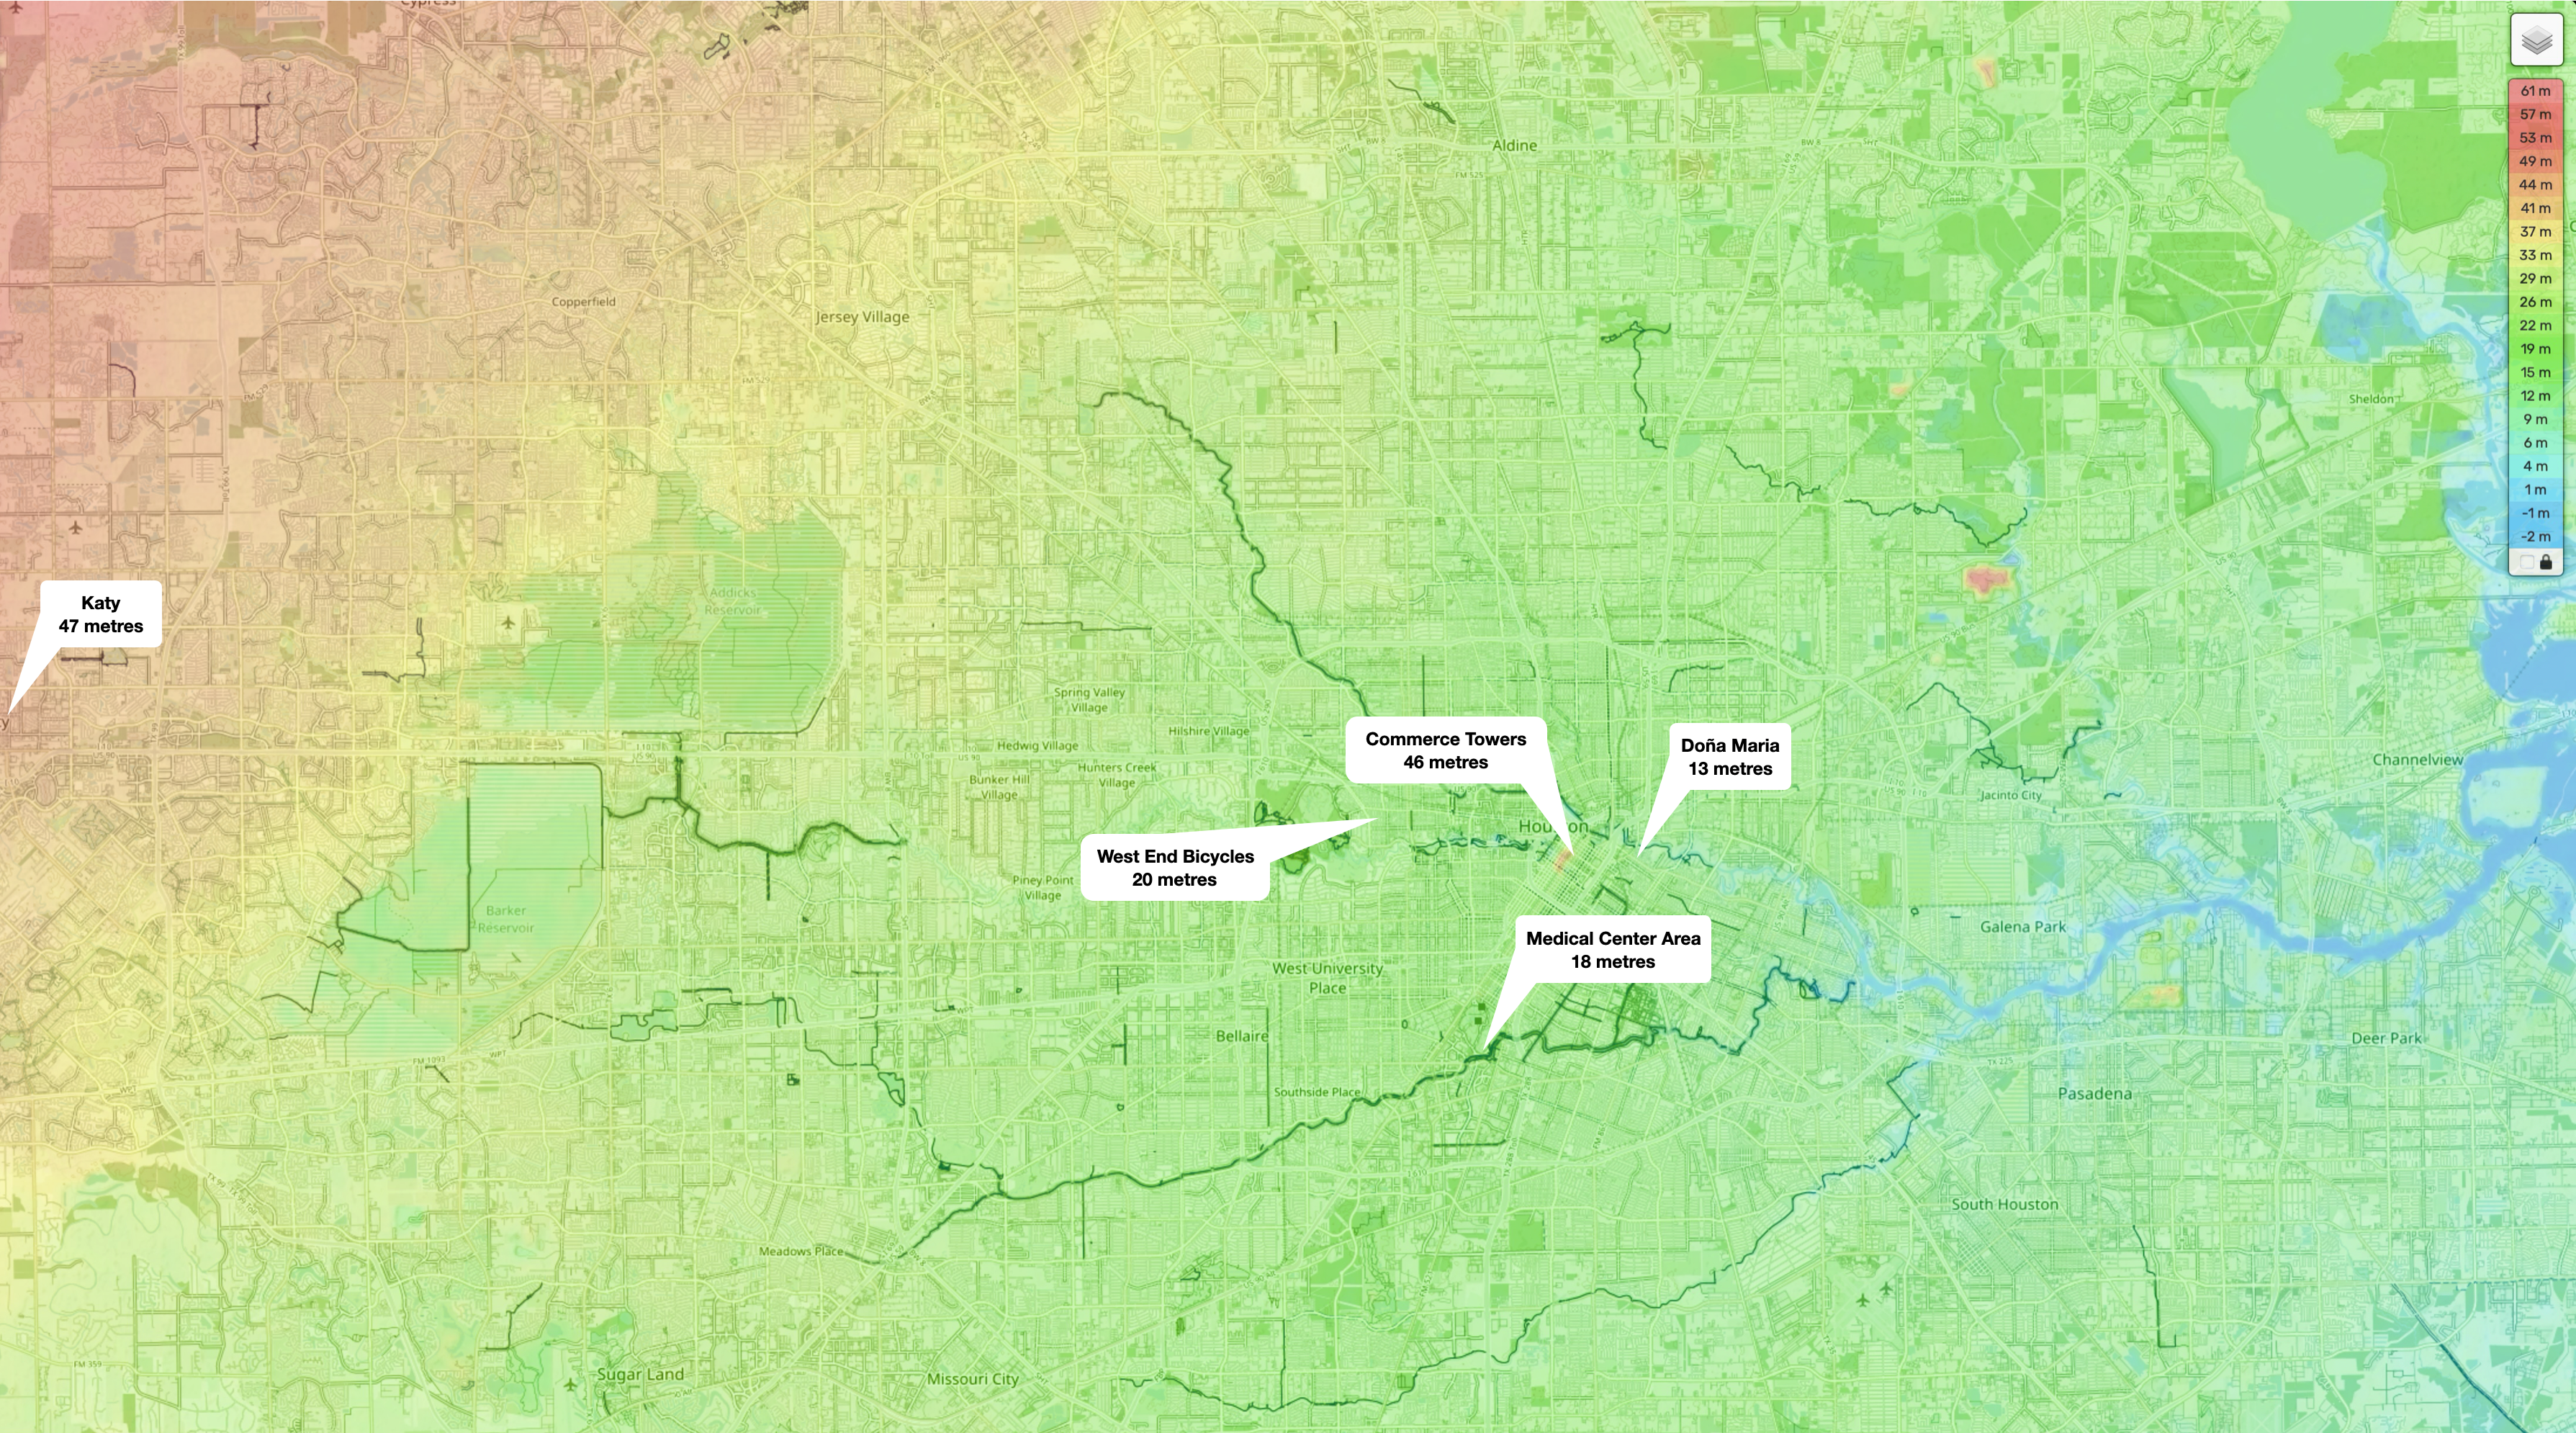
Map courtesy of en-gb.topographic-map.com
This topographic map shows just how flat Houston and the surrounding area are. I hadn’t realised that Commerce Towers, where I lived in Houston, is in the highest part of the city, at 46 m (151 ft) above sea level. It is downhill from there to West End Bicycles where my group rides started. Doña Maria, our Sunday destination for breakfast tacos, is even lower.
You must drive about 48 km (30 mi) west to Katy and onward another 43 km (27 mi) to Bellville (elevation 92 m) to do any hill cycling.
I moved from Houston to Den Haag. Another city not noted for hills. Much of the surrounding area is below sea level.
Map courtesy of en-gb.topographic-map.com
I lived on Van Hougenhoucklaan which is 5 m (16 ft) above sea level. The sand dunes to the west are a natural form of coastal defence. They form the highest parts of the west of the country. You go 43 km (27 mi) east to Ruiterberg to find land twice as high as Noordwijk. Or 170 km (106 mi) south to Valkenberg which sits at 137 m (450 ft) above sea level.
I moved back to Kuala Lumpur after two years of pan-flat cycling in the western Netherlands.
Map courtesy of en-gb.topographic-map.com
My first ride in Malaysia was to Genting Sempah which is 637 m (2,090 ft) above sea level. That was a shock to my system.
I don’t have to go far from home to find a hill. Bukit Damansara is 6 km (4 mi) west of Anggun Residences. I climb 80 m (262 ft) to get there. Higher climbs lie to the east. Anything from 158 m (518 ft) above sea level to 500 m (1,640 ft) above sea level.
The terrain to the west isn’t as high, but it is rolling. An 18.7 km (11.6 mi) ride along the Guthrie Corridor Expressway (GCE) can include 361 m (1,184 ft) of climbing as you cycle up and down between 16 m (52 ft) and 70 m (230 ft) above sea level.
Map courtesy of ridewithgps.com
I can’t avoid hills, especially if I start riding from home. Climbing is hard work. In my case, the effort is worth it. I enjoy the payoff a lot.
Like other big cities, Kuala Lumpur is crisscrossed with major roads. Some are accessible to cyclists. Others increasingly less so.
Map courtesy of Google Maps
Over the years, several popular cycling roads in and around the city have been closed to cyclists.
The LATAR Expressway (E25), or Lebuhraya Assamjawa Taman Rimba Expressway, links Templer’s Park in Gombak district to Ijok in Kuala Selangor district. LATAR opened in 2011.
Map courtesy of klia2.info
LATAR became popular with cyclists after the Guthrie Corridor Expressway (E35) opened in 2015. The motorcycle lanes of the GCE provide easy access from Bukit Jelutong to the Kuang Interchange with LATAR. Most cyclists headed west on LATAR to Kundang, Puncak Alam and further afield to Ijok and Kuala Selangor. Cyclists could also ride east to Rawang.
These were the toll rates when LATAR opened. It was free for bicycles.
Table courtesy of klia2.info
My friends and I rode along LATAR many times. Including at the start of a ride to Teluk Intan in 2016.
Photo courtesy of M Lai
Rides on LATAR ended in 2020, when the highway concessionaire, KL-Kuala Selangor Expressway Berhad, banned cycling on safety grounds.
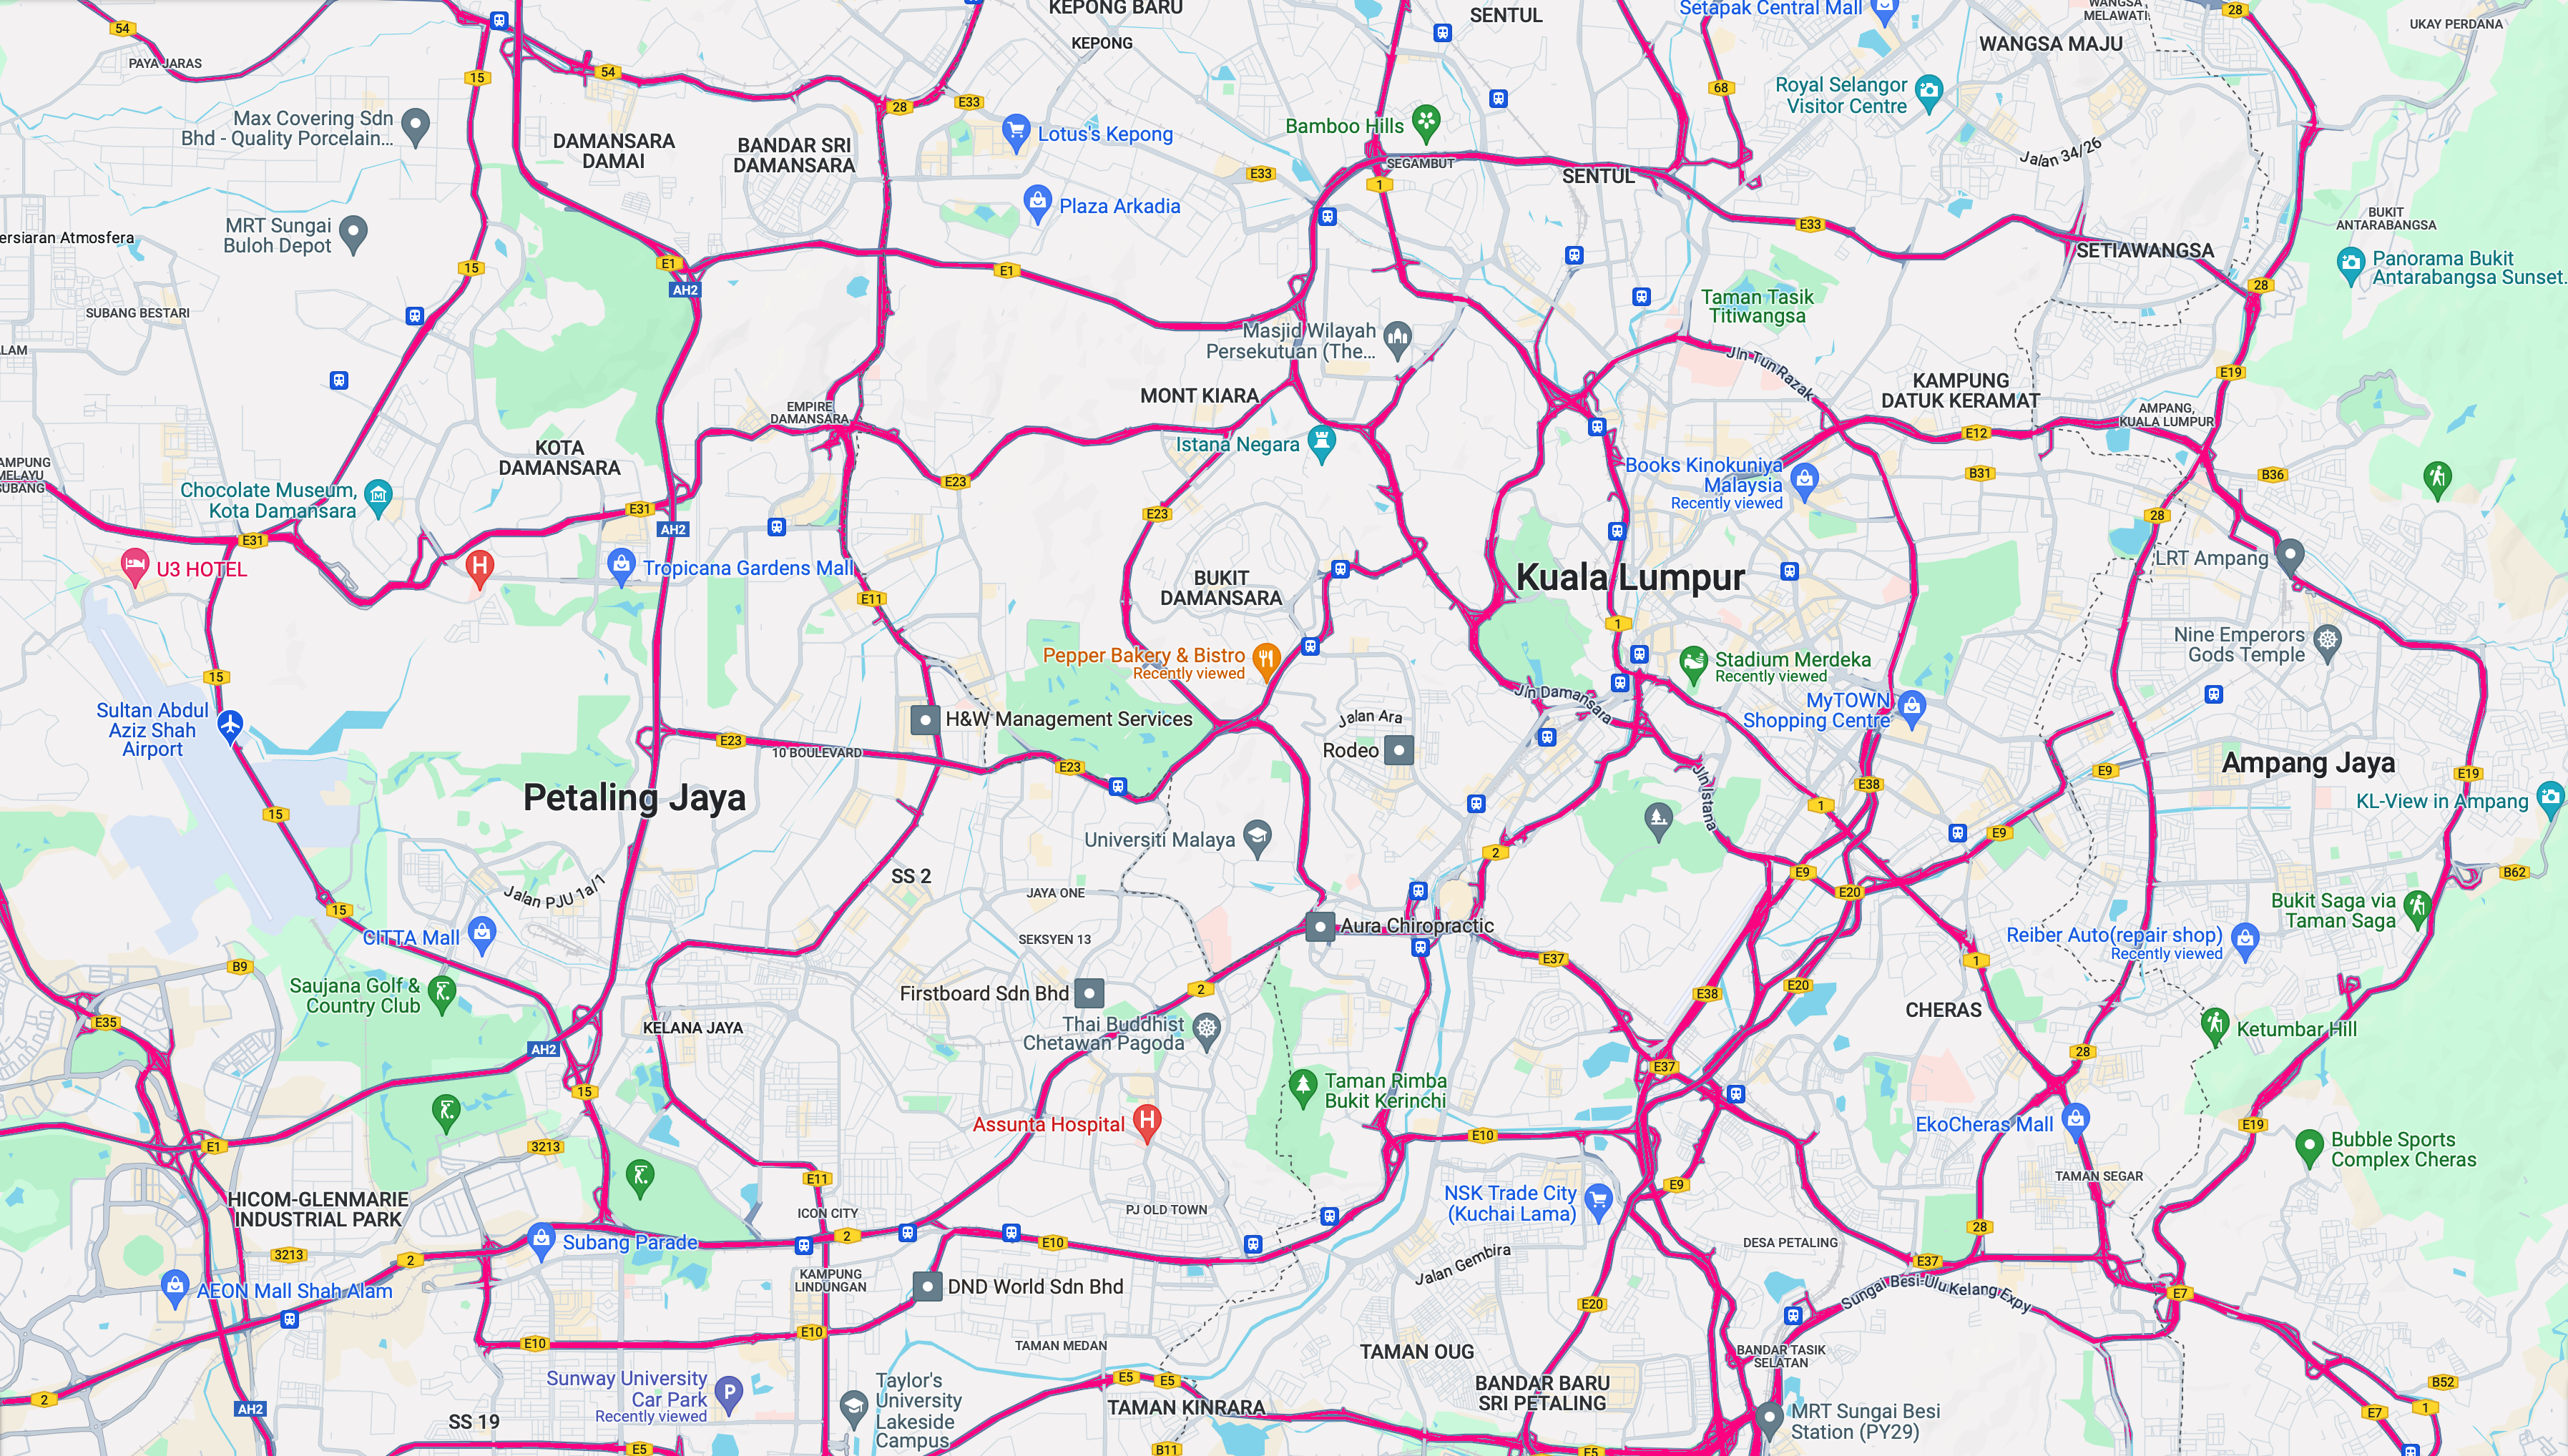
The Maju Expressway (E20) opened in 2007. MEX links Kuala Lumpur with Cyberjaya and Putrajaya.
Map courtesy of klia2.info
MEX gave me easy access to the motorcycle lanes on the KESAS Highway (E5) via the Bukit Jalil Interchange. Those motorcycle lanes took me from Bukit Jalil to Bandar Sunway, Kota Kemuning, Bandar Botanic and Federal Route 5.
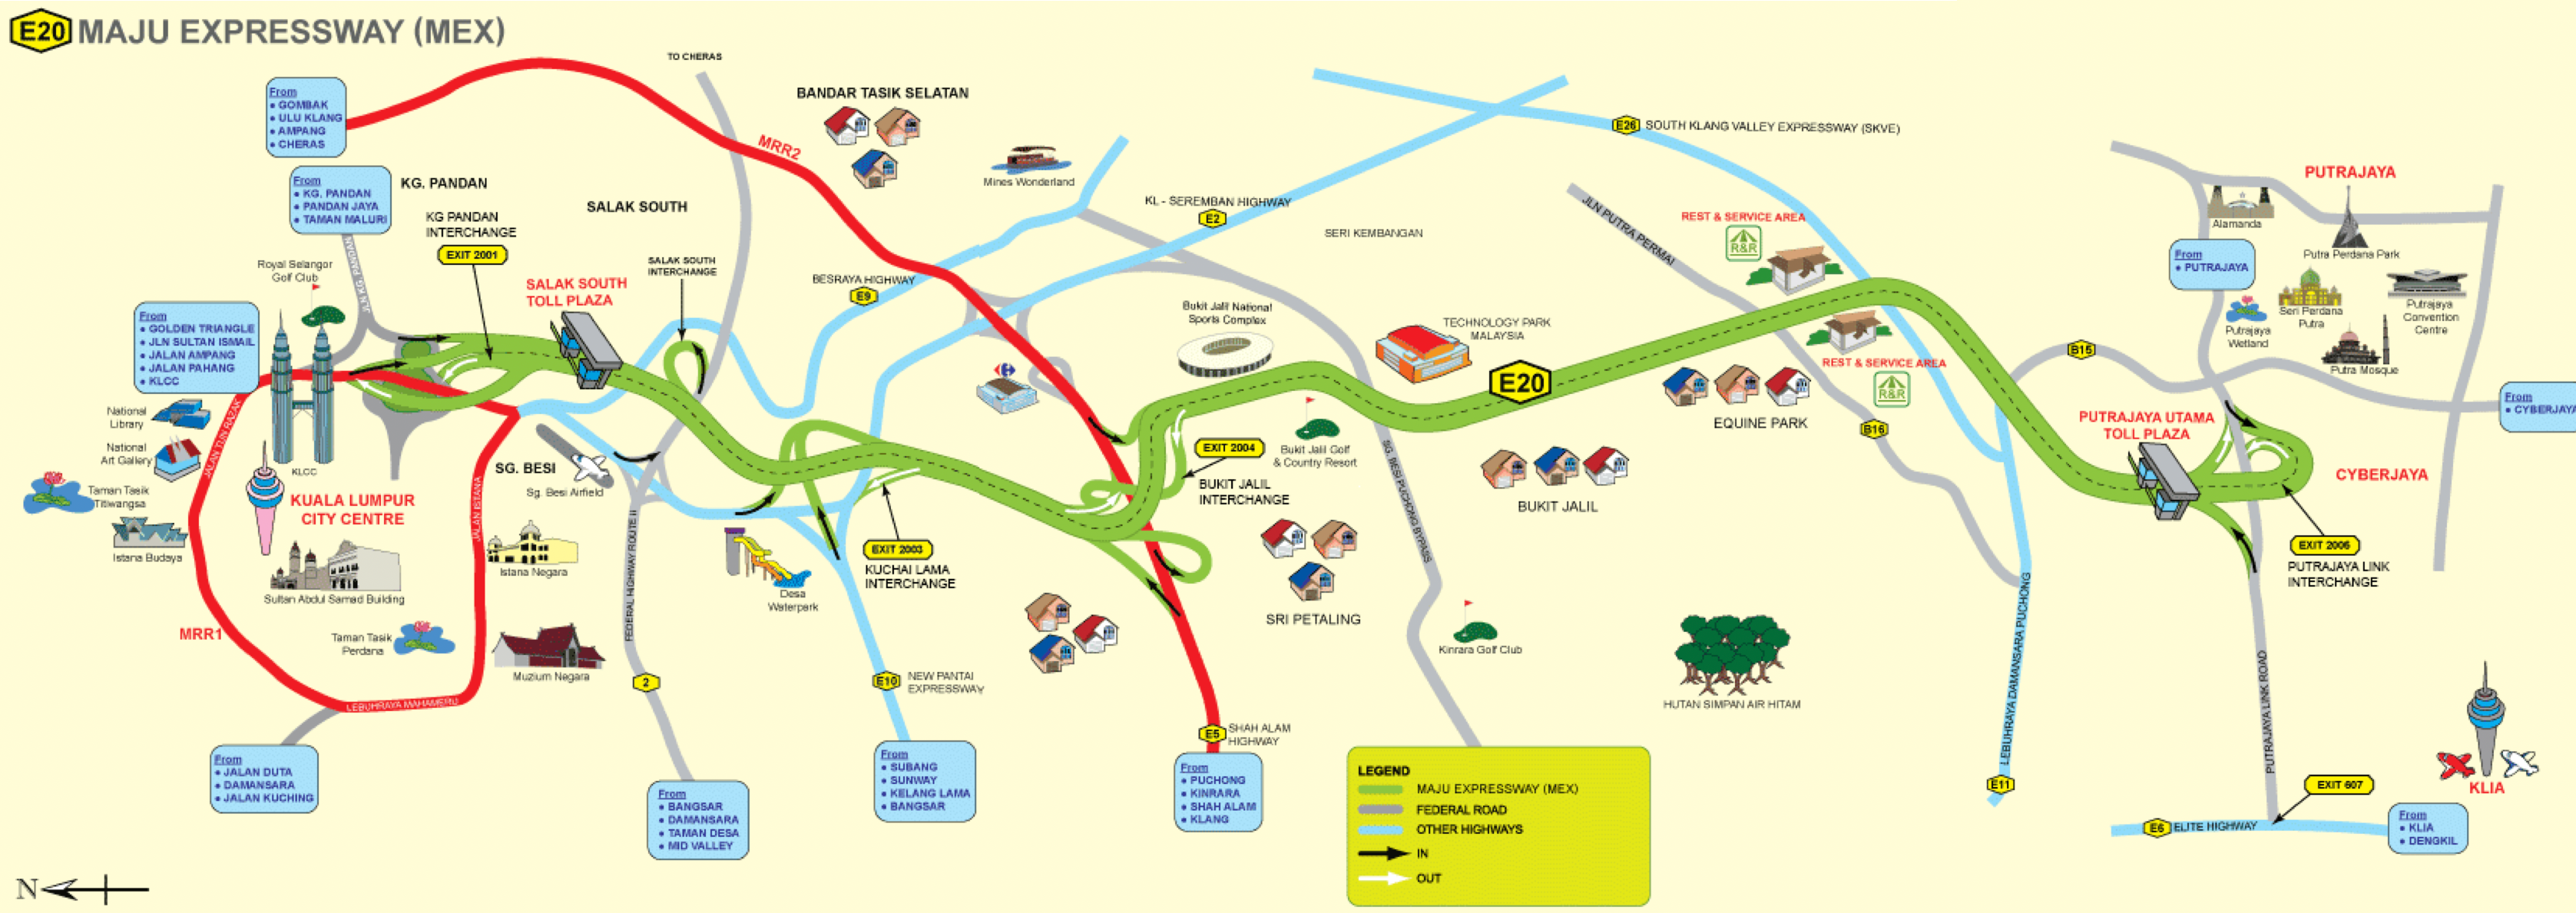
MEX was also free for bicycles when it opened.
Table courtesy of klia2.info
My friends and I rode the full length of MEX a few times, including in 2018. MEX was the starting leg of rides south to Port Dickson and Melaka.
Photograph courtesy of M Lim
The concessionaire, Maju Expressway Sdn Bhd, banned cyclists from MEX in 2020. At about the same time that cyclists were banned from LATAR.
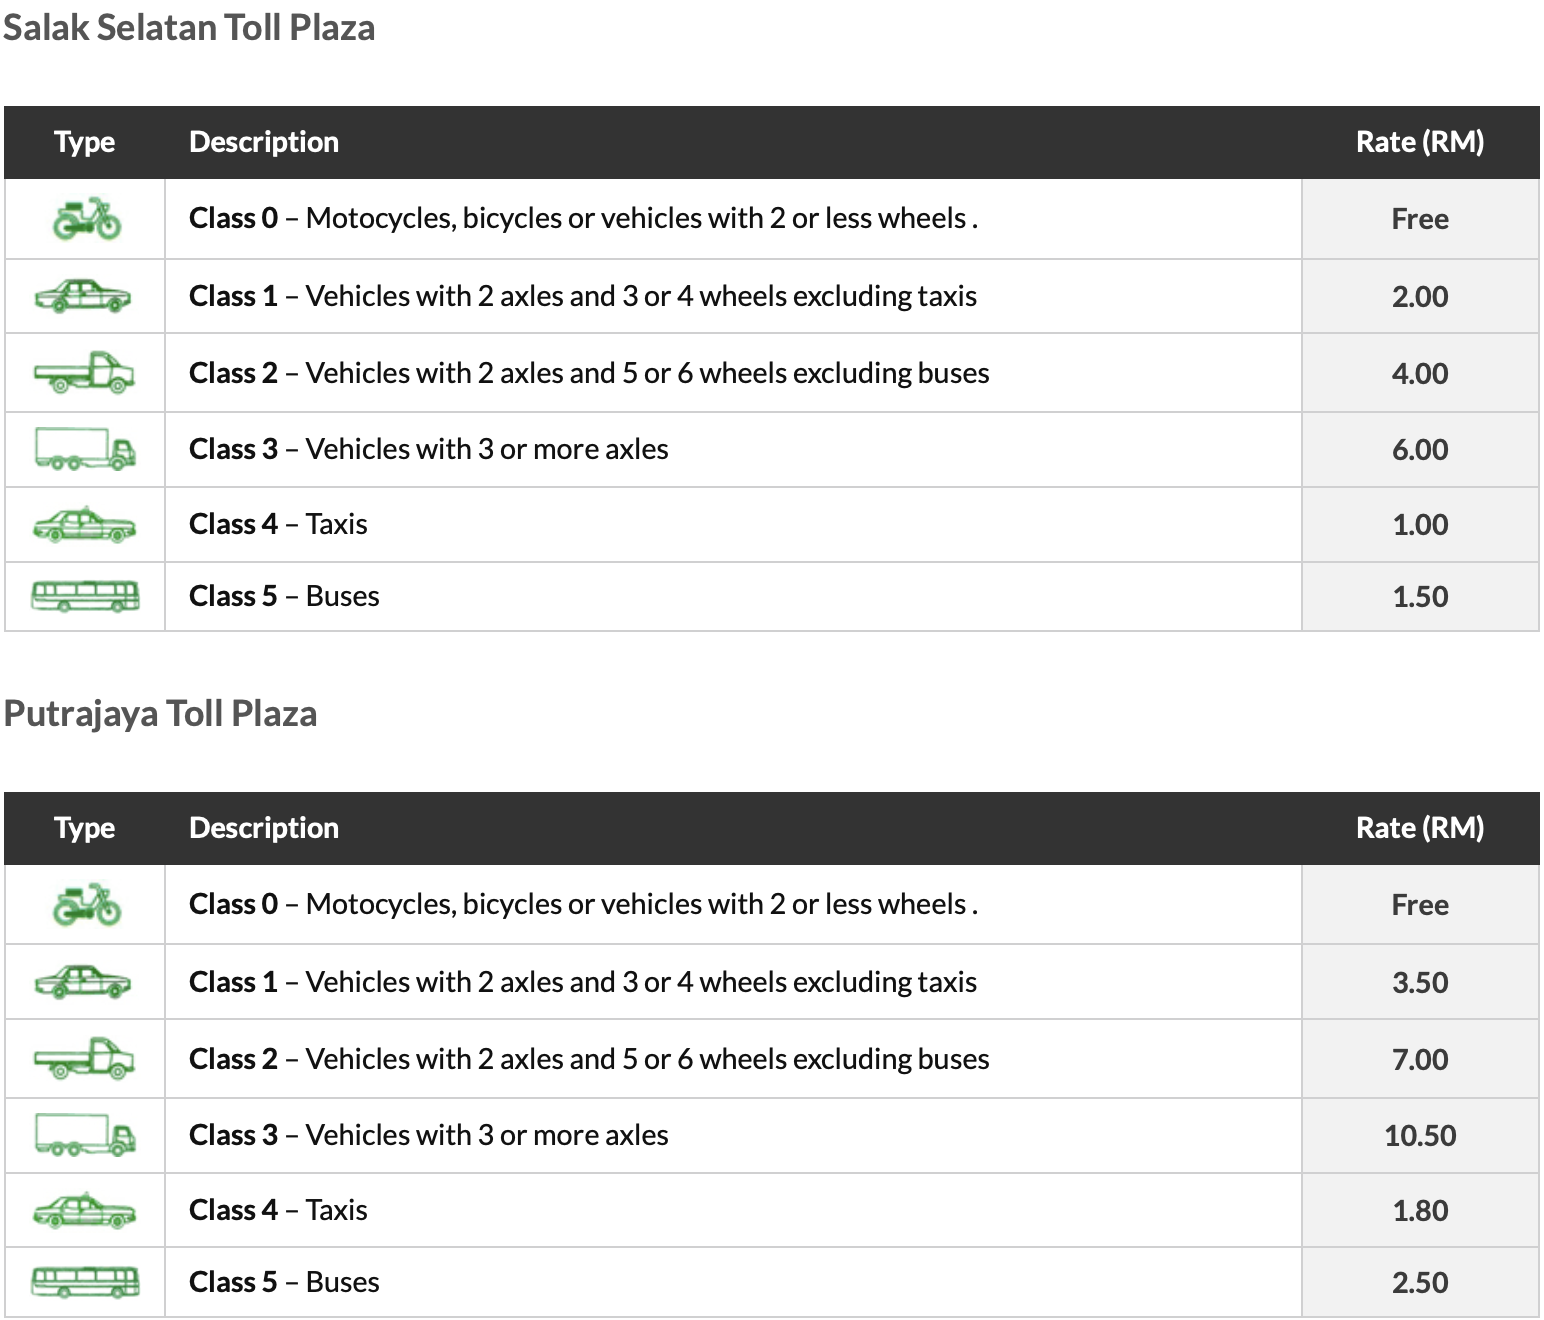
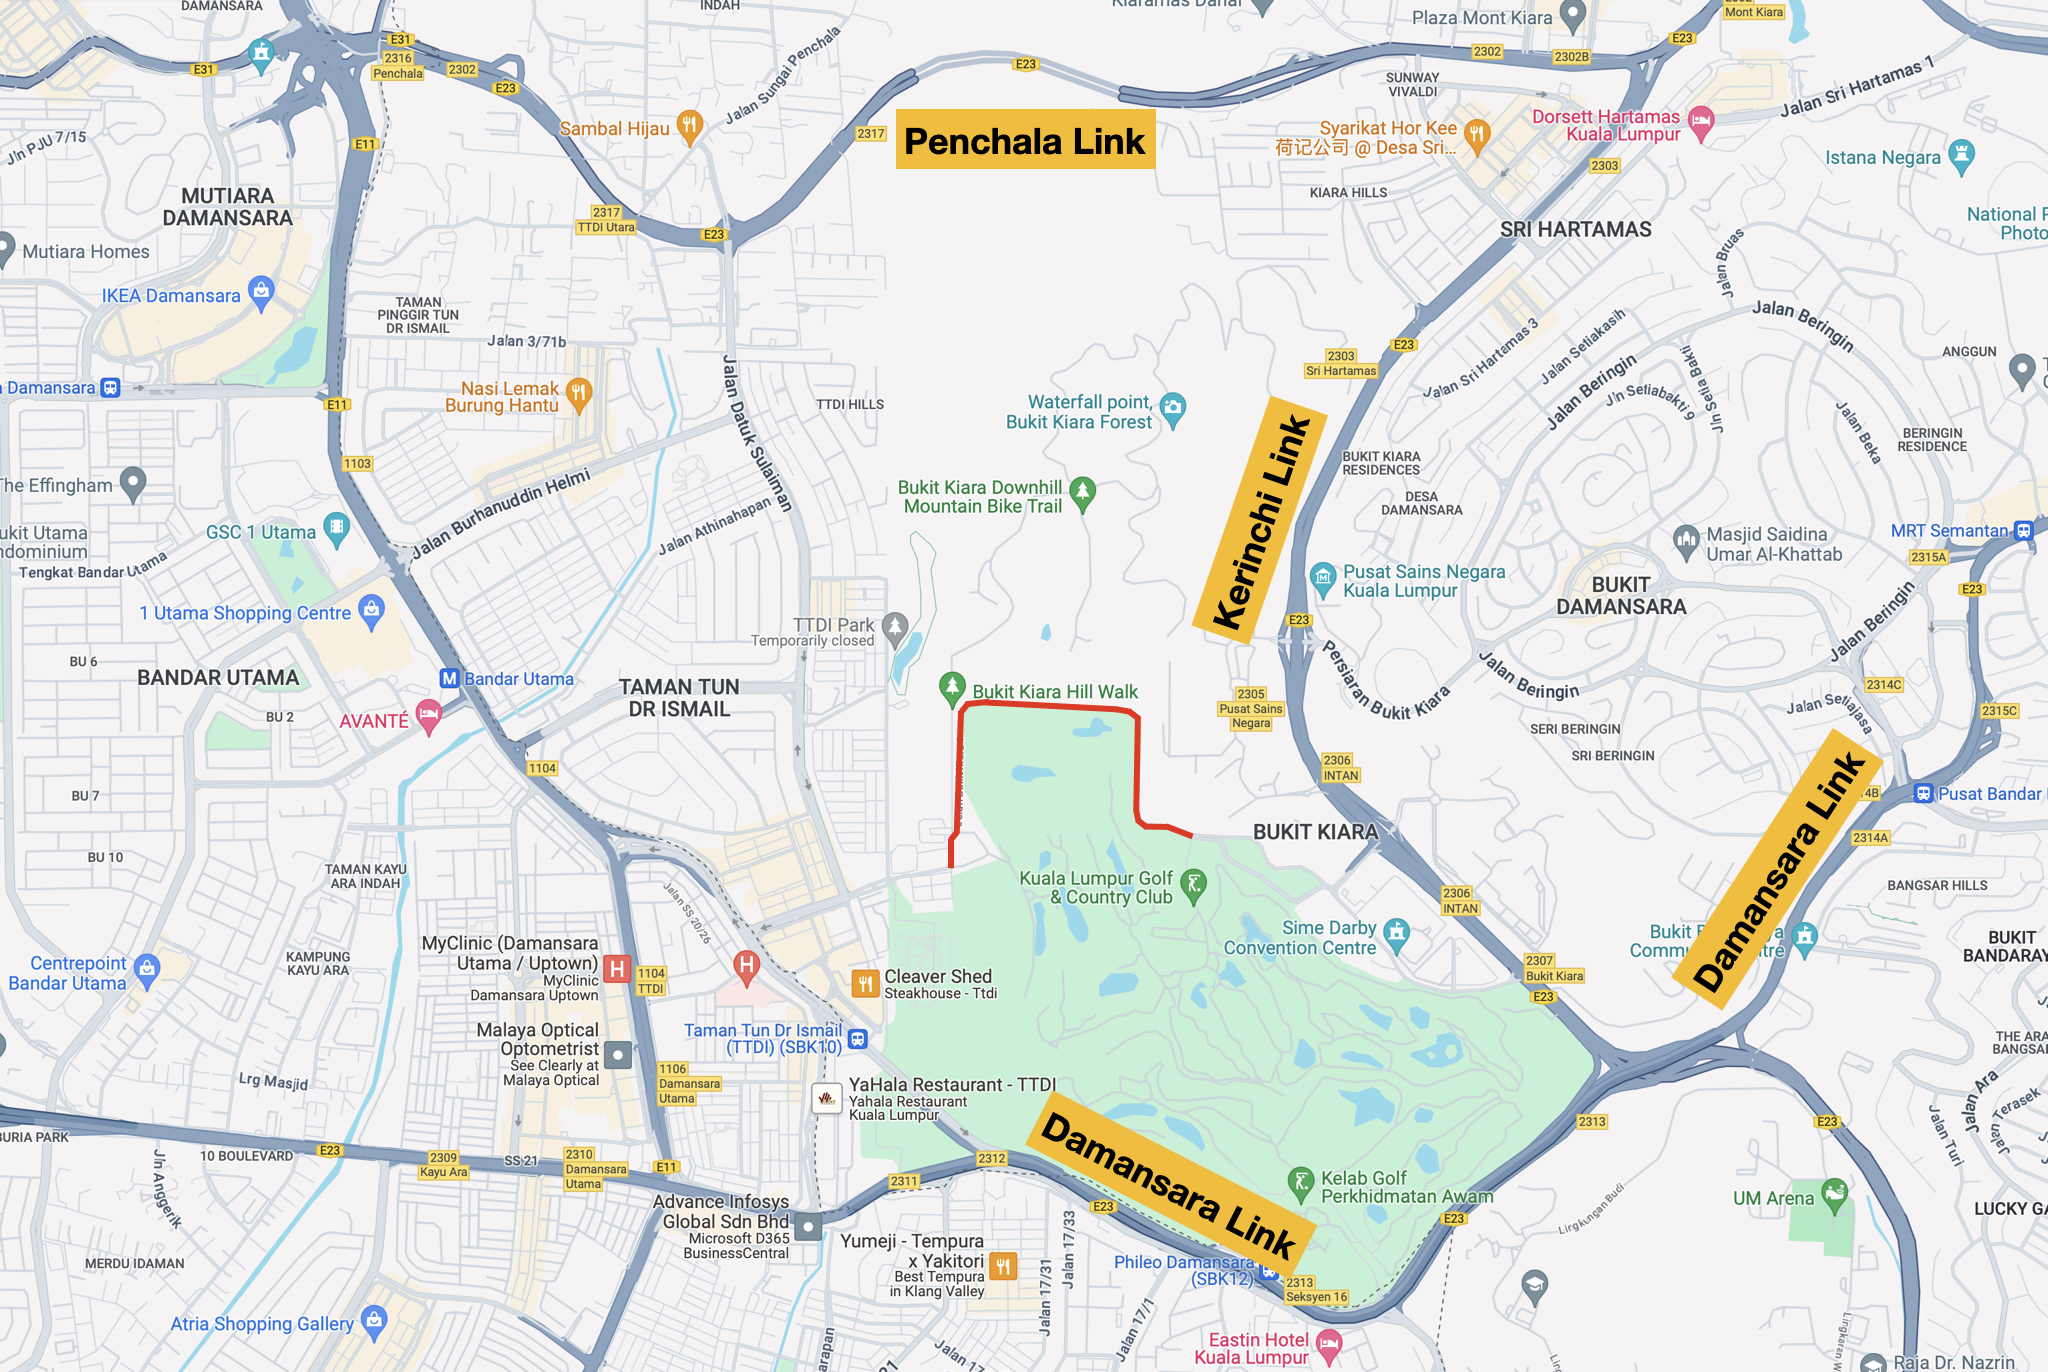
The latest highway concessionaire to ban cyclists is Sistem Penyuraian Trafik KL Barat Sdn Bhd (SPRINT). In their case, from the SPRINT Highway (E23).
SPRINT has three parts. The Kerinchi Link and the Damansara Link were opened in 2001, followed by the Penchala Link in 2004.
Map courtesy of klia2.info
A favourite route of mine is from home through Bukit Tunku to Sri Hartamas to Damansara Heights. I ride on the Kerinchi Link and Damansara Link from the Sri Hartamas interchange (2303) to the Jalan Setiapuspa exit and the back roads to Damansara Heights.
Last Sunday at about 7:30 am, I was on the Kerinchi Link about 200 metres from the Sri Hartamas interchange. Two SPRINT Auxiliary Police officers on motorbikes, blue lights flashing, saw me from the other side of the highway. They made a U-turn at the Sri Hartamas interchange, caught up to me, and flagged me down.
Photograph courtesy of litrak.com.my
The officer was very polite. He apologised while telling me that cyclists are prohibited on the SPRINT Highway. So I had to exit at the Pusat Sains Negara Interchange (E2305) and climb the Science Centre hill. The hill that I avoid by riding to the Jalan Setiapuspa exit.
Map courtesy of Google Maps
This ban will be hard on cyclists who live in Taman Tun Dr Ismail (TTDI) and Bandar Utama. Since Jalan Bukit Kiara 1, along the edge of the Kuala Lumpur Golf & Country Club (in red below), was closed, the only way cyclists had of getting from TTDI and Bandar Utama to Bukit Damansara and other popular cycling spots further east was either along the Damansara Link or the Penchala Link.
Map courtesy of Google Maps
Those options are now not available. That means no more cycling from TTDI and Bandar Utama to Damansara Heights.
I am stuck too. I can get to Damansara Heights via Jalan Parlimen, Jalan Tuanku Abdul Halim and Jalan Semantan. However, that requires crossing multiple lanes of traffic before turning left onto Jalan Semantan. That is much more dangerous than using the Kerinchi Link and the Damansara Link, where all the turns are to the left and do not require crossing lanes.
I may have to drive my bicycle to Damansara Heights from now on.
My Biker Chick had a three-day work event at Avani Sepang Goldcoast Resort. I tagged along with my bicycle.
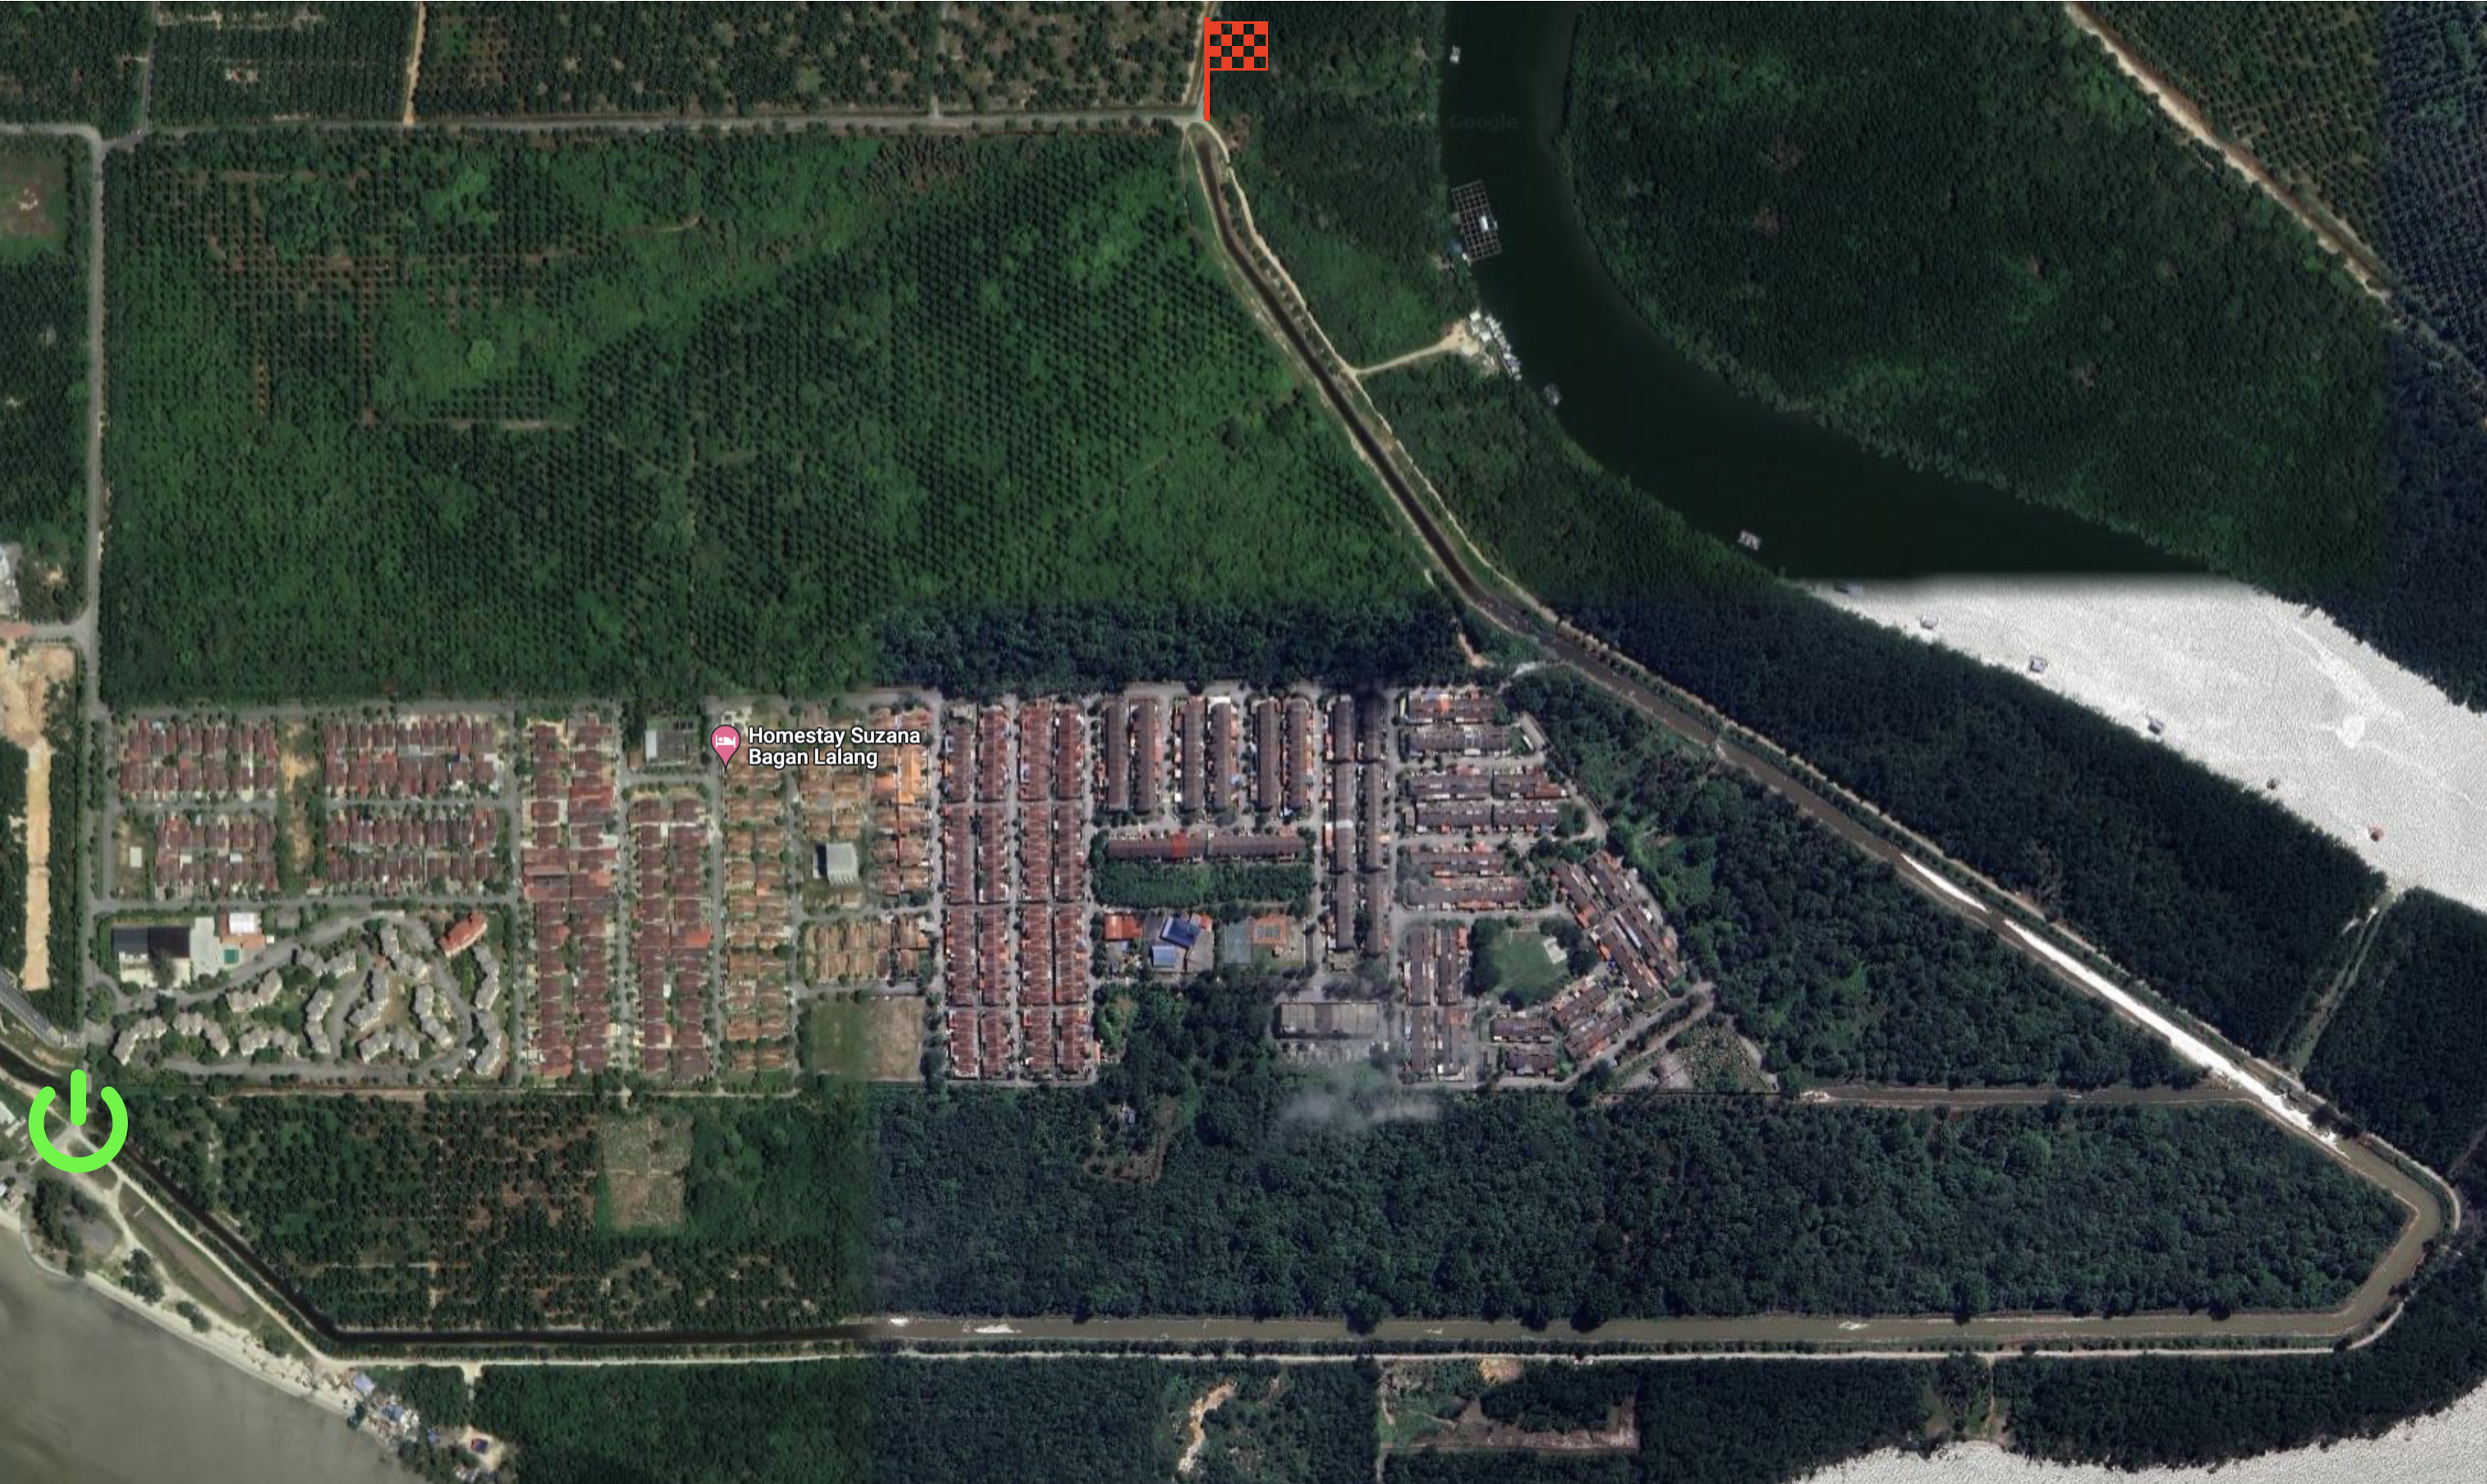
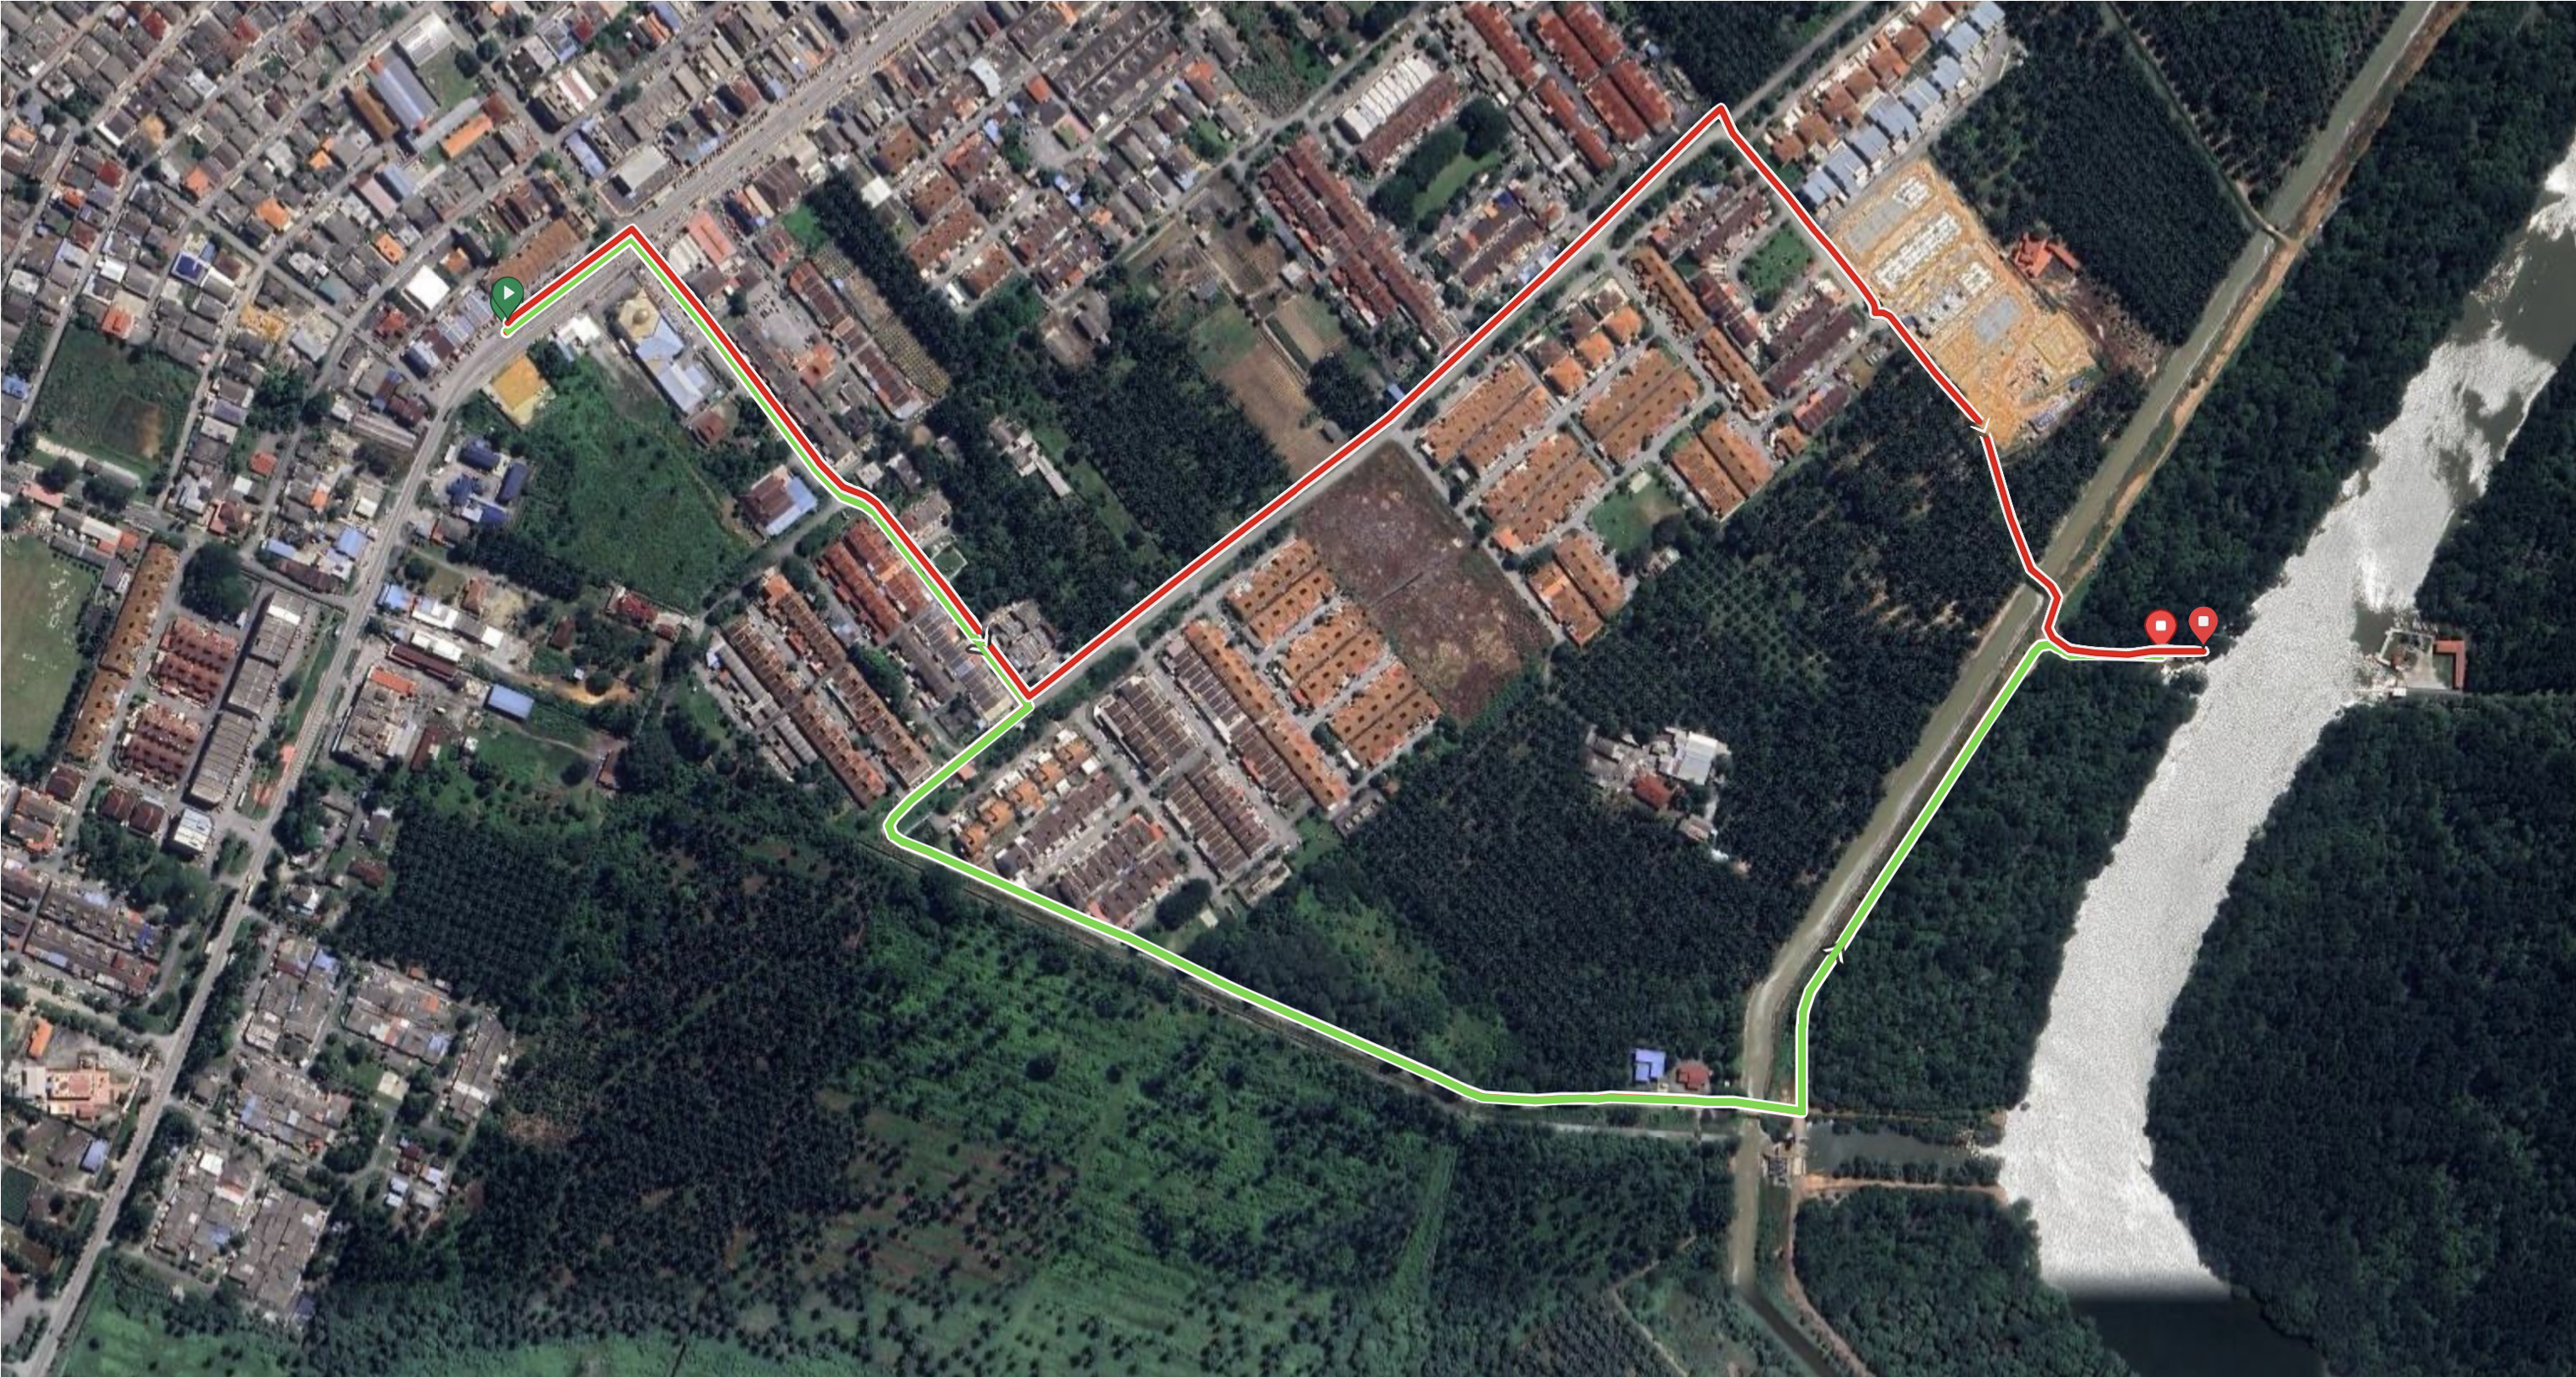
I mapped a ride for each of those three days. The first was from the resort to the Sungai Pelek ferry crossing and on to Kuala Lukut.
Map courtesy of ridewithgps.com
When I mapped this ride I didn’t know that 1.5 km into my ride the road turns into a fairly narrow gravel path. The gravel path runs counterclockwise for 7 km. Nor did I realise that the path paralleled a canal.
Map courtesy of ridewithgps.com
I was on my bike at 5:40 am under a full moon.
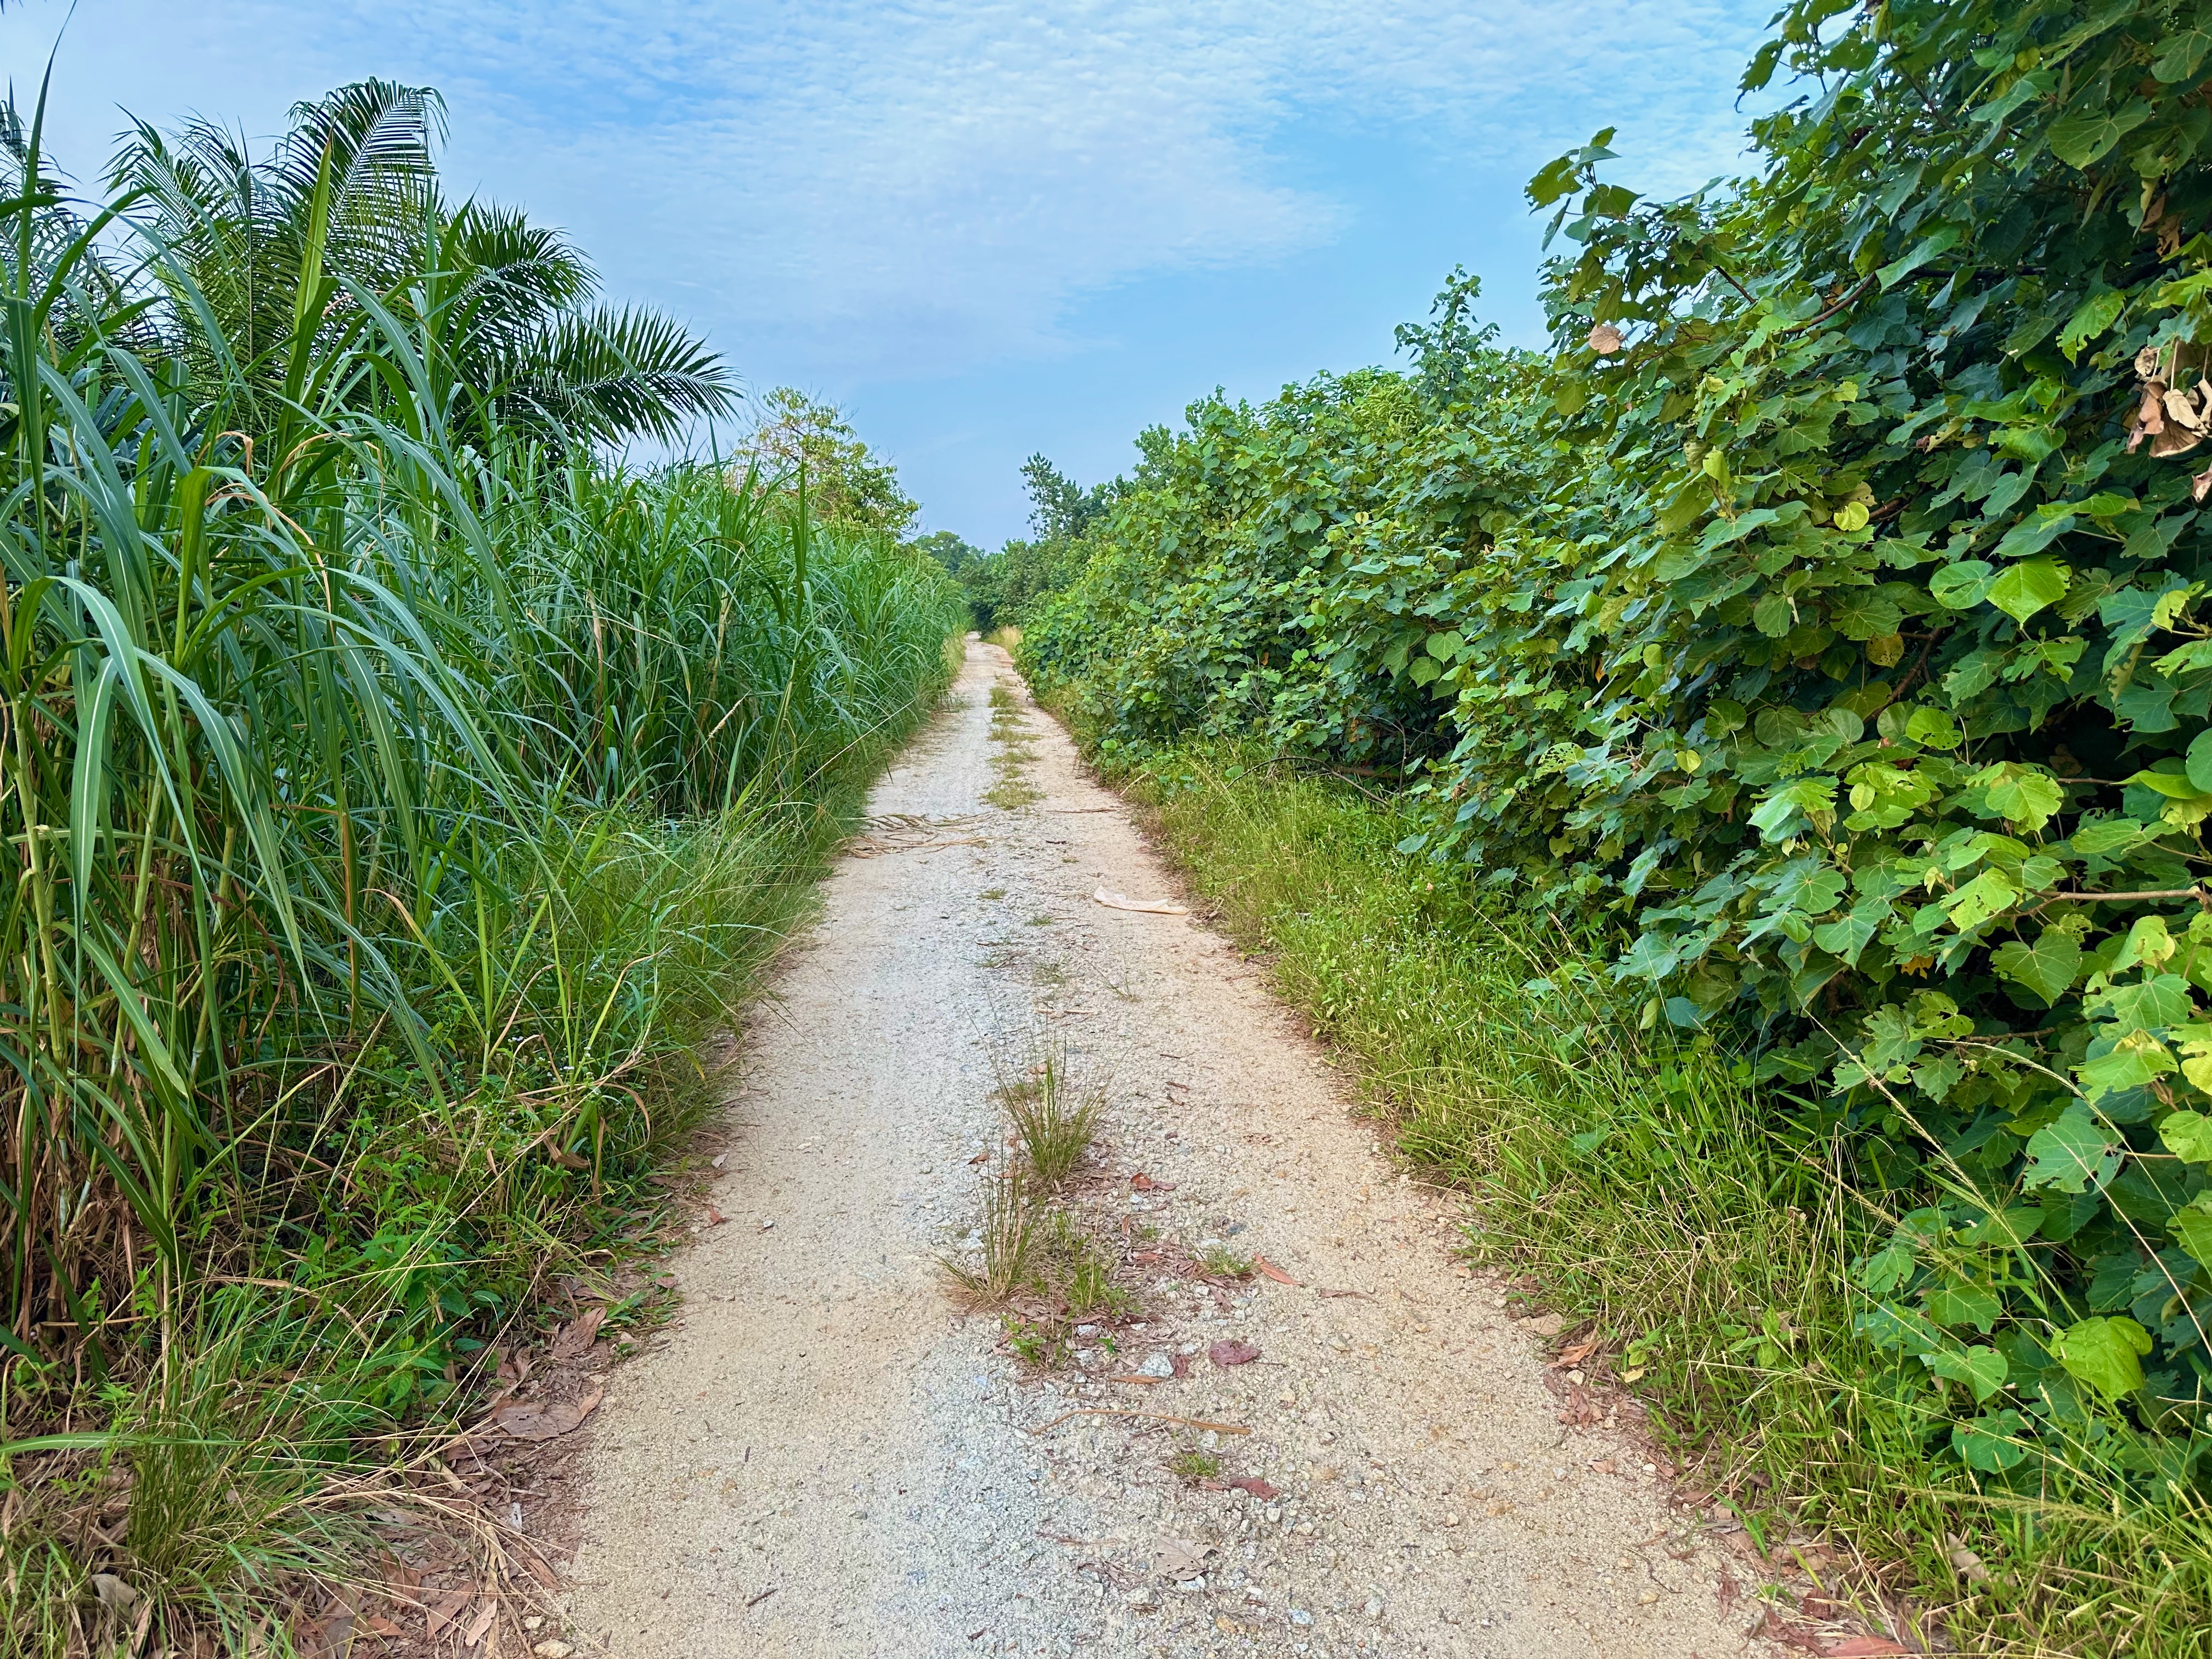
The path looks innocuous in daylight. I took this photograph the next day.
Not so at night. Despite the full moon, it was pitch-black. The only light on the path was from my Garmin Varia UT800 front light. The UT800 was bright enough to illuminate the path ahead, but nothing was visible outside the light beam.
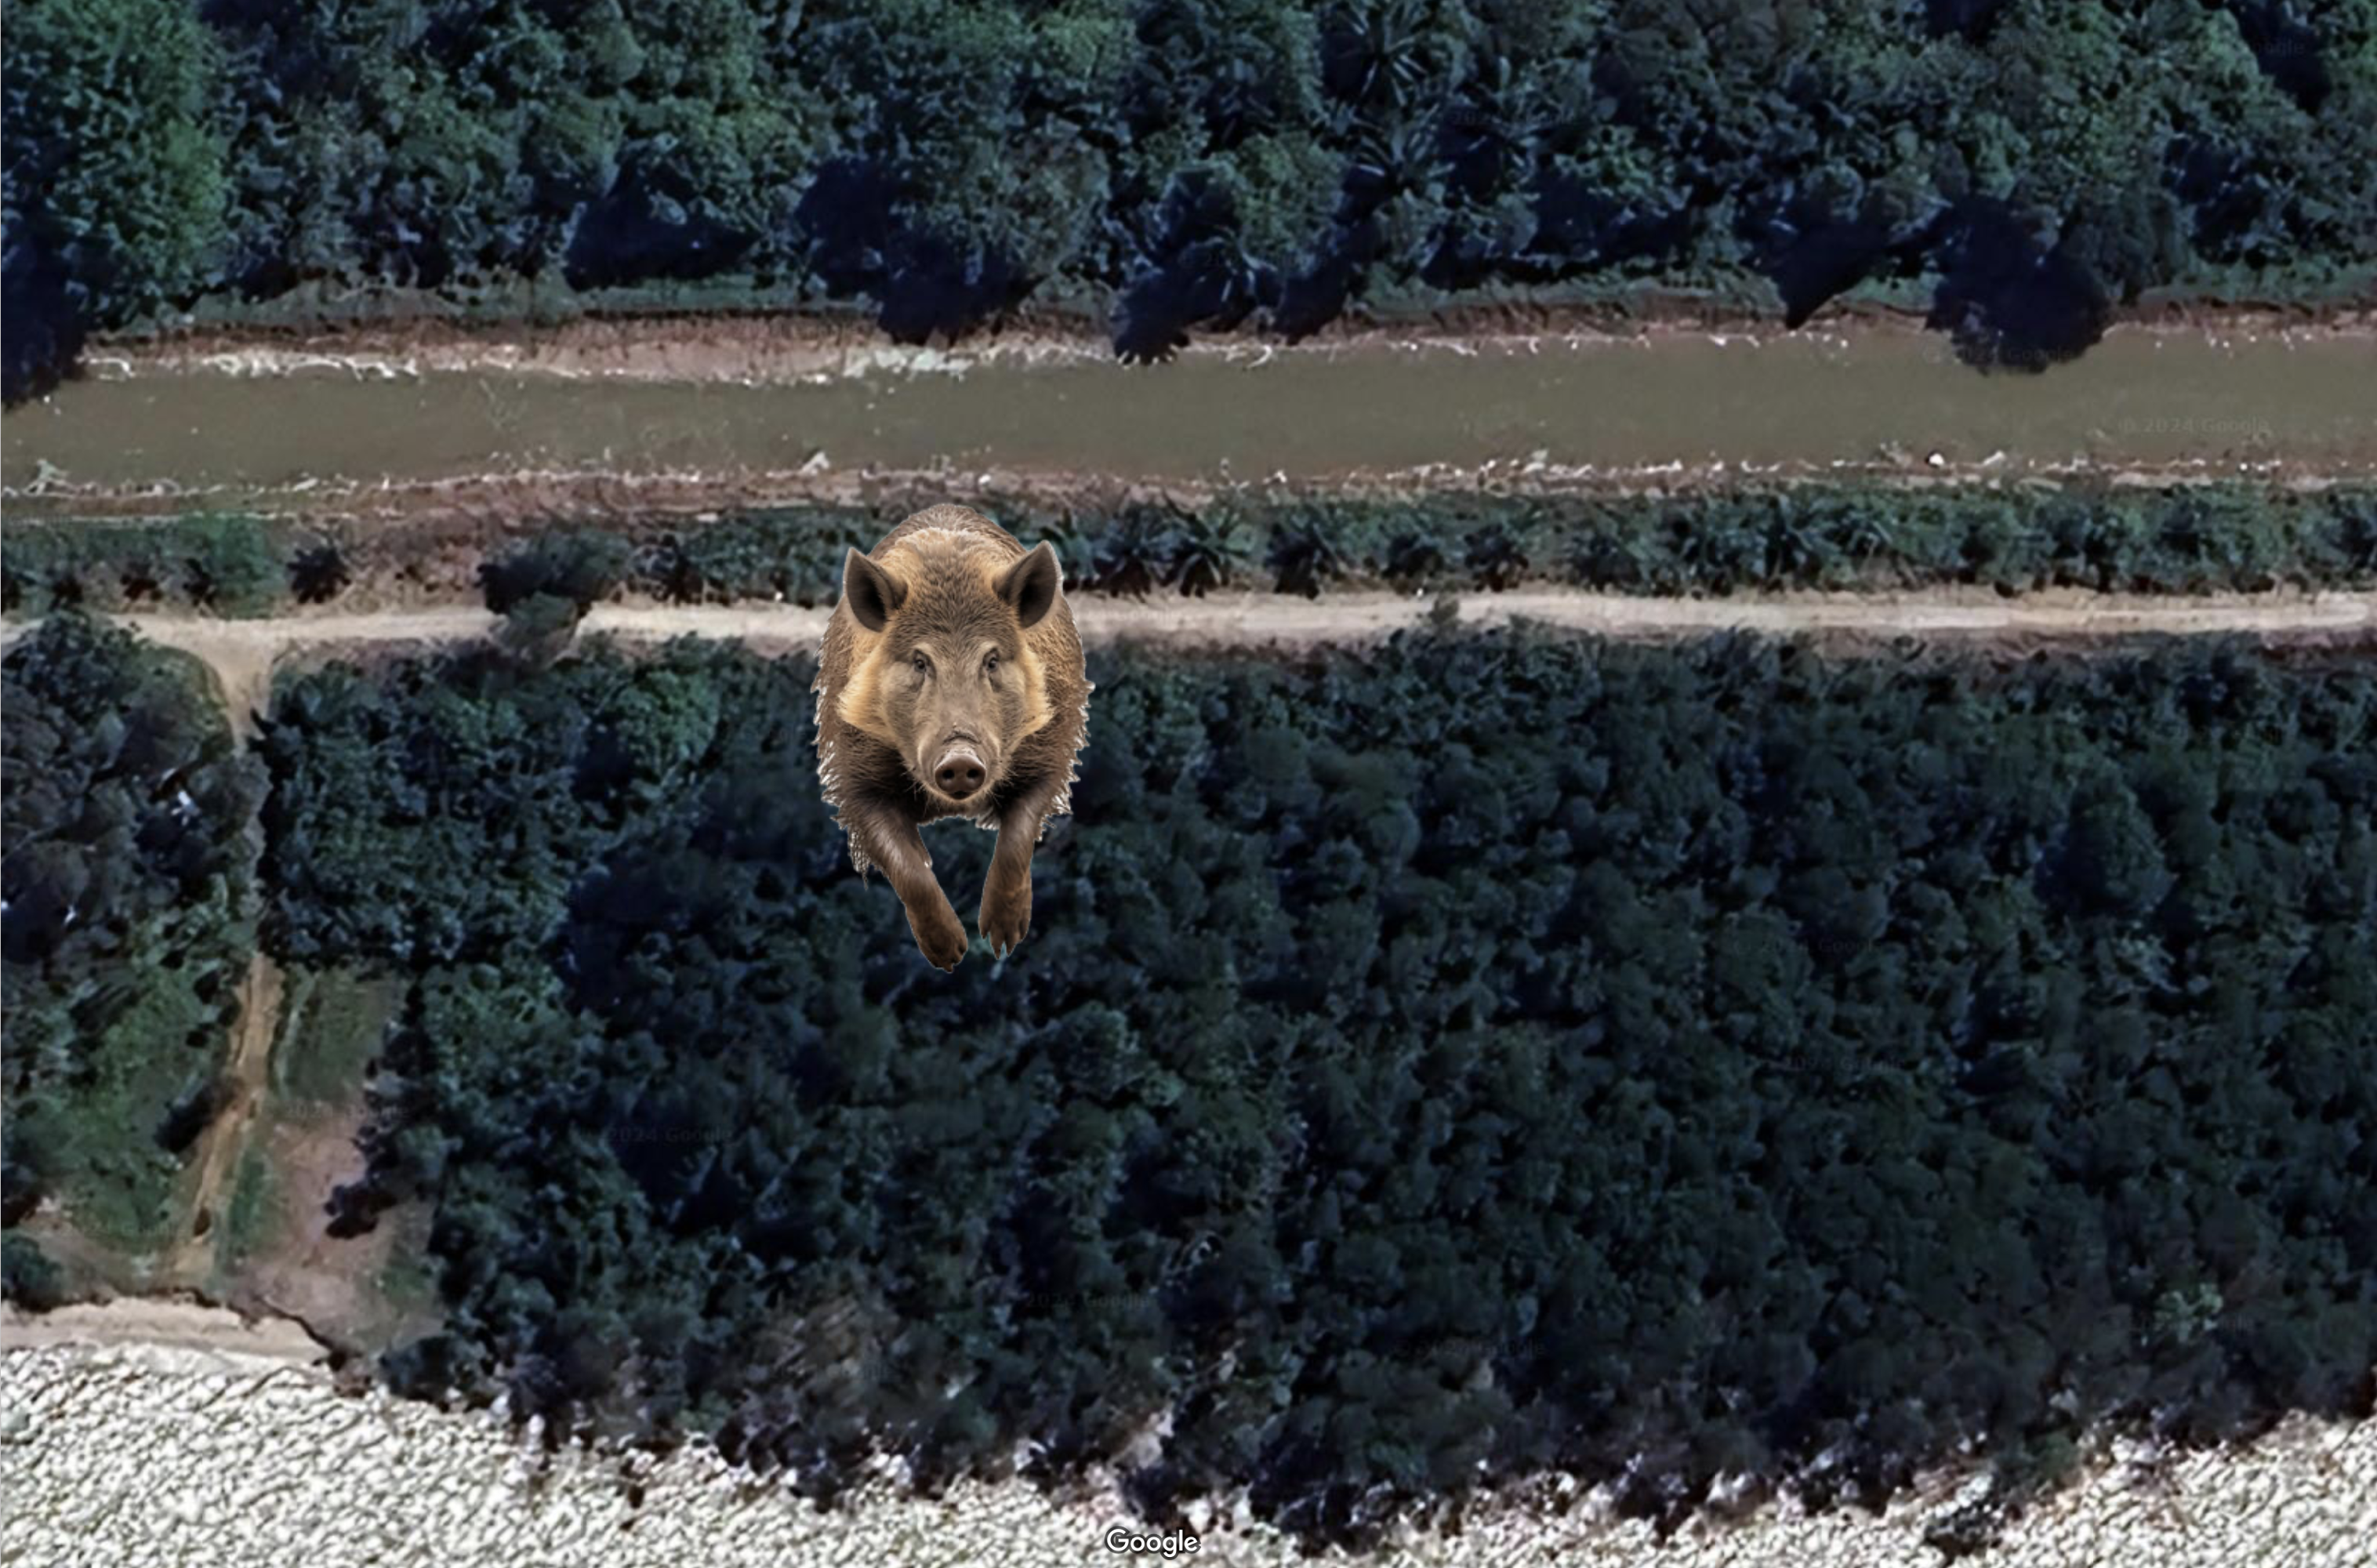
I was focused on avoiding the stones on the path when what looked like a rock rose into the air. That gave me a shock. More rocks took flight as I progressed along the trail. Birds were sleeping on the open ground. My post-ride research into the birds of the area identified the birds as being Blue-Breasted Quail.
Photograph courtesy of flickr.com
Just as I got used to birds flying up ahead, a dark shape shot out of the undergrowth in front of me. Before I knew it I was over the handlebar and on the ground. Whatever I hit disappeared without a sound.
Subsequent conversations with a few resort staff identified the animal as a wild boar. Hunting kept the wild boar population in check in the past. Today there is much less hunting and the wild boar population has increased.
I think the boar was drinking from the canal beside the path when I came along and disturbed it.
Map courtesy of google.com Photograph of wild boar courtesy of stock.adobe.com
I was on the ground just 3 km into my ride. The heels of both palms were scraped and bruised. The little finger of my right hand throbbed. Both of my wrists were sore. Other bumps and bruises would reveal themselves later. I am still sore and aching after three days.
I brushed the sand off my hands and knees. My right shifter had been pushed inward and clogged with sand when my bike hit the ground. I straightened the shifter and cleared out the sand. I was in the middle of nowhere. There was nothing else to do but pedal on.
1,200 metres later I reached down for my bidon. It wasn’t there. It must have fallen out of the bottle cage when my bicycle somersaulted.
I backtracked, hoping to find the bidon where I had hit the wild boar. I wasn’t sure where I had fallen so I rode until I was sure I had passed the crash site. I didn’t find my bidon. It must have landed in the undergrowth beside the trail.
Map courtesy of google.com
At kilometre 8.5 I got back onto the asphalt. My hands and wrists hurt, but not enough to dissuade me from continuing on my planned route. I came across a row of shops at kilometre 22. A 7-Eleven was open. I bought drinks, and plasters to dress the scrape on my left palm.
That is when my Biker Chick sent me a WhatsApp message asking “Did you forget your water bottle?”, accompanied by this photograph.
I was embarrassed at forgetting it, but happy that I still had a bidon. Onward to the Sungai Pelek ferry.
If only I could get to it. I rode through the housing area in Sungai Pelek toward the path that leads to the ferry as I had done many times before. Except this time access to that path was blocked by a construction site.
No signs were pointing toward a new route. I spent fifteen aimless minutes looking for the way to the ferry. Then a lady watering the plants at her front gate gave me the directions I needed.
The green line shows the new route to the ferry Map courtesy of ridewithgps.com
More gravel on the way to the ferry, but this time no startled quail and charging wild boar.
The sun was rising, and the rest of my ride was trouble-free.
I have been asked if my blog is about cycling or about eating. It is a fair question. Cycling and eating go hand-in-hand in my world and those of my cycling companions. Almost every ride includes a meal stop either mid-ride or after the ride.
Sometimes, the choice of café or restaurant is entirely opportunistic. We stop at the place that appeals most at that time. Other times, we have a food and/or drink stop in mind before we start riding. These are the regular stops along the routes I ride the most.
Psyclist Café
Psyclist Café is the preferred stop when we do loops up and down Persiaran Saujana. The café is in Dataran PHB, one floor up from street level. There is a bike rack at the entrance to the café. Once inside, it is obvious that the owner is a cycling buff. Vintage bicycles line the walls. Classic jerseys and bicycle components sit under the glass on the long table.
The food and the coffee are delicious. The staff are attentive and friendly. The last time we went there we were given cold towels to wipe our faces Very nice.
Tingkat 1, Block F Dataran PHB, Saujana Resort, Seksyen U2, 40150 Shah Alam
Monday – Saturday: 8:00 am – 8:00 pm Sunday: 8:00 am – 2:00 pm
Common Man
Common Man Coffee Roasters (CMCR) is a café concept and specialty coffee brand established in Singapore in 2013. CMCR works directly with farmers, millers, roasters and exporters. CMCR has its own Roastery and Barista Academy and operates 6 cafés in Singapore, 2 in Malaysia and 2 in Manila.
The CMCR café we go to is in Taman Tun. There is no bike rack, but there is a lot of space outside the café for bicycles. CMCR aims to provide the best brunch in town. This café does not disappoint in that regard.
A-G-1 New Podium, Plaza Vads, 1 Jalan Tun Mohd Fuad. 60000 Kuala Lumpur
Monday – Friday: 8:00 am – 5:00 pm Saturday – Sunday: 8:00 am – 6:00 pm (last orders at 5:30 pm)
Street Bakers
On the other side of the city centre is Street Bakers. Street Bakers is an outdoor roadside stall only open on Saturdays and Sundays. It is no ordinary roadside stall. Run by a master baker and her family, Street Bakers offers croissants, muffins, cookies, cakes, sweet and savoury pies, sausage rolls, hot sandwiches, lasagna and a few other delicious eats. Sip Spot next door provides coffee and tea.
We lean our bicycles in a convenient spot and sit at tables under the trees. Very pleasant.
There is the occasional weekend when Street Bakers is not open. Check their Instagram page at https://www.instagram.com/streetbakers23/ to see if they will be open that weekend, and to see that weekend’s menu.
Roadside stall between Masjid Al-Mardhiyah and Bulatan Hillside, Jalan Taman Melawati, Taman Melawati, Kuala Lumpur
Saturday and Sunday: 8:00 am – 1:00 pm
AMP Café
Immediately south of Street Bakers is AMP Café. AMP Café is relatively new. One of my cycling buddies is a trained chef. He designed the menu and helped set up this café. AMP Café has become very popular in the short time it has been operating. I was there this morning. Most of the tables, both inside and outside, were occupied. There was also a steady stream of delivery riders picking up orders. Good to see.
The food and coffee are delicious. Much of what this café serves is made from scratch. Items like their nut butter, ricotta cheese, chicken patties and, of course, all their baked goods.
65 Jalan Memanda 9, Taman Dato Ahmad Razali, 68000 Ampang
Monday – Sunday: 8:00 am – 6:00 pm
If Only
Closer to home is If Only Restaurant. I regularly ride past If Only on my solo rides from my apartment.
Excellent coffee and pastries are available from 7:00 am. The beetroot and the tomato Danish are worth ordering. The kitchen opens at 9:00 am. I have had some items from the breakfast menu. Also very good.
Ground floor, Regal House, 1, Jalan U Thant, Taman U Thant, 55000 Kuala Lumpur
Sunday – Monday: 7:00 am – 6:00 pm Tuesday – Saturday: 7:00 am – 11:00 pm The kitchen opens at 9:00 am
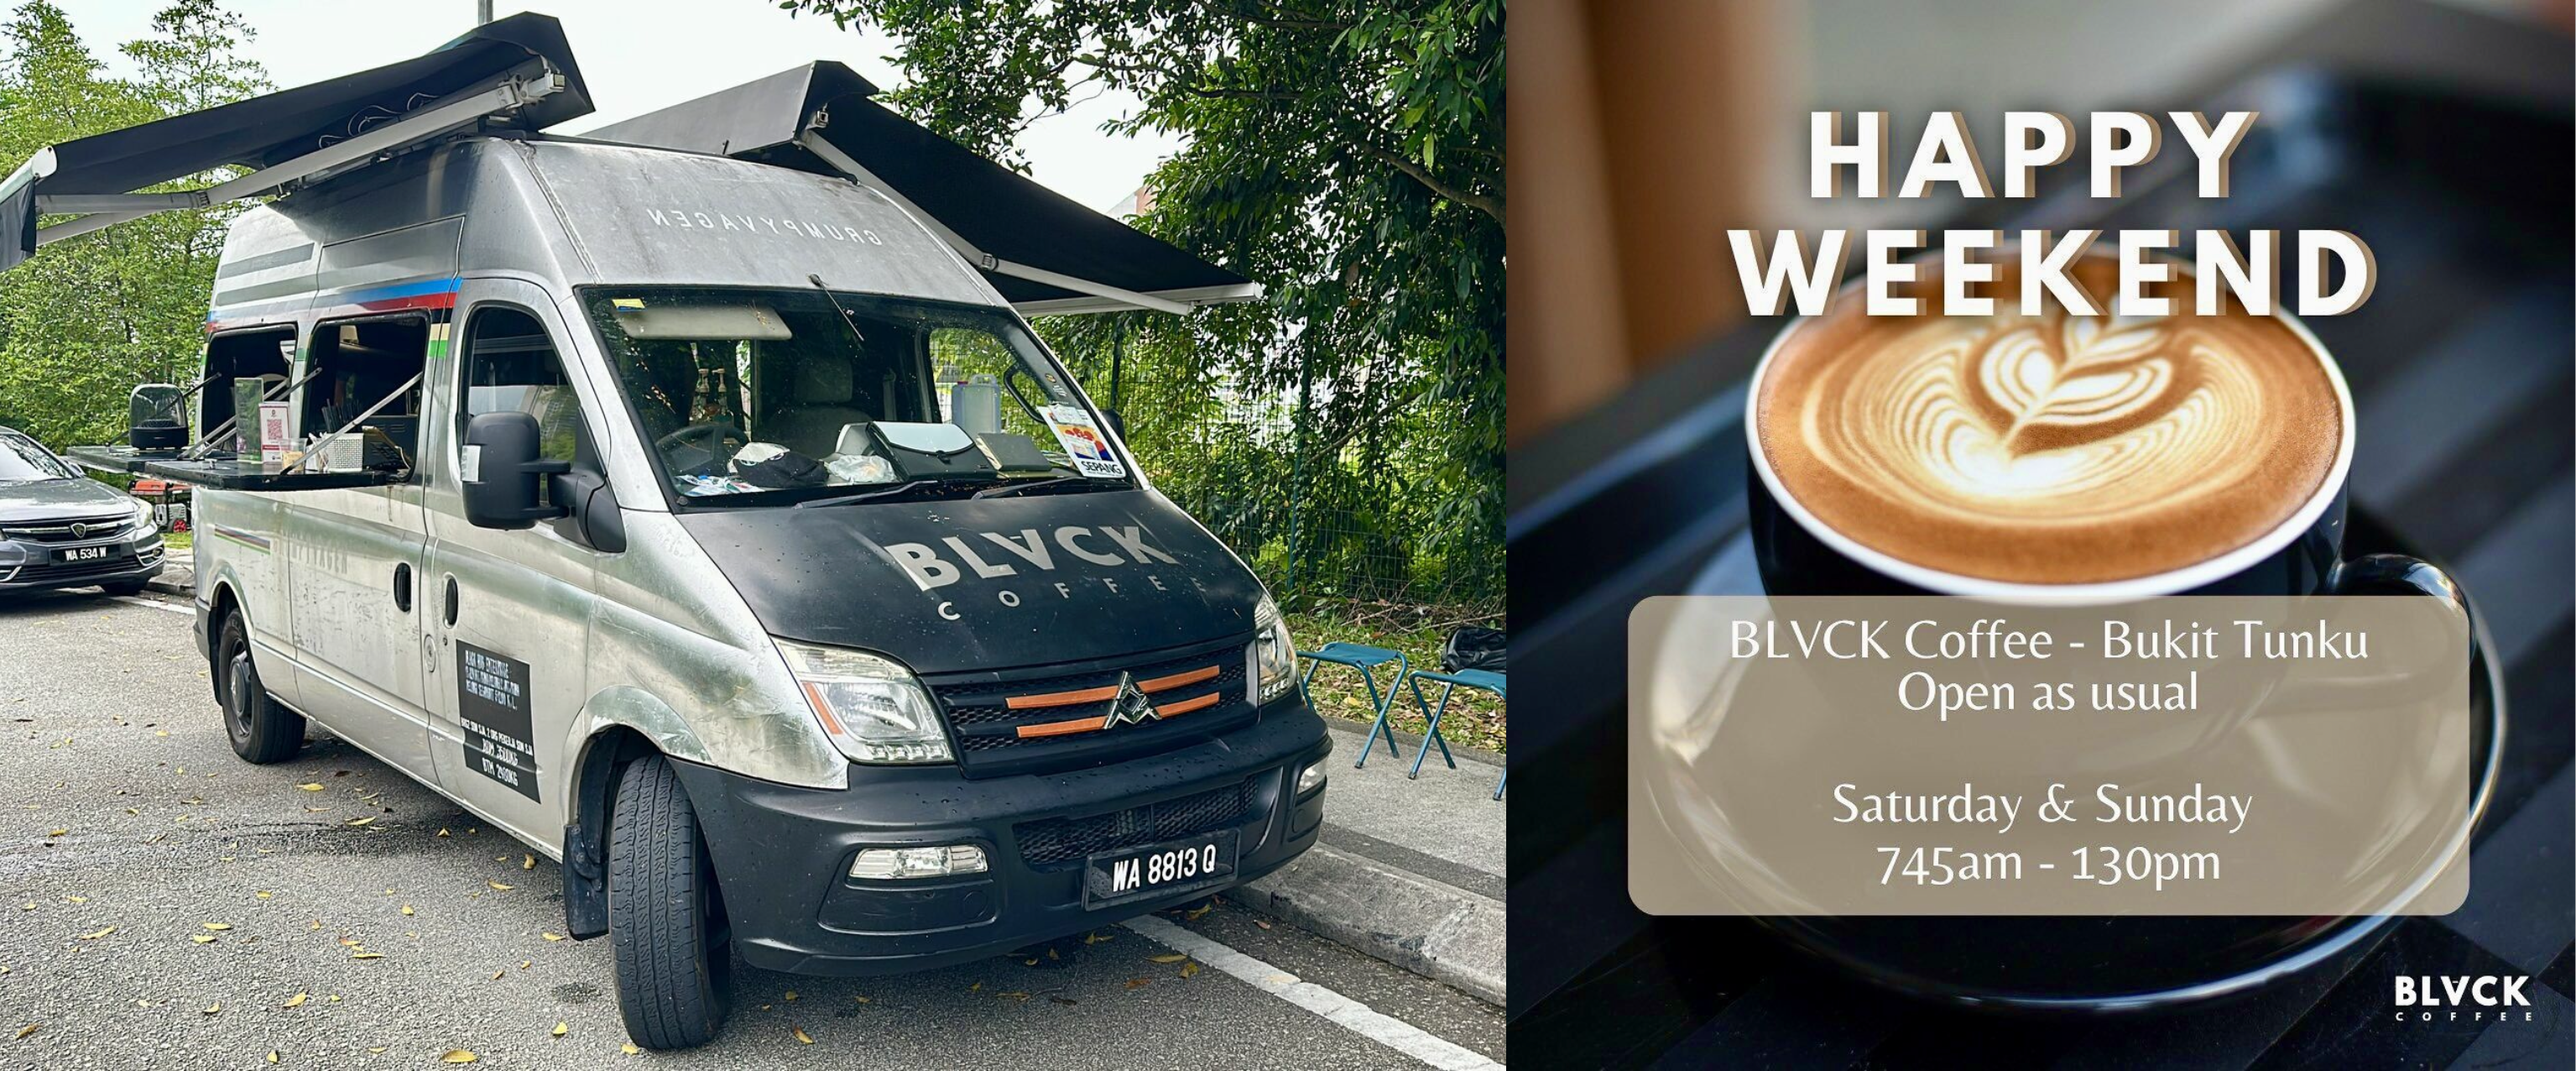
BLVCK Coffee
This coffee van is parked on weekends at the T-junction of Jalan Tun Ismail and Jalan Tunku. The van sits at the top of a hill, so a climb is required to get to it. It is on my route home whenever I ride to Sri Hartamas or Damansara Heights. A caffeine hit 3 km from home hits the spot.
I stop there for a latte, but they serve a variety of hot brewed and cold bottled coffees. You can usually relax in one of the seats set up on the pavement. Failing that, the curb is high enough to sit on.
The posted operating time is from 7:45 am, but the van has been known to be late. The van can also be reserved for special events, so it might not turn up.
Bukit Tunku. Jalan Tun Ismail 1, Bukit Tunku , Kuala Lumpur, Malaysia, 50480
Saturday and Sunday: 7:45 am – 1:30 pm
RGB
RGB (Really Good Beans) has been in their renovated bungalow for at least eight years. RGB serves a substantial Asian and Western breakfast menu until 2:00 pm. The coffee there lives up to the Really Good Beans moniker.
Another plus is the covered bike rack. There are usually other cyclists there, so you don’t feel out of place in your lycra and cycling shoes.
35, Jalan Damai, Kampung Datuk Keramat, 55000 Kuala Lumpur
Monday – Sunday: 8:00 am – 5:00 pm
Crema
The last café on my list is also the closest to home. Crema is 160 metres away. In the daytime, it is Crema Pasticceria Moderna. Serving croissants, panini, egg dishes, amazing pastries, and Italian coffee and sodas. The pastry selection alone is sufficient reason to stop at Crema.
There is a lunch menu of more substantial dishes. Plenty of ceiling fans keep the outdoor terrace cool.
There isn’t a bike rack, but as you can see, there are pillars and trees to lean your bicycle against. In the evening, the space becomes Florentine, an Italian steak house. The food is delicious no matter what time you eat there.
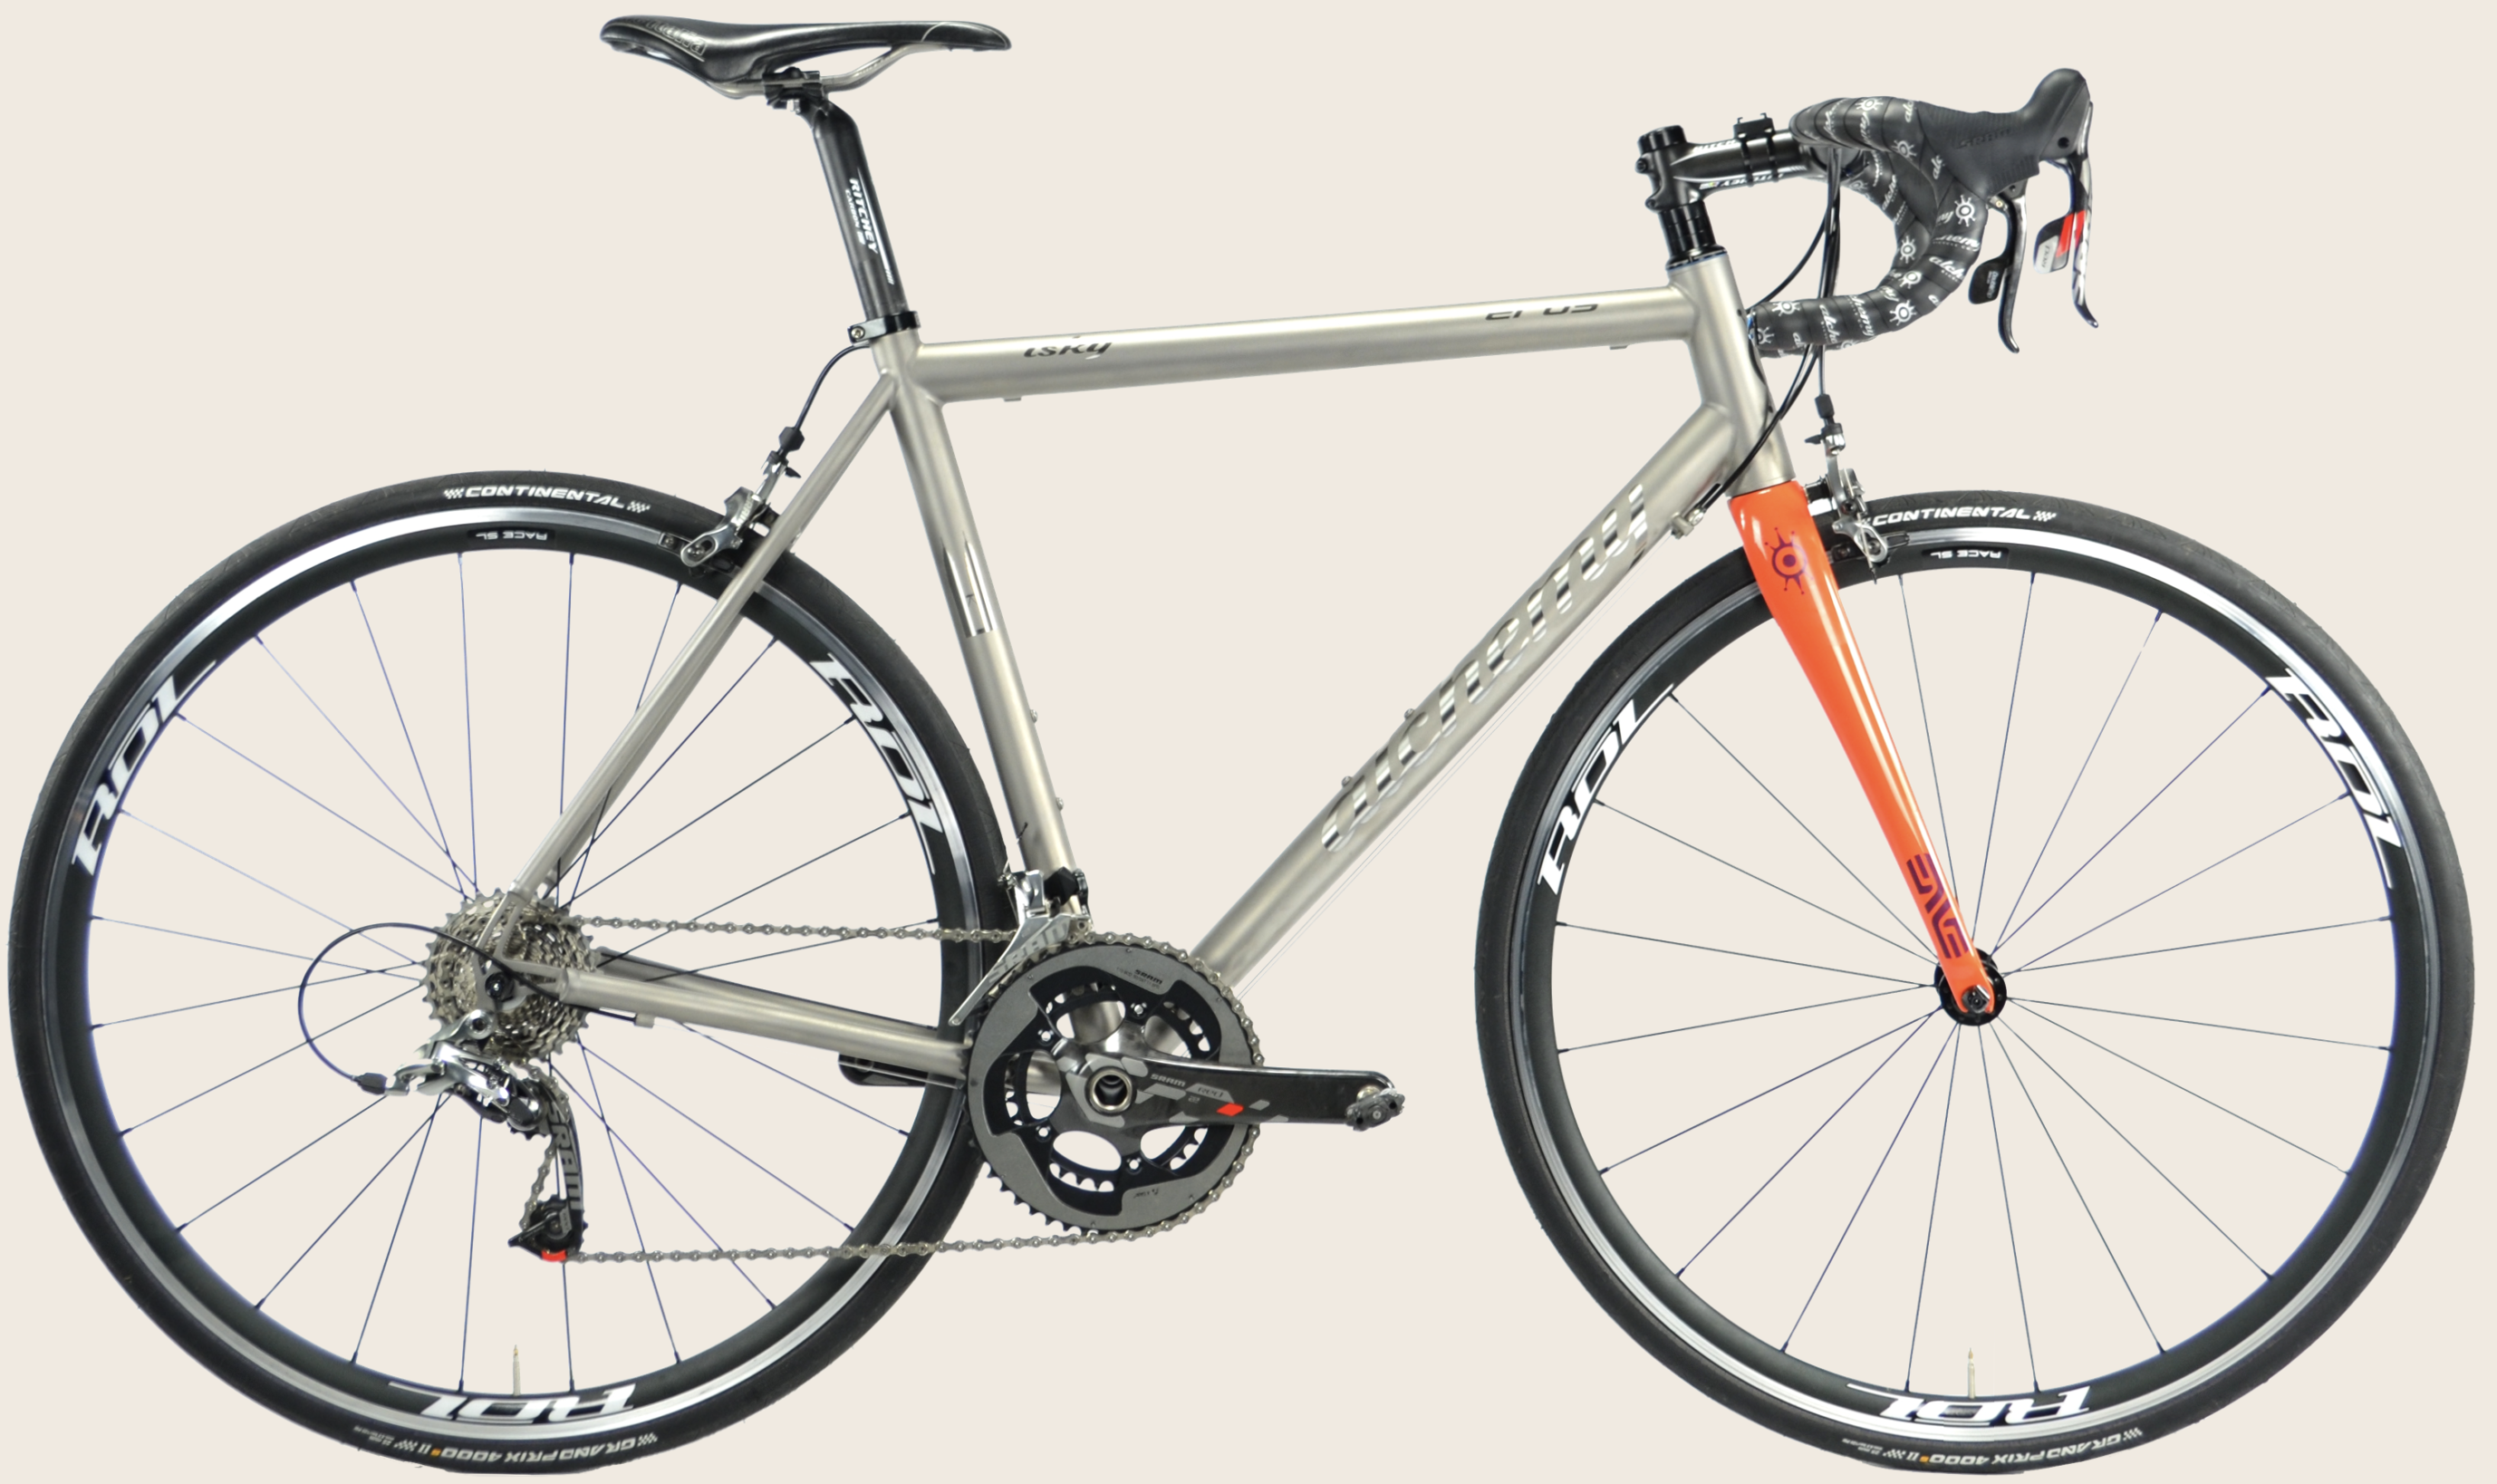
That post came after I had to replace a worn cassette on my Alchemy Eros. I replaced another worn cassette about four years ago and had to replace another this week.
Photograph courtesy of alchemybikes.com
As with the previous replacements, the need to replace this cassette came after installing a new chain. Chains with just 1% of wear should be replaced. My chain was well beyond 1% of wear. Anything more than 1% chain wear and the cassette is probably already damaged.
Chain wear is often called chain stretch, but this is a misnomer. The side plates of a chain do not deform under pedalling forces. Rather, it is wear to the pins, bushes and rollers that causes the distance between the pins to increase, thus giving the illusion of stretch.
This diagram shows A. pin/bushing wear and C. bushing/roller wear. B shows an unworn chain. In short, chain wear is indicated by increasing spacing between pins. Note that roller wear does not affect pin spacing.
The guys at my LBS told me I would probably need to change the cassette. That need was confirmed during my short ride home when the chain started skipping over the teeth of my most-used sprockets. The rollers of the new chain were not meshing with the worn teeth on those sprockets.
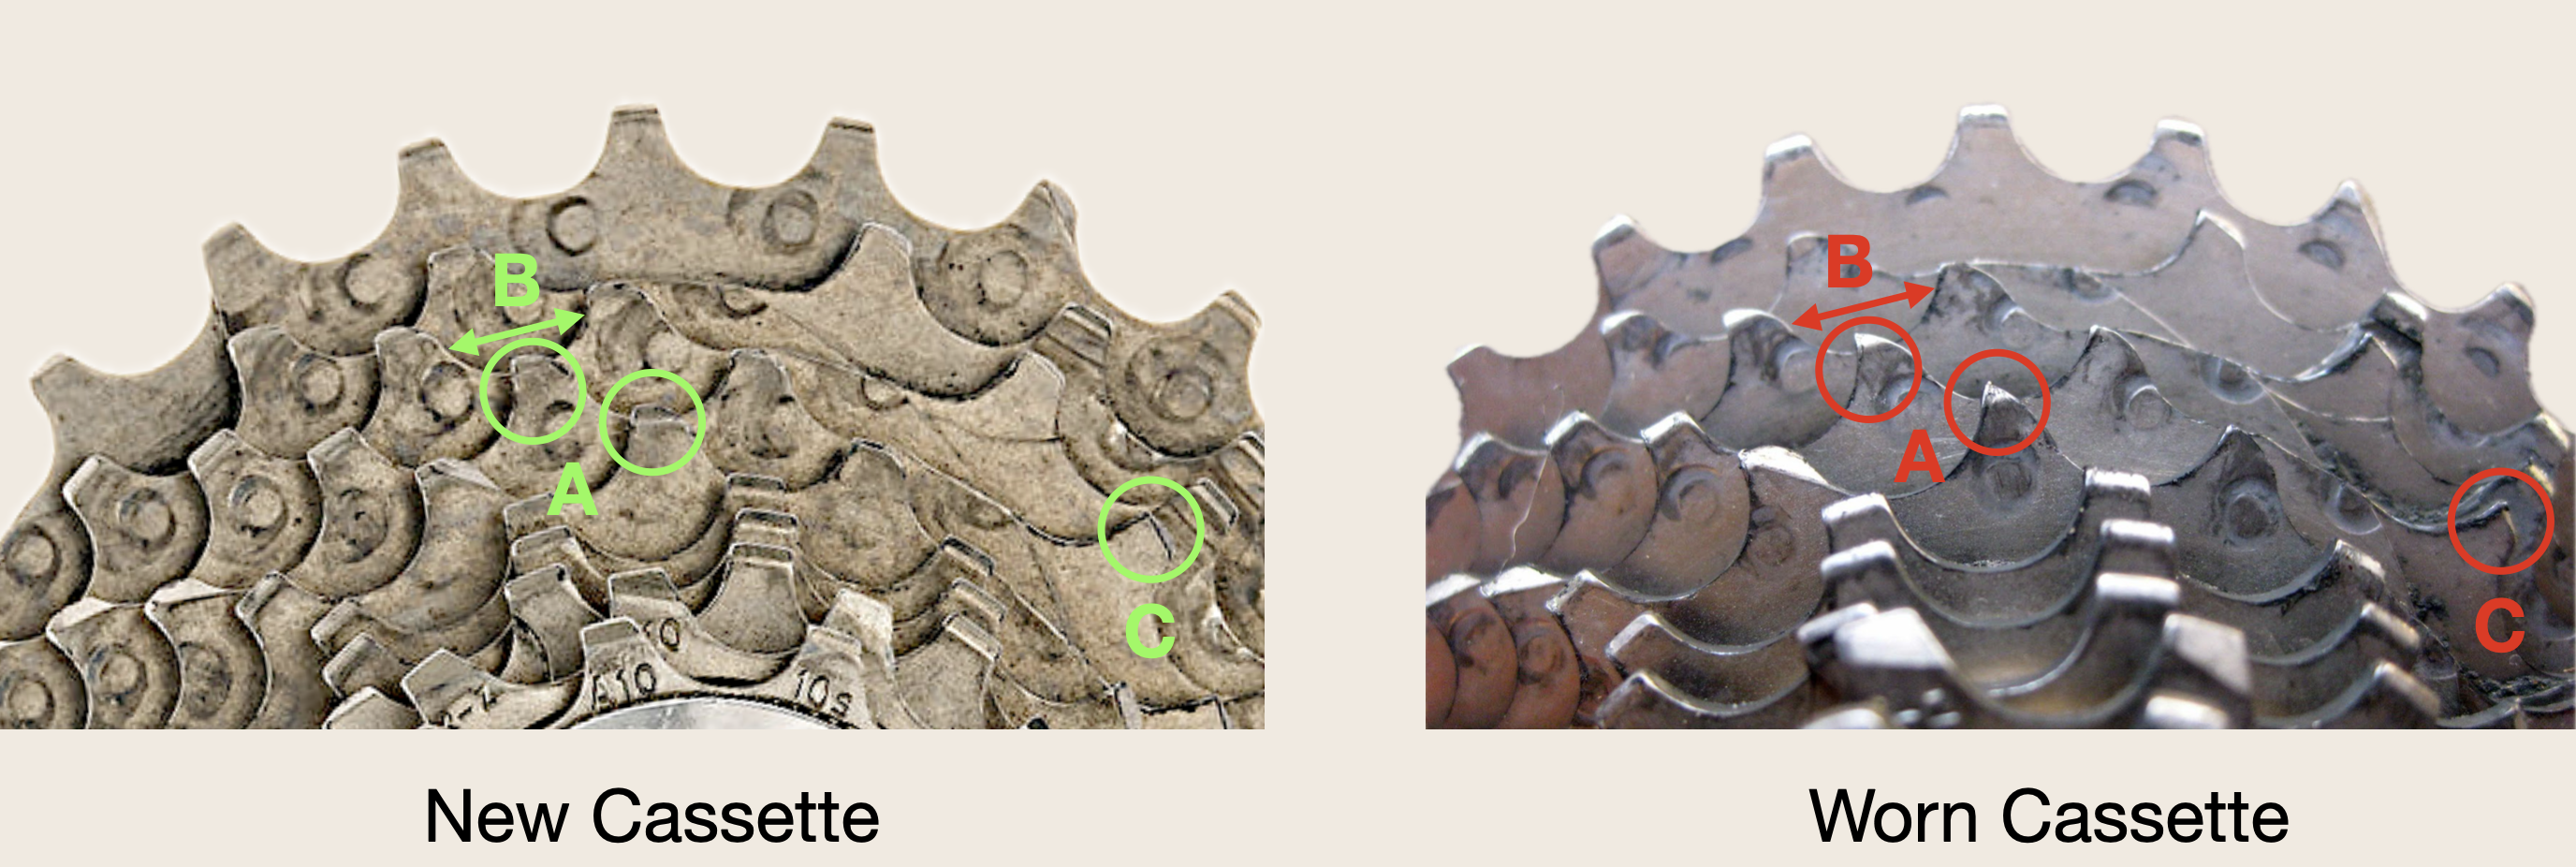
The photographs below show a new cassette on the left and a worn cassette on the right. Both cassettes are SRAM Red OG-1090s.
Photographs courtesy of theprocloset.com (left) and blogspot.com (right)
The two teeth in the green circles labelled A show a normal tooth profile. The red circles labelled A on the right show a phenomenon called “Shark Finning,” where the leading edge of a cog tooth curves inwards, making it resemble a shark’s dorsal fin. In time, this erodes the top of the tooth and causes the chain to skip.
As mentioned above, wear to the pins, bushes and rollers causes the distance between the pins to increase. As the gap between the pins, bushes and rollers widens, the ongoing wear widens the space between teeth. You can see that the gap between the teeth, shown by the red arrow labelled B, is wider than the equivalent gap, shown by the green arrow B. The narrower gap between the pins, bushes and rollers on a new chain means that the new chain rides up the sides of each tooth. The chain has less grip on the teeth and skips.
The third sign of wear is the leading edge of teeth that are mushrooming out a little. That’s from the metal being rubbed down and compressed by the chain. Think of it like a roll of cookie dough. If you slap it down on the table, the bottom will spread out, but the top will remain intact. The metal of the cassette acts the same way.
I didn’t need to see these signs of wear to know I had to replace the cassette. The skipping on the two sprockets I used the most was all the evidence I needed to spend money.
The strain on the wallet didn’t end there. The LBS guys told me I also had to replace the chainrings. I should have seen that coming. The combination of putting almost 60,000 km on them with a succession of chains in varying states of wear would lead to eroded teeth.
The challenge was to find replacement parts. My 2015 Eros has a SRAM 11-speed groupset. Groupsets today have 12 or 13 speeds. SRAM 11-speed 11-32 tooth cassettes are getting harder to find. My LBS didn’t have SRAM 11-speed 52-tooth outer and 34-inner chainrings in stock either. Fortunately, I have a son living in Australia. I put him on the case, and he got all three parts for me.
Photographs courtesy of SRAM (chainrings), evobikes.co.za (cassette) and excelsports.com (chain)
The general rule of thumb is that a chain needs replacing after 3,200 km to 4,800 km. A cassette needs replacing after three chain replacements, i.e. after 9,600 km to 14,400 km. There is less of a consensus about chainring lifespan. 60,000 km seems a reasonable expectation.
I will pay more attention to chain wear than I have in the past 😄. In the meantime, I will enjoy the silent running of my brand-new drivetrain.
Escape Collective was founded in March 2023 to be the best bike website on the internet. The history of Escape Collective goes much further back.
In 2008 Wade Wallace started a cycling blog. Cycling Tips became a business Wade ran from his kitchen table until 2013.
Logo courtesy of wildermedia.com
In early 2013 Wade moved the business into a small office and hired his first employees. Cycling Tips quickly became a daily destination for cycling enthusiasts around the globe. Each year millions of people visited the site. In 2015 he entered into a partnership with BikeExchange. That partnership provided capital to grow the Cycling Tips business. In 2019 BikeExchange sold the site to PinkBike. Wade remained as general manager. In June 2021 Pinkbike, including Cycling Tips, was bought by Outside Inc.
That was the start of the end for Cycling Tips. Wade left Outside Inc. in August 2022. By the end of 2022, at least a dozen Cycling Tips staffers were either let go or resigned, with others close behind. By 2023 Cycling Tips has essentially disappeared as a brand. It is now a part of Velo, an Outside Inc. brand.
Wade and Caley Fretz, the former editor-in-chief of Cycling Tips, co-founded Escape Collective in March 2023. To be the “best bike website on the internet.” Many ex-Cycling Tips staffers are on the Escape Collective team.
A key differentiator is that Escape Collective is entirely subscriber-funded. Escape Collective does not accept advertising dollars, which allows them to be independent of the cycling industry whose sponsorships, products, and athletes they aim to cover with honesty and integrity.
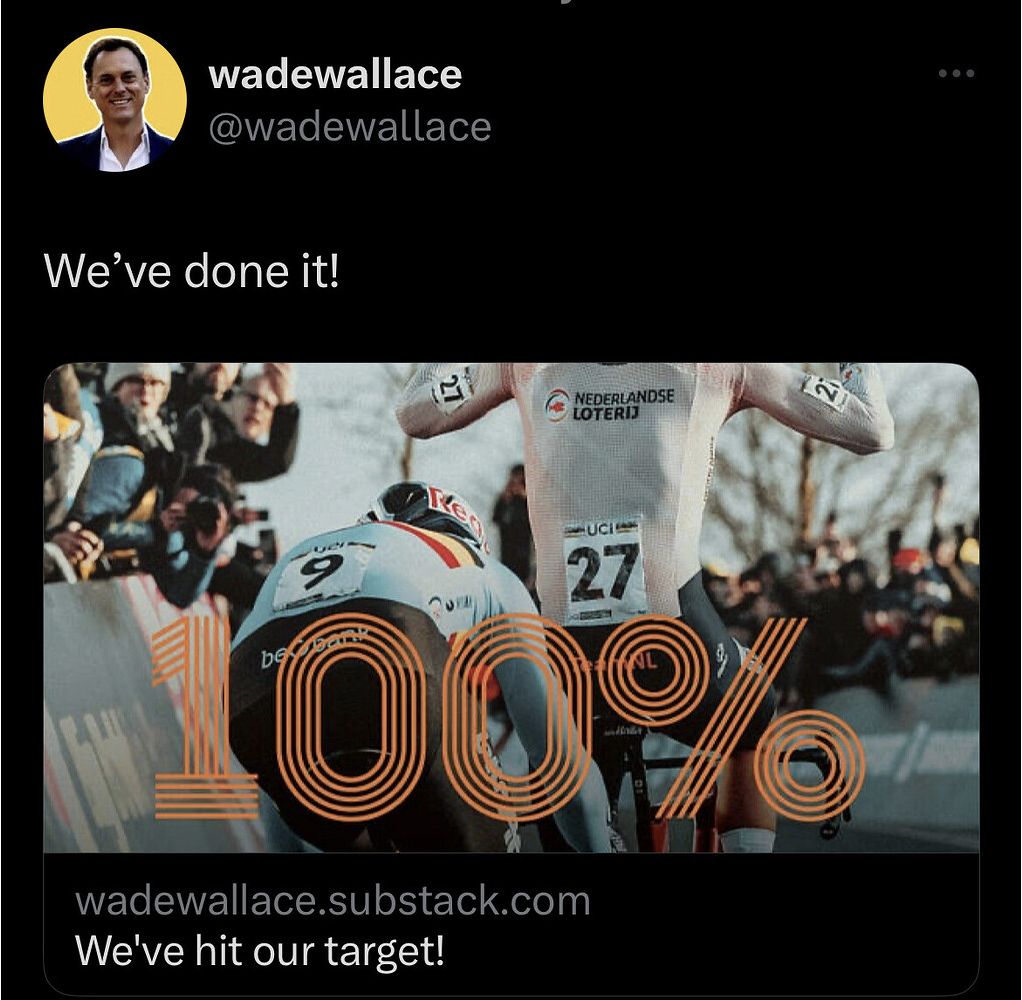
The Escape Collective journey began with a crowdfunding campaign. The goal was to get 5,000 members. They hit their member target in less than a week.
Image courtesy of wade wallace.substack.com
Full disclosure. I am a Founder Member.
Image courtesy of escapecollective.com
It has been one year since Escape Collective launched. I think many members will agree that Escape Collective has lived up to its Mission statement:
To inform, inspire, entertain, connect, and improve the lives of people around the world through our common love of cycling and the power of the bike.
Visit the Escape Collective site to read, listen to and watch content from a long list of contributors that has let Escape Collective provide a wide range of content and services to inspire, educate, and entertain their members.
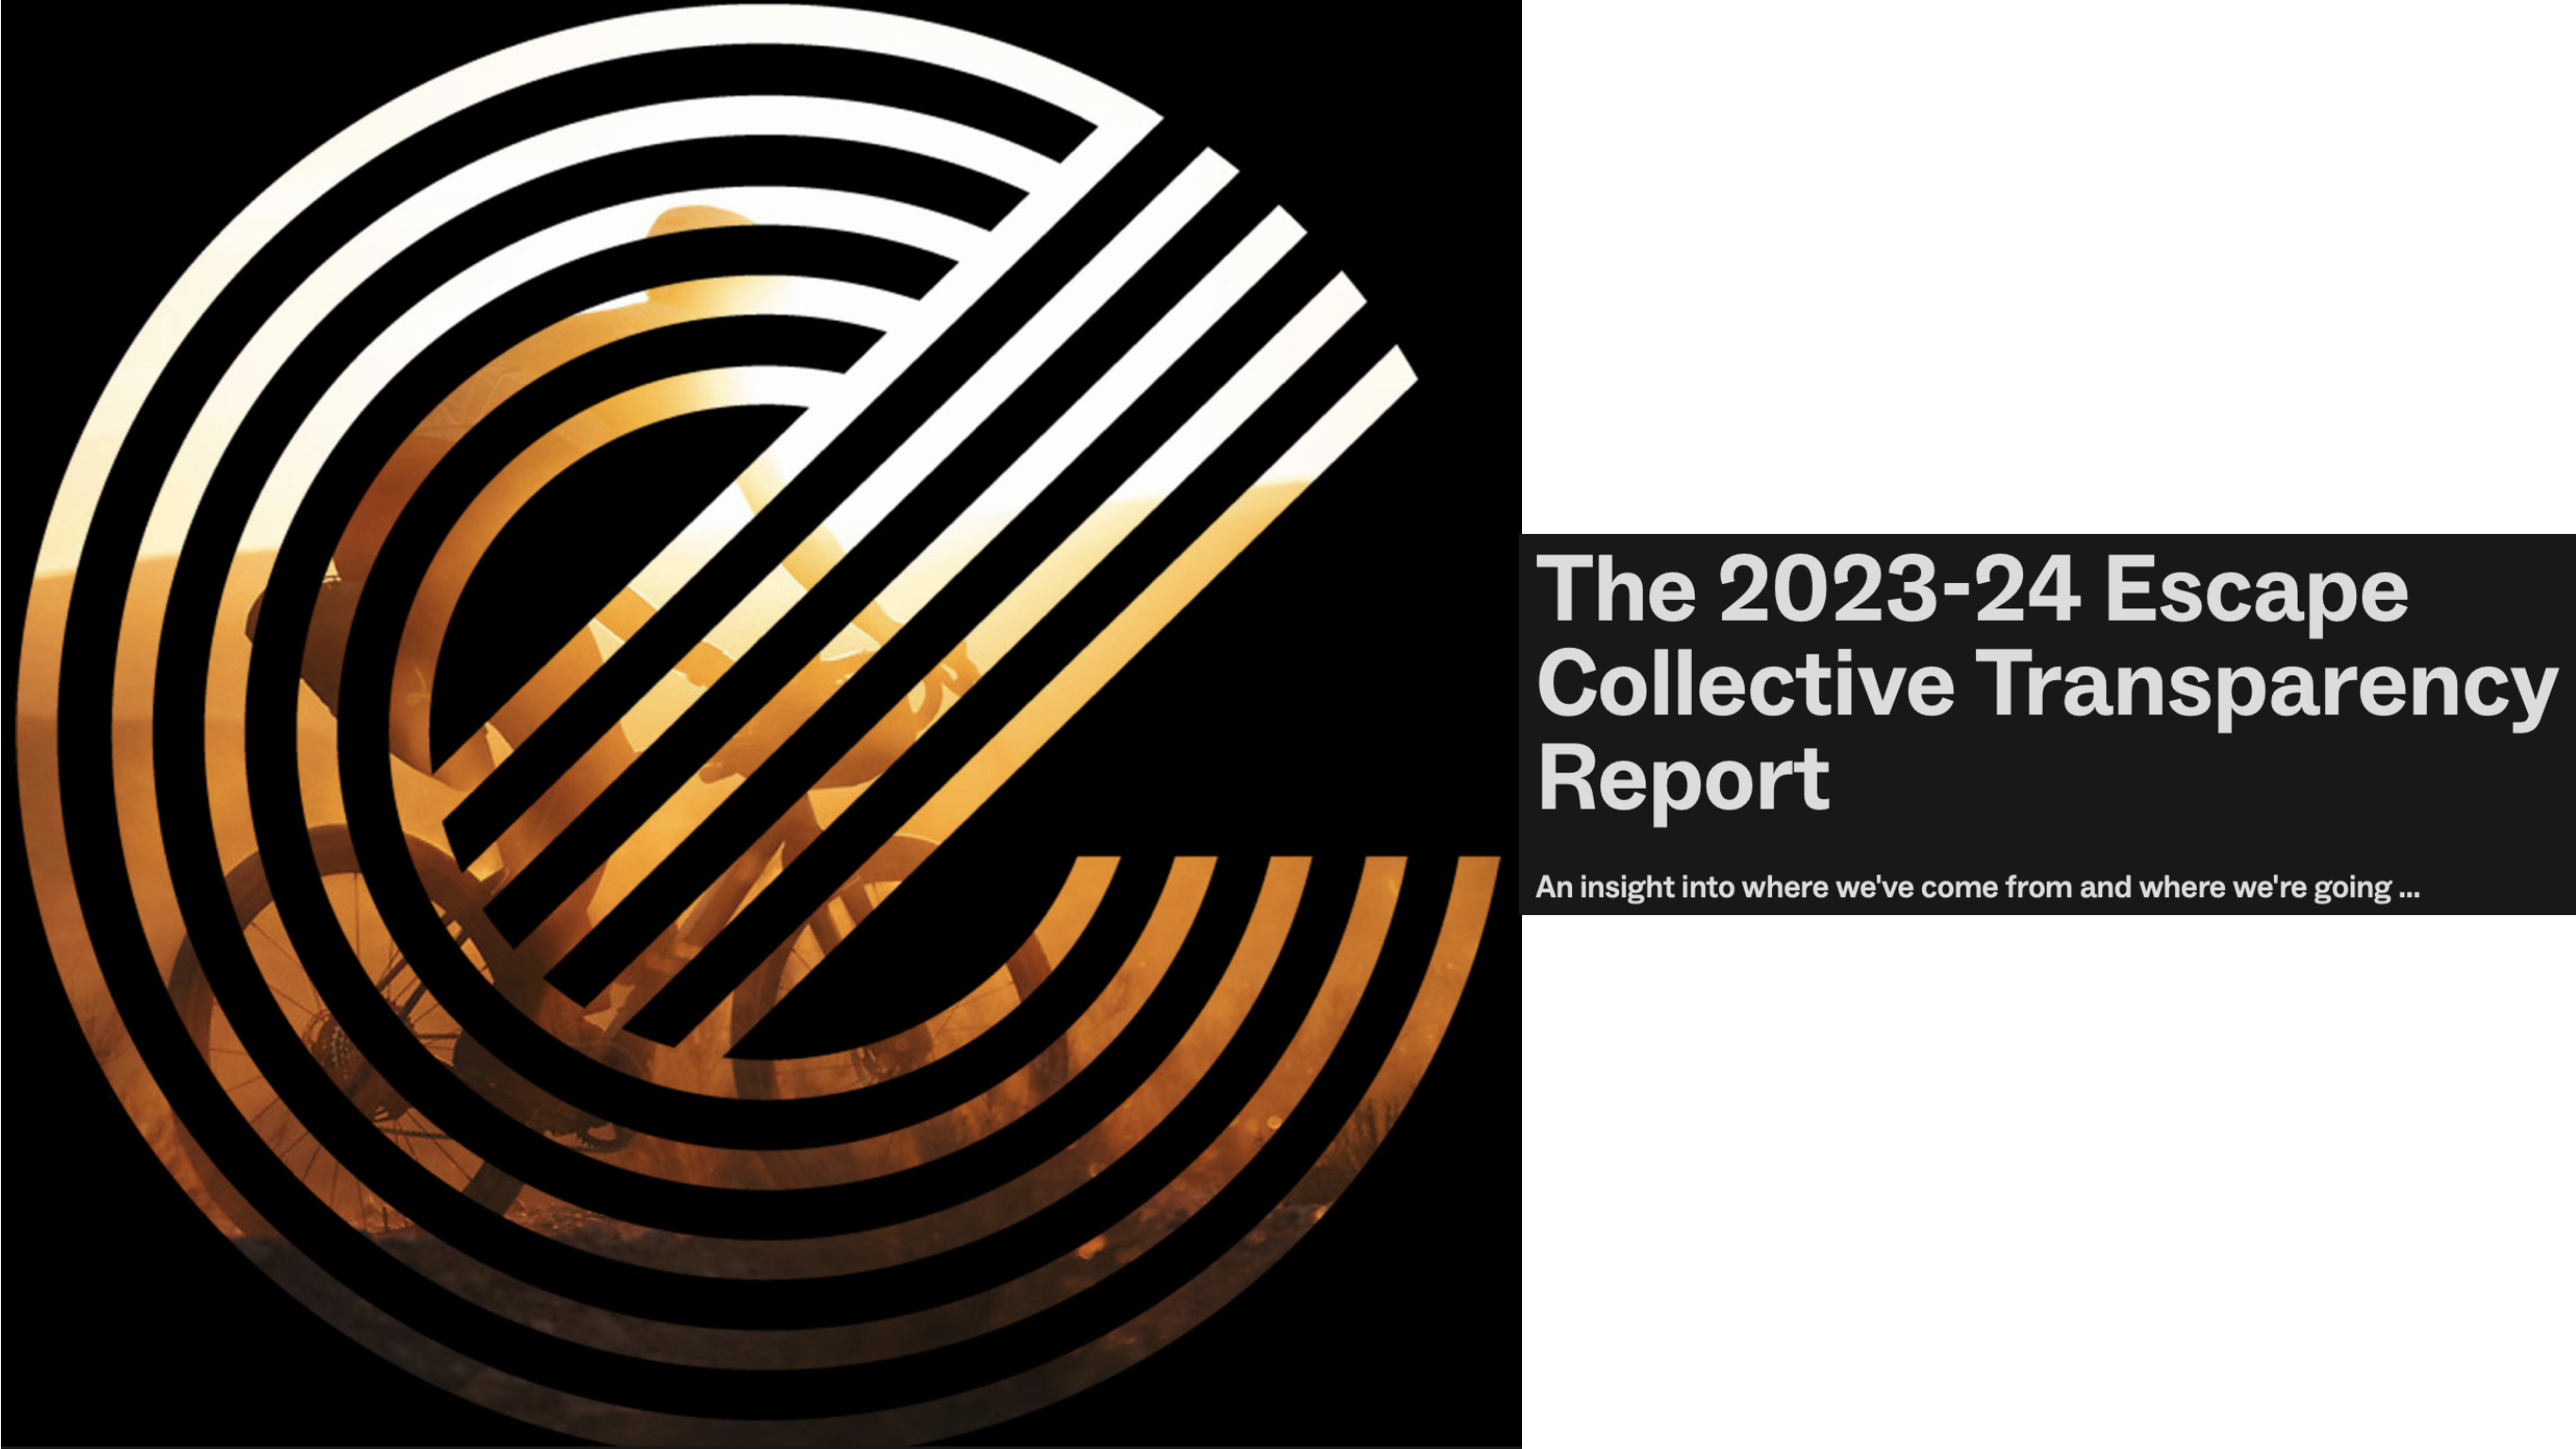
While there, you can read the 2023 – 2024 Escape Collective Transparency Report. A document that further differentiates Escape Collective from the multitude of cycling and cycling-related media available online.
Image courtesy of escapecollective.com
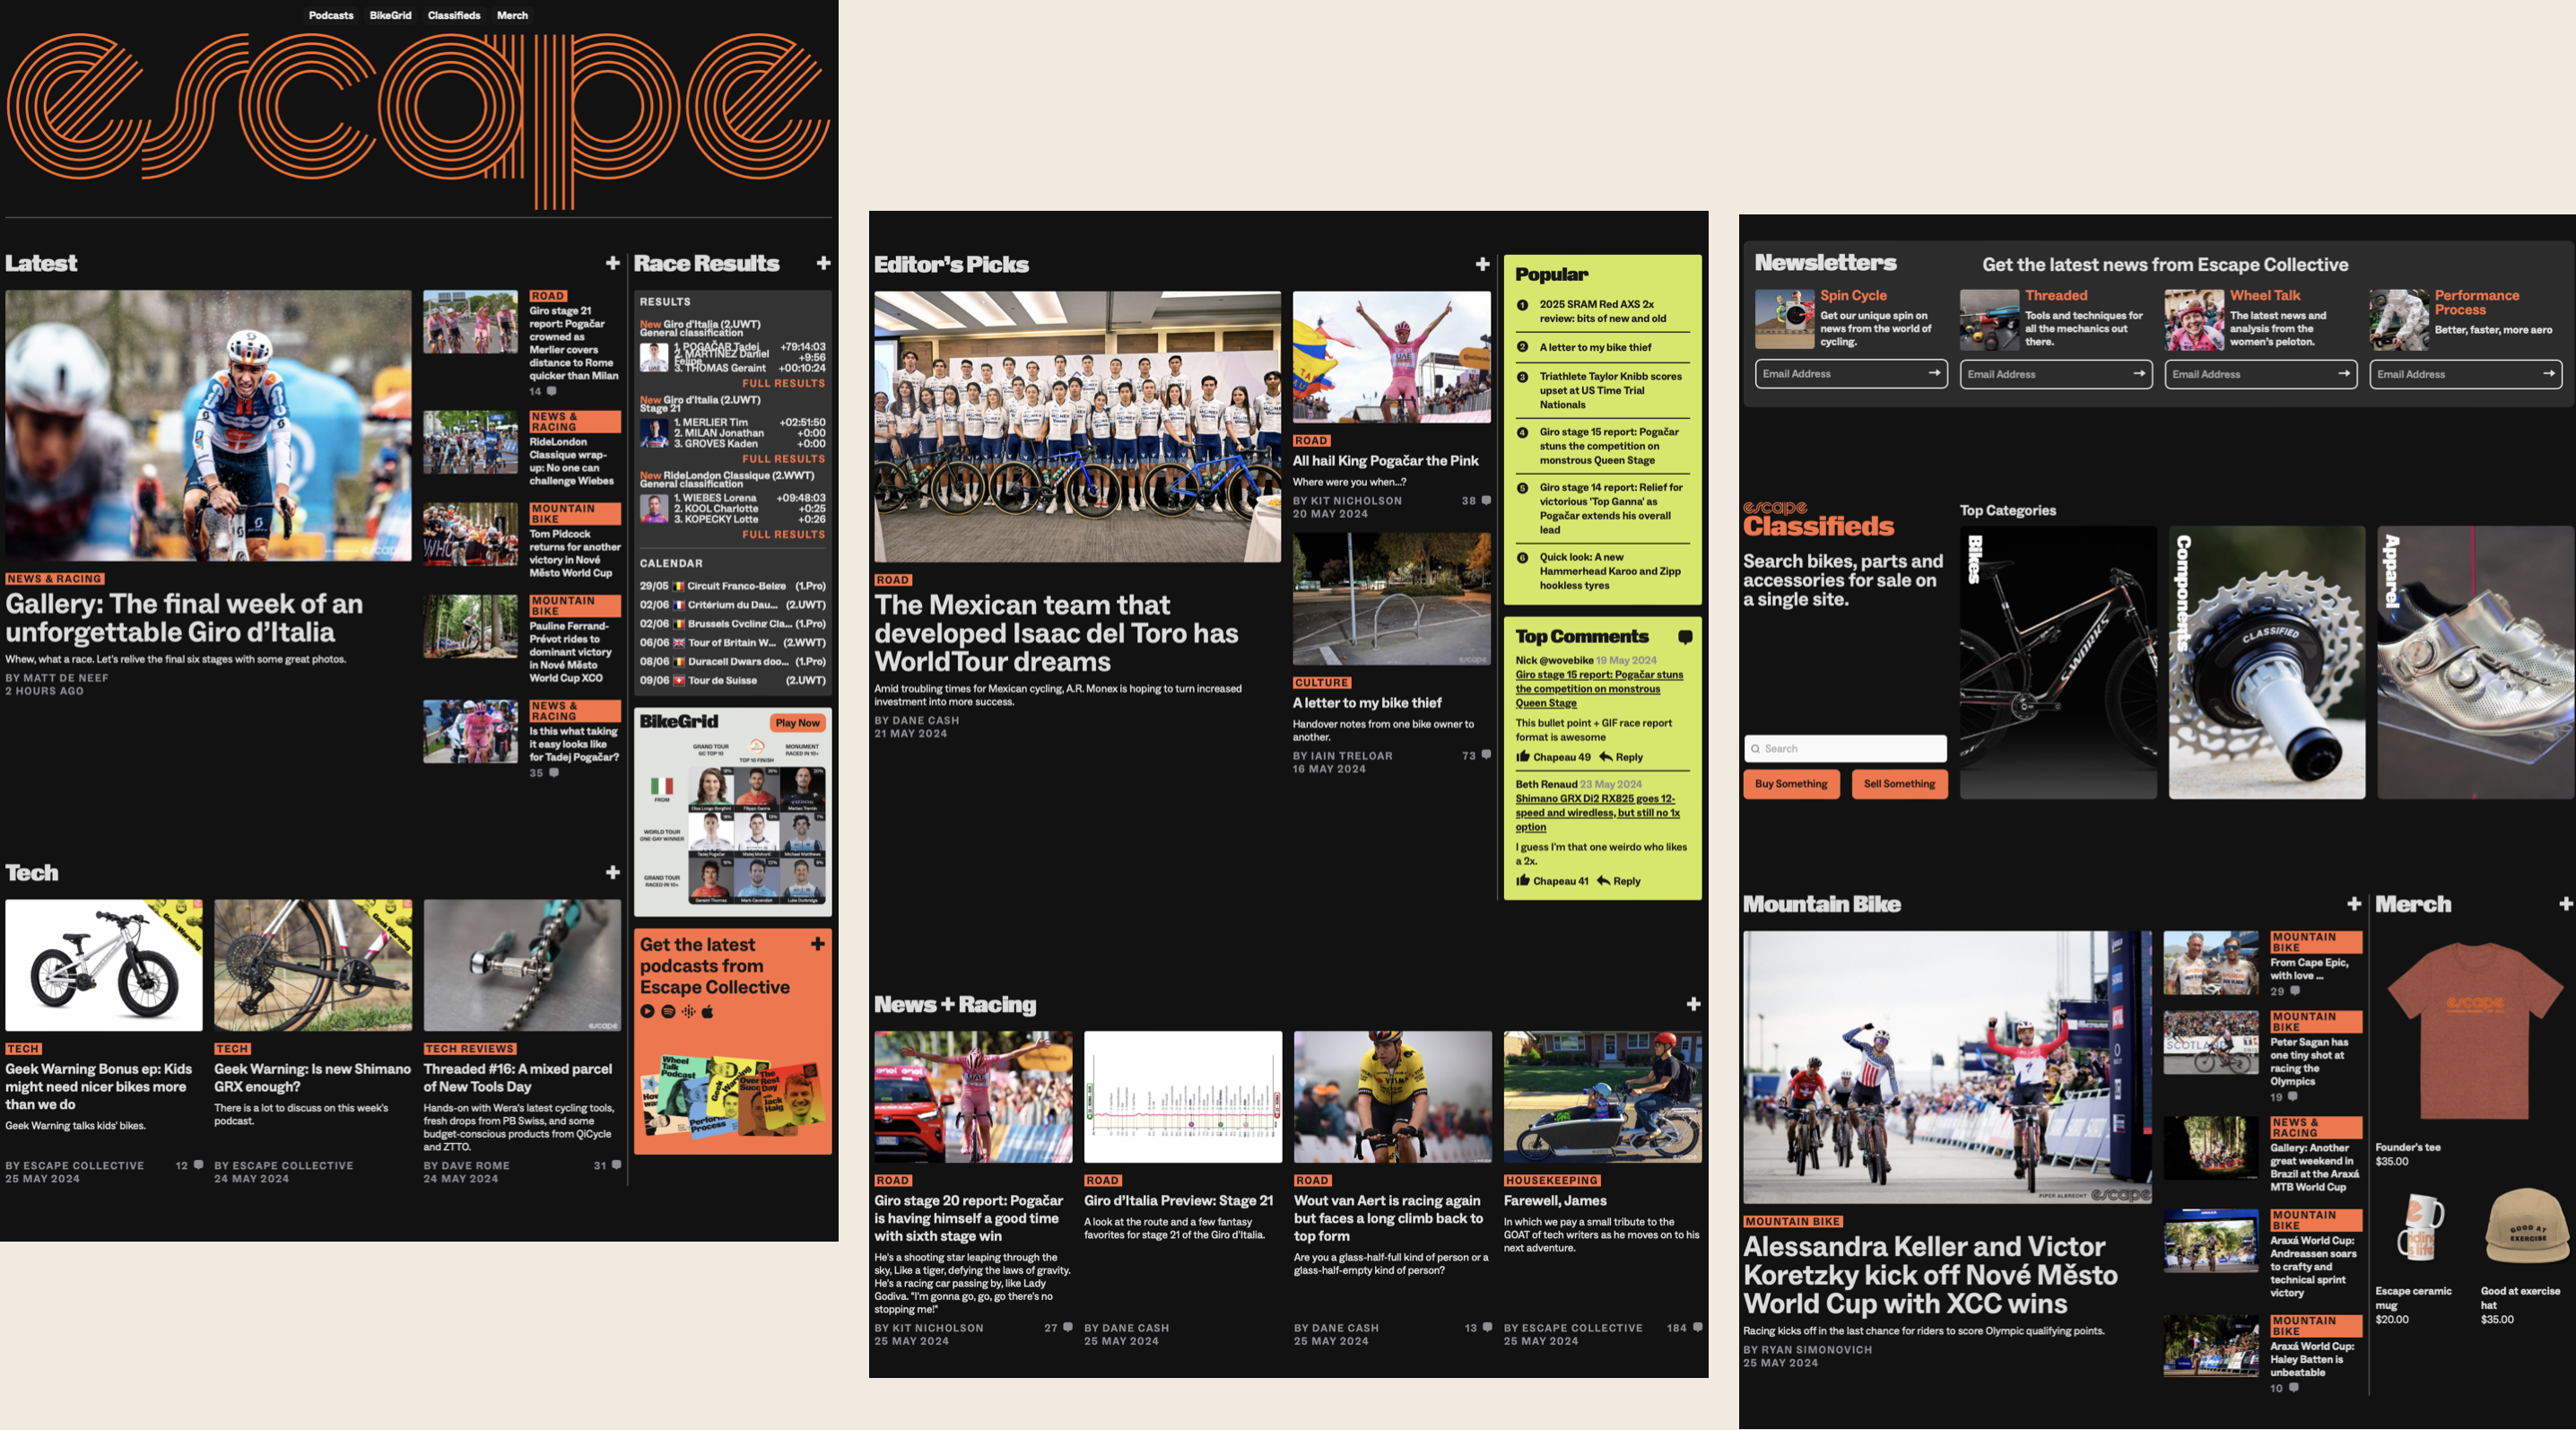
I think Escape Collective is exceptional in the online cycling space. This is a screenshot of today’s Escape Collective website as seen in Safari on an Apple iMac:
Screenshot courtesy of escapecollective.com
As you can see, the content covers a wide array of topics, including the latest news, race results, and developments in technology. There are also links to newsletters and podcasts. Members can receive email notifications whenever the newest newsletter and podcast is available.
Newsletters include Spin Cycle – news from the world of cycling, Threaded – tools and techniques for bicycle mechanics, Wheel Talk – latest news and analysis from the women’s peloton, and Performance Process – how to get better, faster and more aero.
Podcasts include Placeholder – a weekly news show, Geek Warning – all about bike tech, Wheel Talk – what is going on in the Women’s World Tour, How the Race was Won – weekly World Tour race analysis, The Rest Day with Jack Haig – what riders inside the pro peloton talk about, and Overnight Success – about the founders, the innovators, and the remarkable people in the cycling industry.
You can read a limited number of articles for free, after which a subscription is required to continue reading. A weekly Insider newsletter is delivered to members’ email Inboxes. There are also member-only podcasts.
There is also a member-only Escape Collective online community hosted on Discord. Multiple channels make the Escape Collective Discord a home for all cyclists, cycling interests and perspectives.
Logo courtesy of discord.com
If you are willing to pay for high-quality online cycling content free of advertising, I strongly recommend you sign up for an Escape Collective subscription.