RSS Feed

Tag Archives: Pedals

The Bearings We All Forget

Posted on

Bearings

Bicycles run on bearings.  Starting from the front of the bicycle, there are bearings in the front wheel hub, which allow the wheel to spin on its axle.  There are bearings in the headset, which is the assembly that connects the front fork to the frame, and permits the fork to turn for steering and balancing.  There are bearings in the bottom bracket, which allow the crankset spindle to rotate freely.  There are bearings in the rear wheel hub and the freewheel attached to it.  There are bearings in the two rear derailleur pulleys.

Bearings Bicycle.png

Cyclists pay lots of attention to the bearings in wheels and drivetrains.  These are the bearings which help the bicycle’s forward progress.  Any reduction in friction (loss of watts, in cyclist’s parlance) is highly sought after.  These bearings are regularly serviced. Steel bearings are often replaced with ceramic bearings, which have a lower rolling resistance.

Headset bearings get less love.  Bike mechanics should check headset adjustment when servicing bikes.  Occasionally a headset needs tightening.  It is usually only after the rider feels roughness, notchiness, or uneven drag while steering, that headset bearing get serviced or replaced.

And the bearings we all forget?  The ones in our pedals.  Cyclists notice when their cleats need replacing.  The wear is visible, and that wear is often made tangible by clipping in and out of the pedals requiring either too much or too little force.

Pedals just seem to go on and on doing their job with no fuss or bother.  That adage about the squeaky wheel is certainly true where pedals are concerned.

I bought my Alchemy Eros, and the Speedplay pedals that I specified for the bike, in June 2015.  I had given my pedals little or no thought since then.

A week ago the bike developed an irritating click.  Lim, the mechanic at The Bike Artisans, thought that my pedals could be the source of the noise.  The pedals were spinning too freely on their spindles, which is a sign that they needed regreasing.  He didn’t have a needle-type grease injector gun, so couldn’t do the quick and easy pedal maintenance via the grease port hole built into the pedal bodies.

When I got home I consulted the Speedplay website.  Speedplay recommends that the pedal bearings be regreased at least every 3,200 km / 2000 mi, or every two months.

Bearings What

That means my pedals should have been regreased between five and twelve times by now.

I found online instructions to disassemble my pedals.  The Spindle Screw was held in place by some Loctite Threadlocker Blue, but I got the screw to turn without having to heat it, as mentioned in some posts.  The fiddliest step was removing the retaining ring.

It is possible to replace the bearings – Speedplay sells a pedal rebuild kit for USD100 which replaces everything but the spindles.  I just cleaned all the parts, flushed out what grease was left in the bearings, flooded the pedal body with fresh grease, and reassembled the pedals.

Bearings Pedal Disassembly

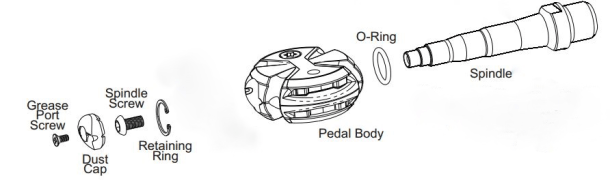
Diagram courtesy of forum.slowtwitch.com

So far so good.  The pedals are turning smoothly and quietly.

Unfortunately that irritating click is still there.

Bearings Irritated

Postscript

I have found the source of the click.  It was coming from the rear dropouts.  A touch of lubrication between the QR faces and the dropouts, and silence was restored.

Thank you Uffe Lindhardt for the link to Keep It Quiet!  Jim Langley’s wide-ranging bicycle blog is an excellent resource.

Saddle Up

A rider touches a bicycle at three points.  At the pedals, the saddle, and the handlebar.  When I got my first road bike the components at these three contact points were chosen for me by James Flatman, the bike builder.  Thank goodness, because the choices of pedals, saddles and handlebars are seemingly endless.

My steel Alchemy came with Speedplay Zero pedals, a Selle Italia SL Flow saddle, and a Ritchey Comp Road Logic handlebar.  I was happy with all those contact points, so a year later when I got my next road bike I was happy to stick with what I was used to.

Welcome to the concept of product updates in the cycling components world.

My titanium Alchemy came with Speedplay Zero pedals, a Selle Italia SLR Flow saddle (the SL Flow having been discontinued), and a Ritchey WCS Carbon Evolution handlebar (the Road Logic having been discontinued).  The saddle and handlebars were not very different from the models which they had replaced, but they were different enough for the change to be noticeable.

So it was that I contracted that affliction that affects so many cyclists.  The desire to fiddle.  In my case with saddles.

Fortunately the itch to fiddle has not extended to my pedals and handlebars.  The scope for mucking around with my pedals is limited anyway.  I like the dual-sided entry of the Speedplays.  Other makes of road pedals are single-sided.  So my only option is getting lighter Speedplays; chrome-moly or titanium.  I haven’t yet been cursed with the ultimate cyclist’s affliction, the desire for the lightest components on earth.  So my stainless steel Speedplays remain my pedals of choice.

I must admit that I like the Carbon Evolution handlebar more than I like the Comp Road Logic handlebar.  The Carbon Evolution has an oval top with a 4 degree sweep, which makes it more comfortable  than the Comp Road Logic.  So about a year ago I put a Carbon Evolution handlebar on the steel Alchemy.

Back to fiddling with saddles.  Of the three contact points I notice the saddle the most while I am riding.  Not that the SL Flow or the SLR Flow are uncomfortable saddles.  They both have a central cutout, which I like.  This is the SL Flow.

Selle Italia SL Flow

This is the SLR Flow.

Selle Italia SLR Flow

The SLR Flow has a slightly larger cutout than the SL Flow, but they are essentially the same saddle.  Equally comfortable.  But as I learned more about saddle shapes and the different materials used to make them, I kept wondering if there may be a more comfortable saddle out there for me.

Then in the latter half of 2011 I read about the Fi’zi:k Kurve range of saddles.

Fizik Kurve

There was enough new technology in the Kurve saddles to appeal to the geek in me.  Spine Concept designs, Re:flex construction, a Tuner interchangeable tension system, a Moebius one-piece saddle rail.  Add positive reviews about outstanding comfort to the mix, and I wanted one.

The Fi’zi:k Kurves appeared in a few London bike shops some time before they turned up in Dutch bike shops.  At the very first opportunity I popped into Condor Cycles in London.  I had every intention of leaving with either a Kurve Snake or a Kurve Chameleon saddle, depending upon what a Spine Concept test showed I was best suited to.

The sales person asked me if I had any problems or discomfort with the Selle Italia saddles.  I said “no.”

I left empty-handed.  She refused to sell me a saddle.  She told me not to try to fix something that wasn’t broken.

That cured my saddle fiddling itch.

That is until I started seeing Michelle again.  Michelle is a Rolf Method Structural Integration Practitioner.   She does myofascial release therapy.  In plain language, she manipulates deep tissue to correct postural imbalances and restrictions.   I saw her regularly in the years before I moved to Houston.  As soon as I got back to Kuala Lumpur I signed up for a course of therapy.  I had lots of things that needed fixing.  Some brought on by cycling.

After Michele had worked on my hip muscles: adductors, glutes, illiopsoas, piriformis, sartorius, etc., my saddles felt less comfortable.  They felt too narrow.

I had learned that bicycle saddles come in different widths.  Perhaps Michelle had loosened up my pelvis such that my sit bones had moved further apart. So I went to a Specialized Concept store to have my sit bones measured.  The resulting number showed that my 130mm wide Selle Italia saddles were indeed to narrow for my sit bones.

Specialized makes saddles in three widths: 130mm, 143mm, and 155mm.  My sit bone measurement showed that I needed a saddle wider than 143mm.  So I left the shop with a 155mm wide Romin Comp Gel saddle under my arm.

Specialized Romin Comp Gel

I replaced the SL Flow saddle on my steel bike with the Romin saddle.   The Romin felt very comfortable at first.  As time went by it felt less and less comfortable.  At the same time the SLR Flow saddle on my titanium bike became increasingly comfortable.  My sit bones must have slowly migrated closer together again.  The Romin saddle started feeling too wide for me.

So when I had to choose a saddle for my Ritchey Breakaway I picked the latest iteration of the Selle Italia SLR saddle.  The SLR Superflow.  A 130mm wide one.

Selle Italia SLR Superflow

The SLR Superflow has a monster cutout.  Which must work as designed because this a very comfortable saddle.

Since April this year I have rotated between the 130mm wide SLR Flow, the 130mm wide SLR Superflow, and the 155mm wide Romin Comp Gel saddles.  The Romin was a mistake.  Certainly in the 155mm width.

Last week I replaced the Romin Comp Gel with another 130mm SLR Superflow.

I think I am done fiddling with my saddles.

But about that handlebar tape . . .

Do You Have That Purple One in a 57?

A recreational cyclist friend asked me for a quick way to gauge if a bike frame is the right size.  Few topics provoke more debate amongst cyclists than how to determine the correct bike fit.  A Google search for “bike fit” generated about 73,900,000 results.  Almost seventy four million items devoted to comfort and efficiency while riding a bicycle!

There seems to be a direct correlation between how serious cyclists are about their riding and the complexity of their bike fit process.  At the complex end of the spectrum are tools like goniometers, forefoot measuring devices and plumb bobs, and a variety of systems that include complete bike fitting rigs and 3D motion capture.  I would have been very happy to know just the following basics when I bought my Trek hybrid.

There are two related things to consider.  The first is the size of the bike’s frame.  The second is to get the five connection points between you and your bike:  pelvis, hands and feet, in the ideal places.

Photo courtesy of bikerowave.org

Having the correct size frame is a good start, although it is not essential to getting a reasonable bike fit.  Witness my too-small hybrid bike that Daniel M. adjusted to fit me quite well.  The simplest measure of a bike frame is the standover height.  For road, mountain and hybrid bikes just step over the top tube (the usually horizontal tube that runs from the seat to the handlebars) and stand with both feet flat on the ground.  Ideally you want 2.5 cm / 1 in clearance between your body and the top tube for a road bike.  If you have a hybrid or mountain bike expect to have 5 cm / 2 in of clearance.  If your road bike has a sloping top tube you will have a clearance similar to that of a hybrid bike.  If the top tube touches your body the frame is too big.  Conversely if you have more than 5 cm / 2 in clearance the frame is too small.

You can also use your height to determine the correct frame size for you.  There are many bicycle sizing tables available online to help you translate height into frame sizes.  For example I am 180 cm / 5’11” tall.  That translates to a large hybrid bike frame size of of 55 or 57 cm and a large road bike frame size of 56 cm, 57 cm or 58 cm.  The mountain bike frame size for my height is a large frame of either 19 in or 20 in.  Why are mountain bike frames measured in inches while road bike frames are measured in centimeters?  Apparently because mountain bikes were invented in America where imperial units still rule.  Road bikes have more of a European heritage, hence the metric units.

Note that a slightly too-small frame is preferable to one that is too big.  Adjustments can be made to the five connection points – see below – to make a too-small frame fit reasonably well.  This cannot be done with a too-big frame.

The second step is to adjust the saddle and handlebars so that you are comfortable on the bike and can pedal it efficiently.  Again you can get very technical about, for example, saddle position.  I would again suggest a more basic approach for the casual cyclist.

Here are some simple steps to set a saddle height that is comfortable and allows you to pedal efficiently.  Turn the pedals backwards until the cranks are vertical with one pedal at it highest point (12 o’clock) and the other at its lowest point (6 o’clock).  Ask someone to hold the bike while you sit on the saddle.  Keep your pelvis level, so no tilting one hip higher than the other.  Hang your leg free on the side where the pedal is at its lowest point (6 o’clock).  Your heel should just touch that pedal.

If this is not the case adjust the saddle height until your heel just touches the pedal as described above.  For most people this provides a saddle height that gives a slight bend in the knee (see picture above) when you move the ball of your foot to the center of the pedal.  Your legs should not straighten out completely at the bottom of the pedal stroke and your hips should not rock from side to side while you are riding.  Note that setting your saddle height this way means that you will not be able to remain seated and easily touch the ground with your feet when you come to a stop.  You should always dismount when you come to a stop.

As for the tilt of the saddle, generally speaking level is best.  However you may feel more comfortable with a slightly downward or slightly upward tilt.  Ride with what feels best to you.

Once you have set your saddle height you can check if you can comfortably reach your handlebars.  Again ask someone to hold the bike while you sit in the saddle.  You should be able to easily reach the brakes and gear shifters.  You should be able to rest your hands lightly on the handlebars.  Your back and neck should be at a comfortable angle.  If you have to lean forward and lock your elbows to reach the handlebars then the handlebars are too low and / or the stem is too long.  The stem is the component that connects the handlebars to the front fork of the bike.  Unfortunately raising handlebars and changing stems is a job for a bicycle shop.

This is just about the full extent of my bike fitting knowledge.  But have no fear.  Seventy four million hits are just a Google search away.