Author Archives: alchemyrider

Kayuhan MPAJ 2025

Map courtest of eve.com.my

The East Klang Valley Expressway (EKVE)  is a new elevated expressway that connects Ukay Perdana in Ampang, Selangor and Bandar Sungai Long in Kajang. The 39.5-kilometre-long (24.5 mi) expressway will open to motor vehicles shortly.

Poster courtesy of Majlis Perbandaran Ampang Jaya

The Majlis Perbandaran Ampang Jaya (Ampang Jaya Town Council), in partnership with the MCC Ampang community cycling club, organised a bicycle ride along the EKVE on Sunday morning, 10th August.

Photograph courtesy of Sungai Long Hill Info and Sharing Station

This was the only opportunity to cycle on the EKVE before it opens to the public. That sounded like it would be fun. G, V and I signed up.

Photograph courtesy of VV

V went to the start point at Laman Tasek Tambahan on Saturday afternoon to collect our number plates and event t-shirts.

Photograph courtesy of VV

The ladies got their number plates. Mine couldn’t be found, so I was told to check with the organizers in the morning.

The ladies and I agreed to meet at Laman Tasek Tambahan at 6:30 am. V realised that with more than 1,000 cyclists registered for this ride, parking would be in short supply. I rode from home to the start. One less car trying to find a parking spot, the better.

Photograph courtesy of VV

My number plate still couldn’t be found, so I got a VIP plate instead. With that, we were ready to roll.

As often happens at these events, the advertised start time came and went. As the minutes ticked by, the sun rose higher in the sky. It has been very hot during the past week. 36ºC / 97ºF hot. V had discovered that there was more than 600 metres / 1,970 feet of elevation ahead of us. That surprised me. It sounded like a lot for a 50 km ride. Whatever the elevation would be, we didn’t fancy climbing under a hot sun.

We started the ride at the back of the group. Just as experience taught me to expect delayed starts, I also knew that, despite this being a fun ride, there would be people who came to race. We did not want to be their way.

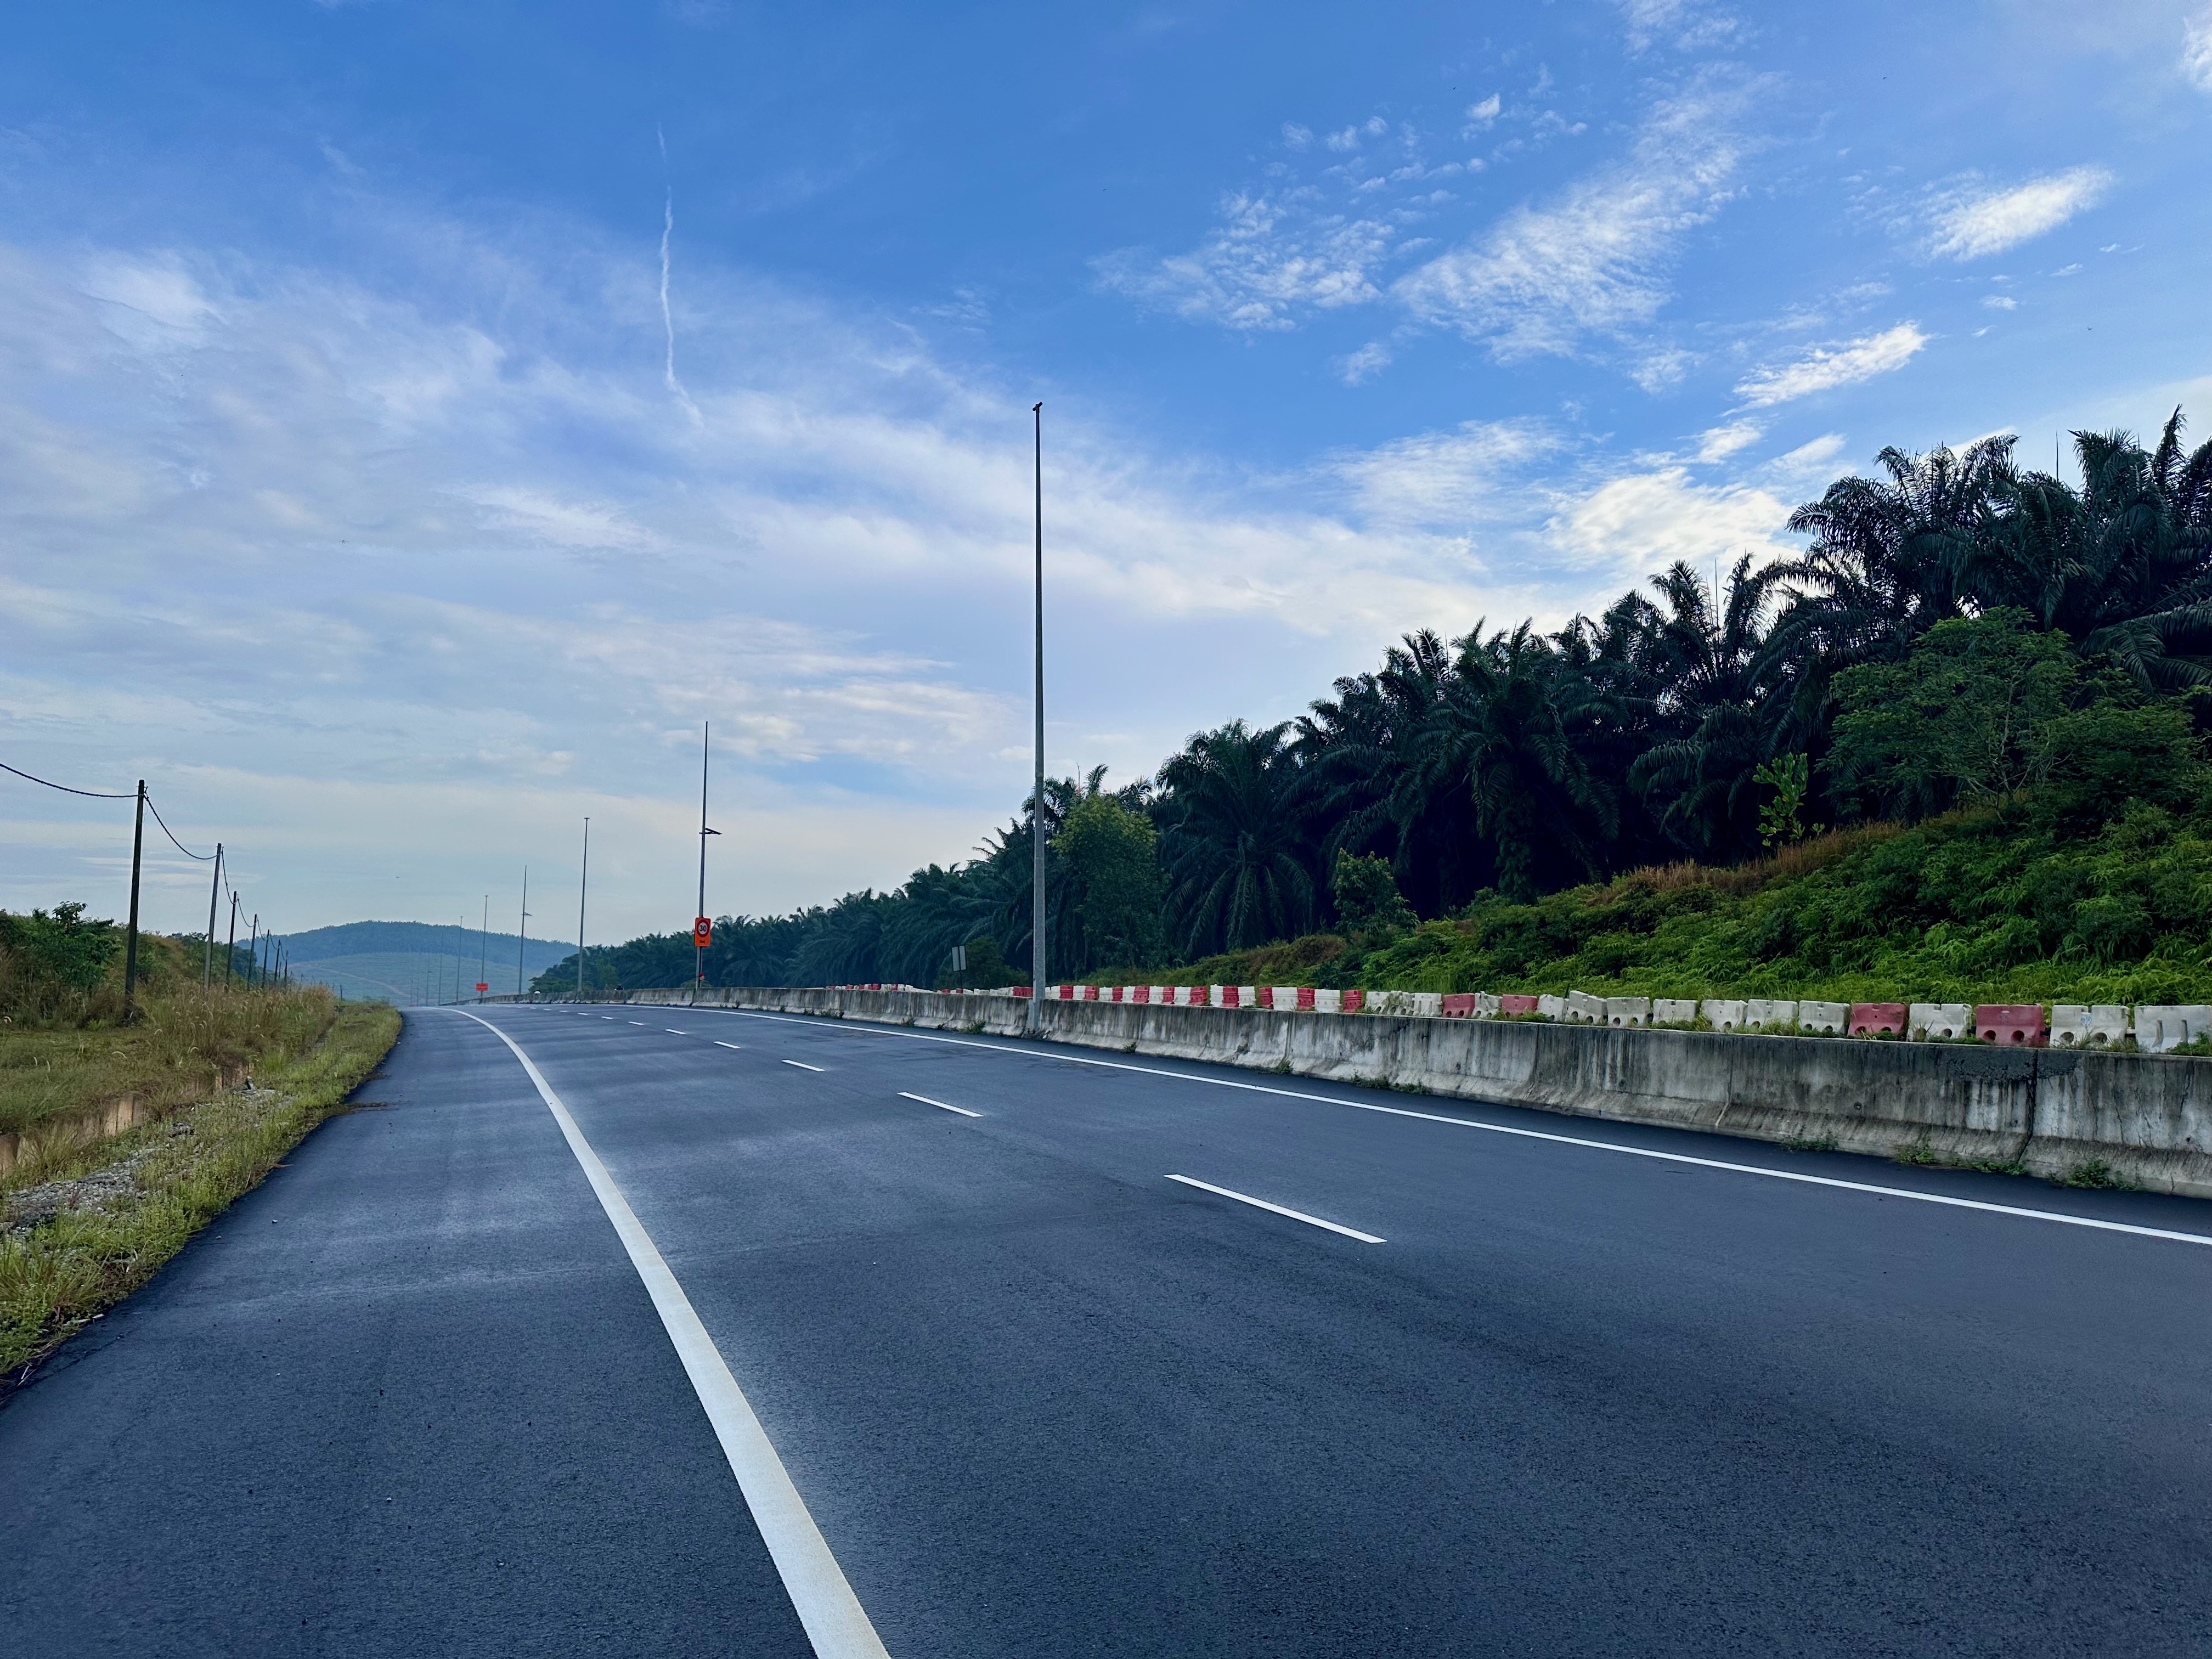
We got moving at 7:55 am. The climbing started immediately. It was 4.3 km to the Ampang toll plaza, incorporating 105 metres of elevation. The next 2.3 km to the Ampang Interchange holds another 130 metres of elevation. We had 135 metres of elevation under our wheels as we rode onto the EKVE. And as V said we would, we did climb more than 600 metres overall.

Map courtesy of Ride With GPS

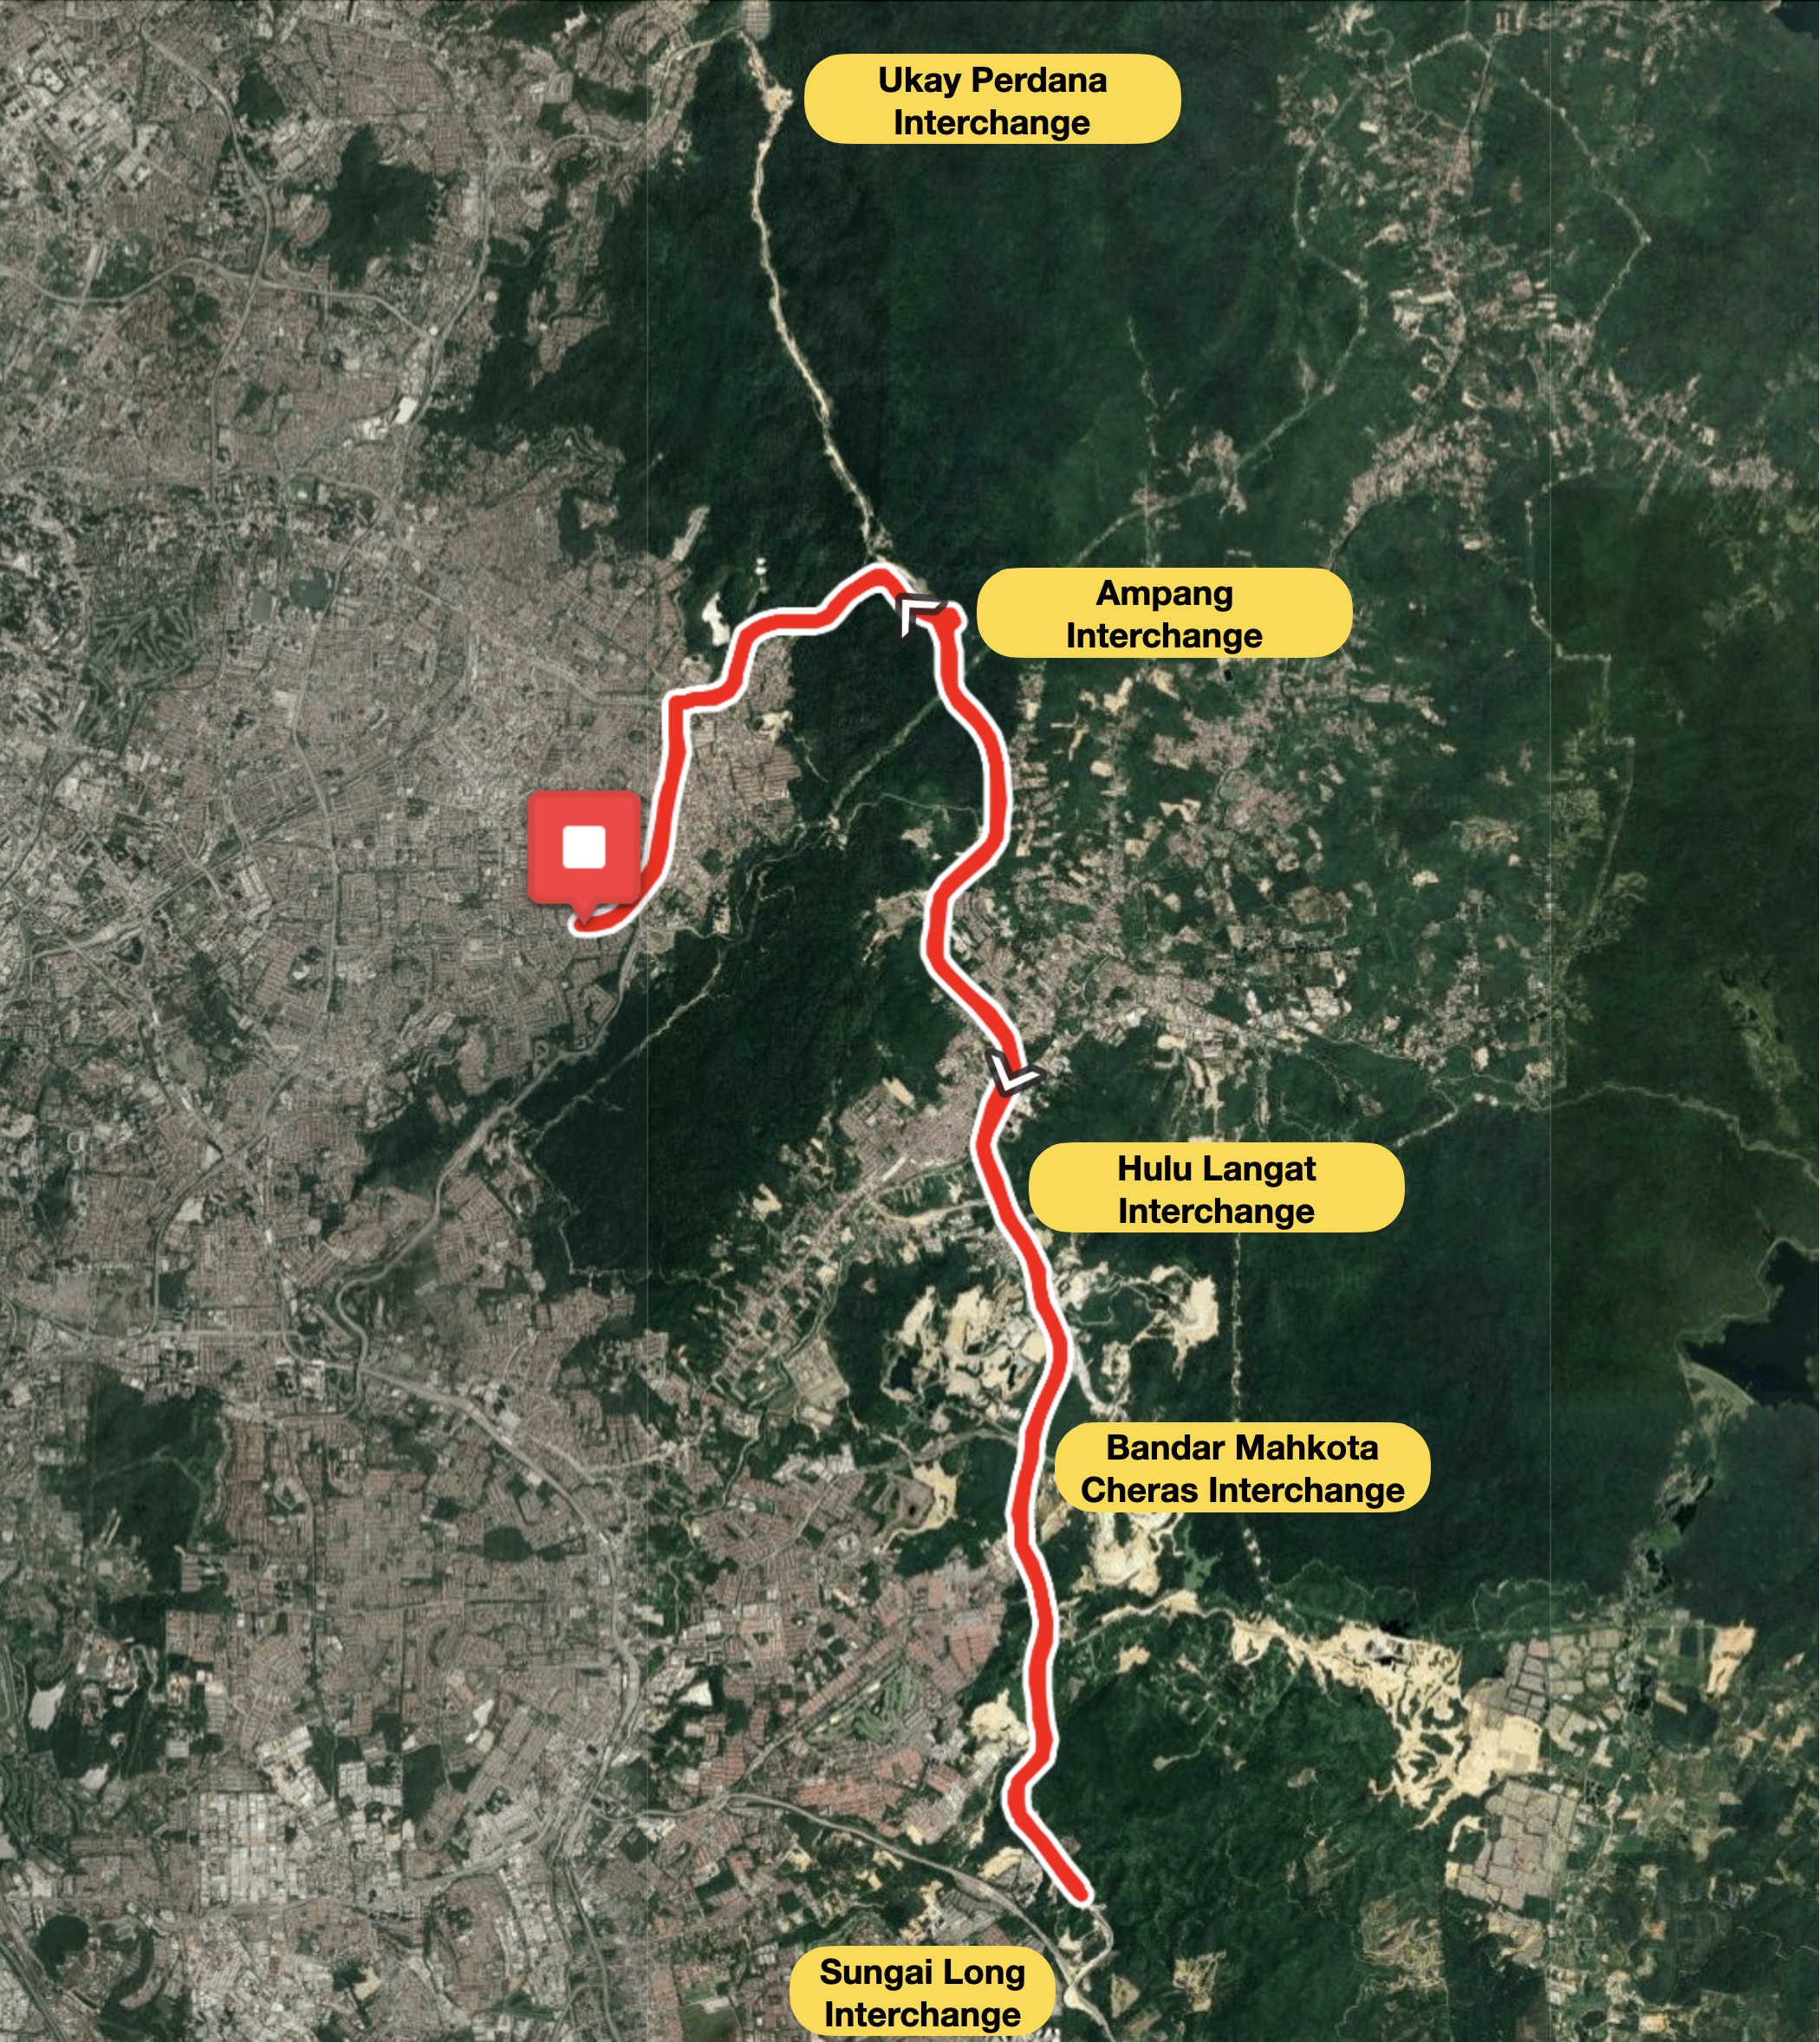
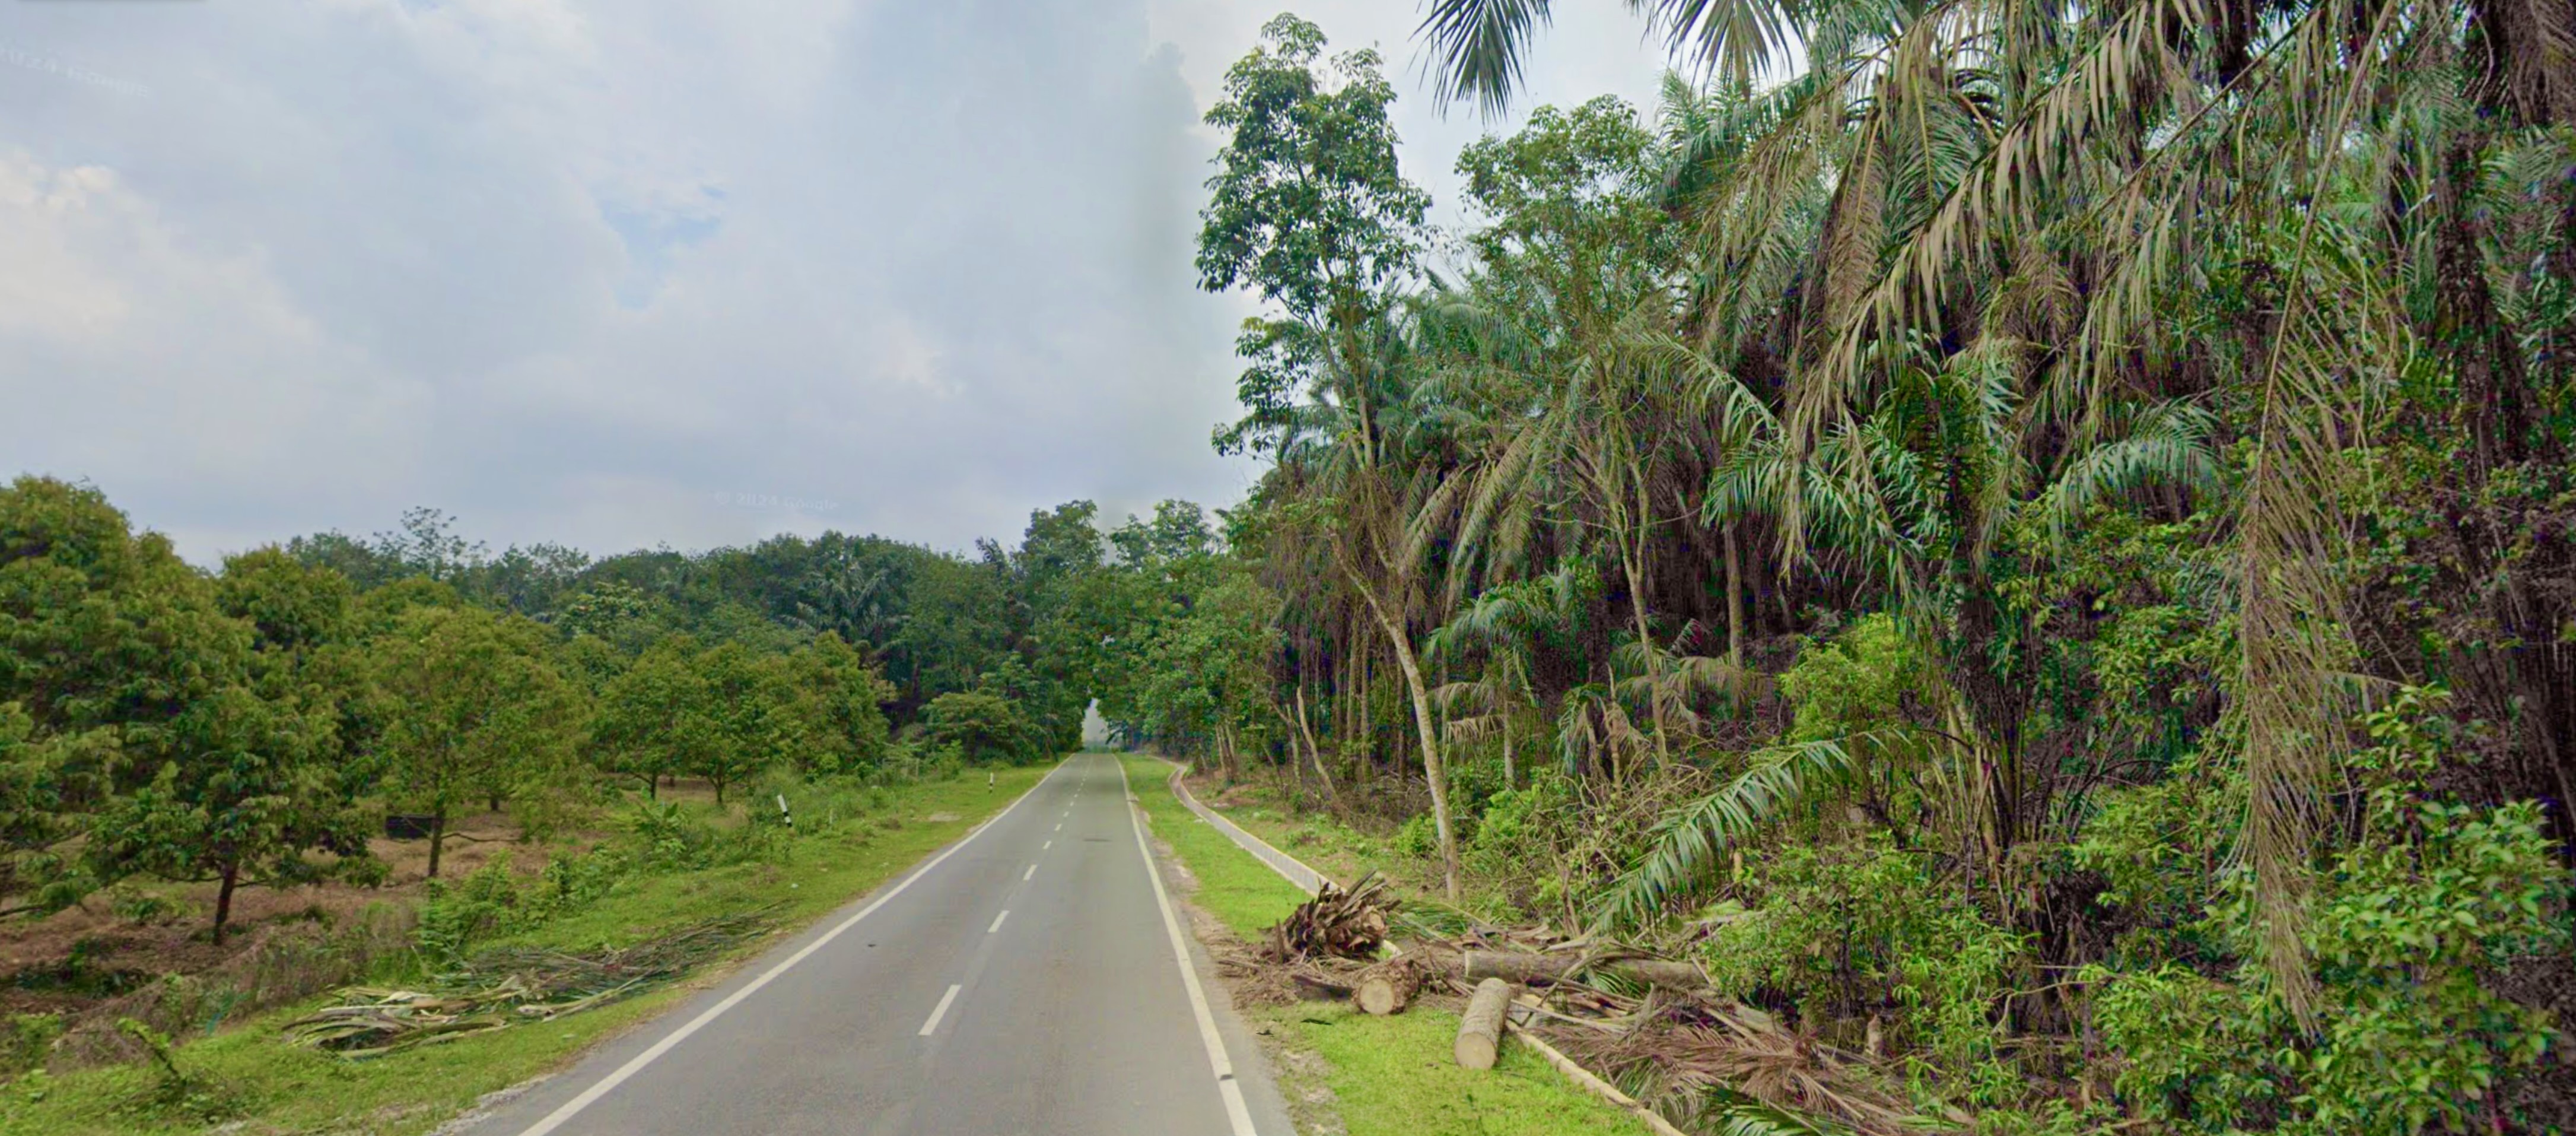
The expressway is so new that it isn’t on Google Maps. You need Google Satellite view to see the expressway winding through the Ampang Forest Reserve. The route through this ecologically sensitive area was the source of much controversy.

Photograph courtesy of Babyboss Michael Sin

The sun had disappeared behind clouds as we rode onto the expressway. The route through forested hillsides helped keep the temperature down.

There were water stops at the Rest and Recreation Centres on both sides of the highway, as well as at the Sungai Long toll plaza, between the Ampang interchange and the U-turn point 16 km later. In anticipation of a hot morning, I had two bidons on my bike, so I didn’t need to stop for water.

The concern about it being a hot morning was unfounded.

Map courtesy of Ride With GPS

It started to drizzle about 15 minutes after the U-turn. Five minutes later, it was raining hard enough that I stopped to put on my rain jacket.

Photograph courtesy of MCC Ampang

The rain was heavy until the Ampang Interchange. It then became progressively lighter as I cycled through the Ampang toll plaza and arrived at the Laman Tasek Tambahan.

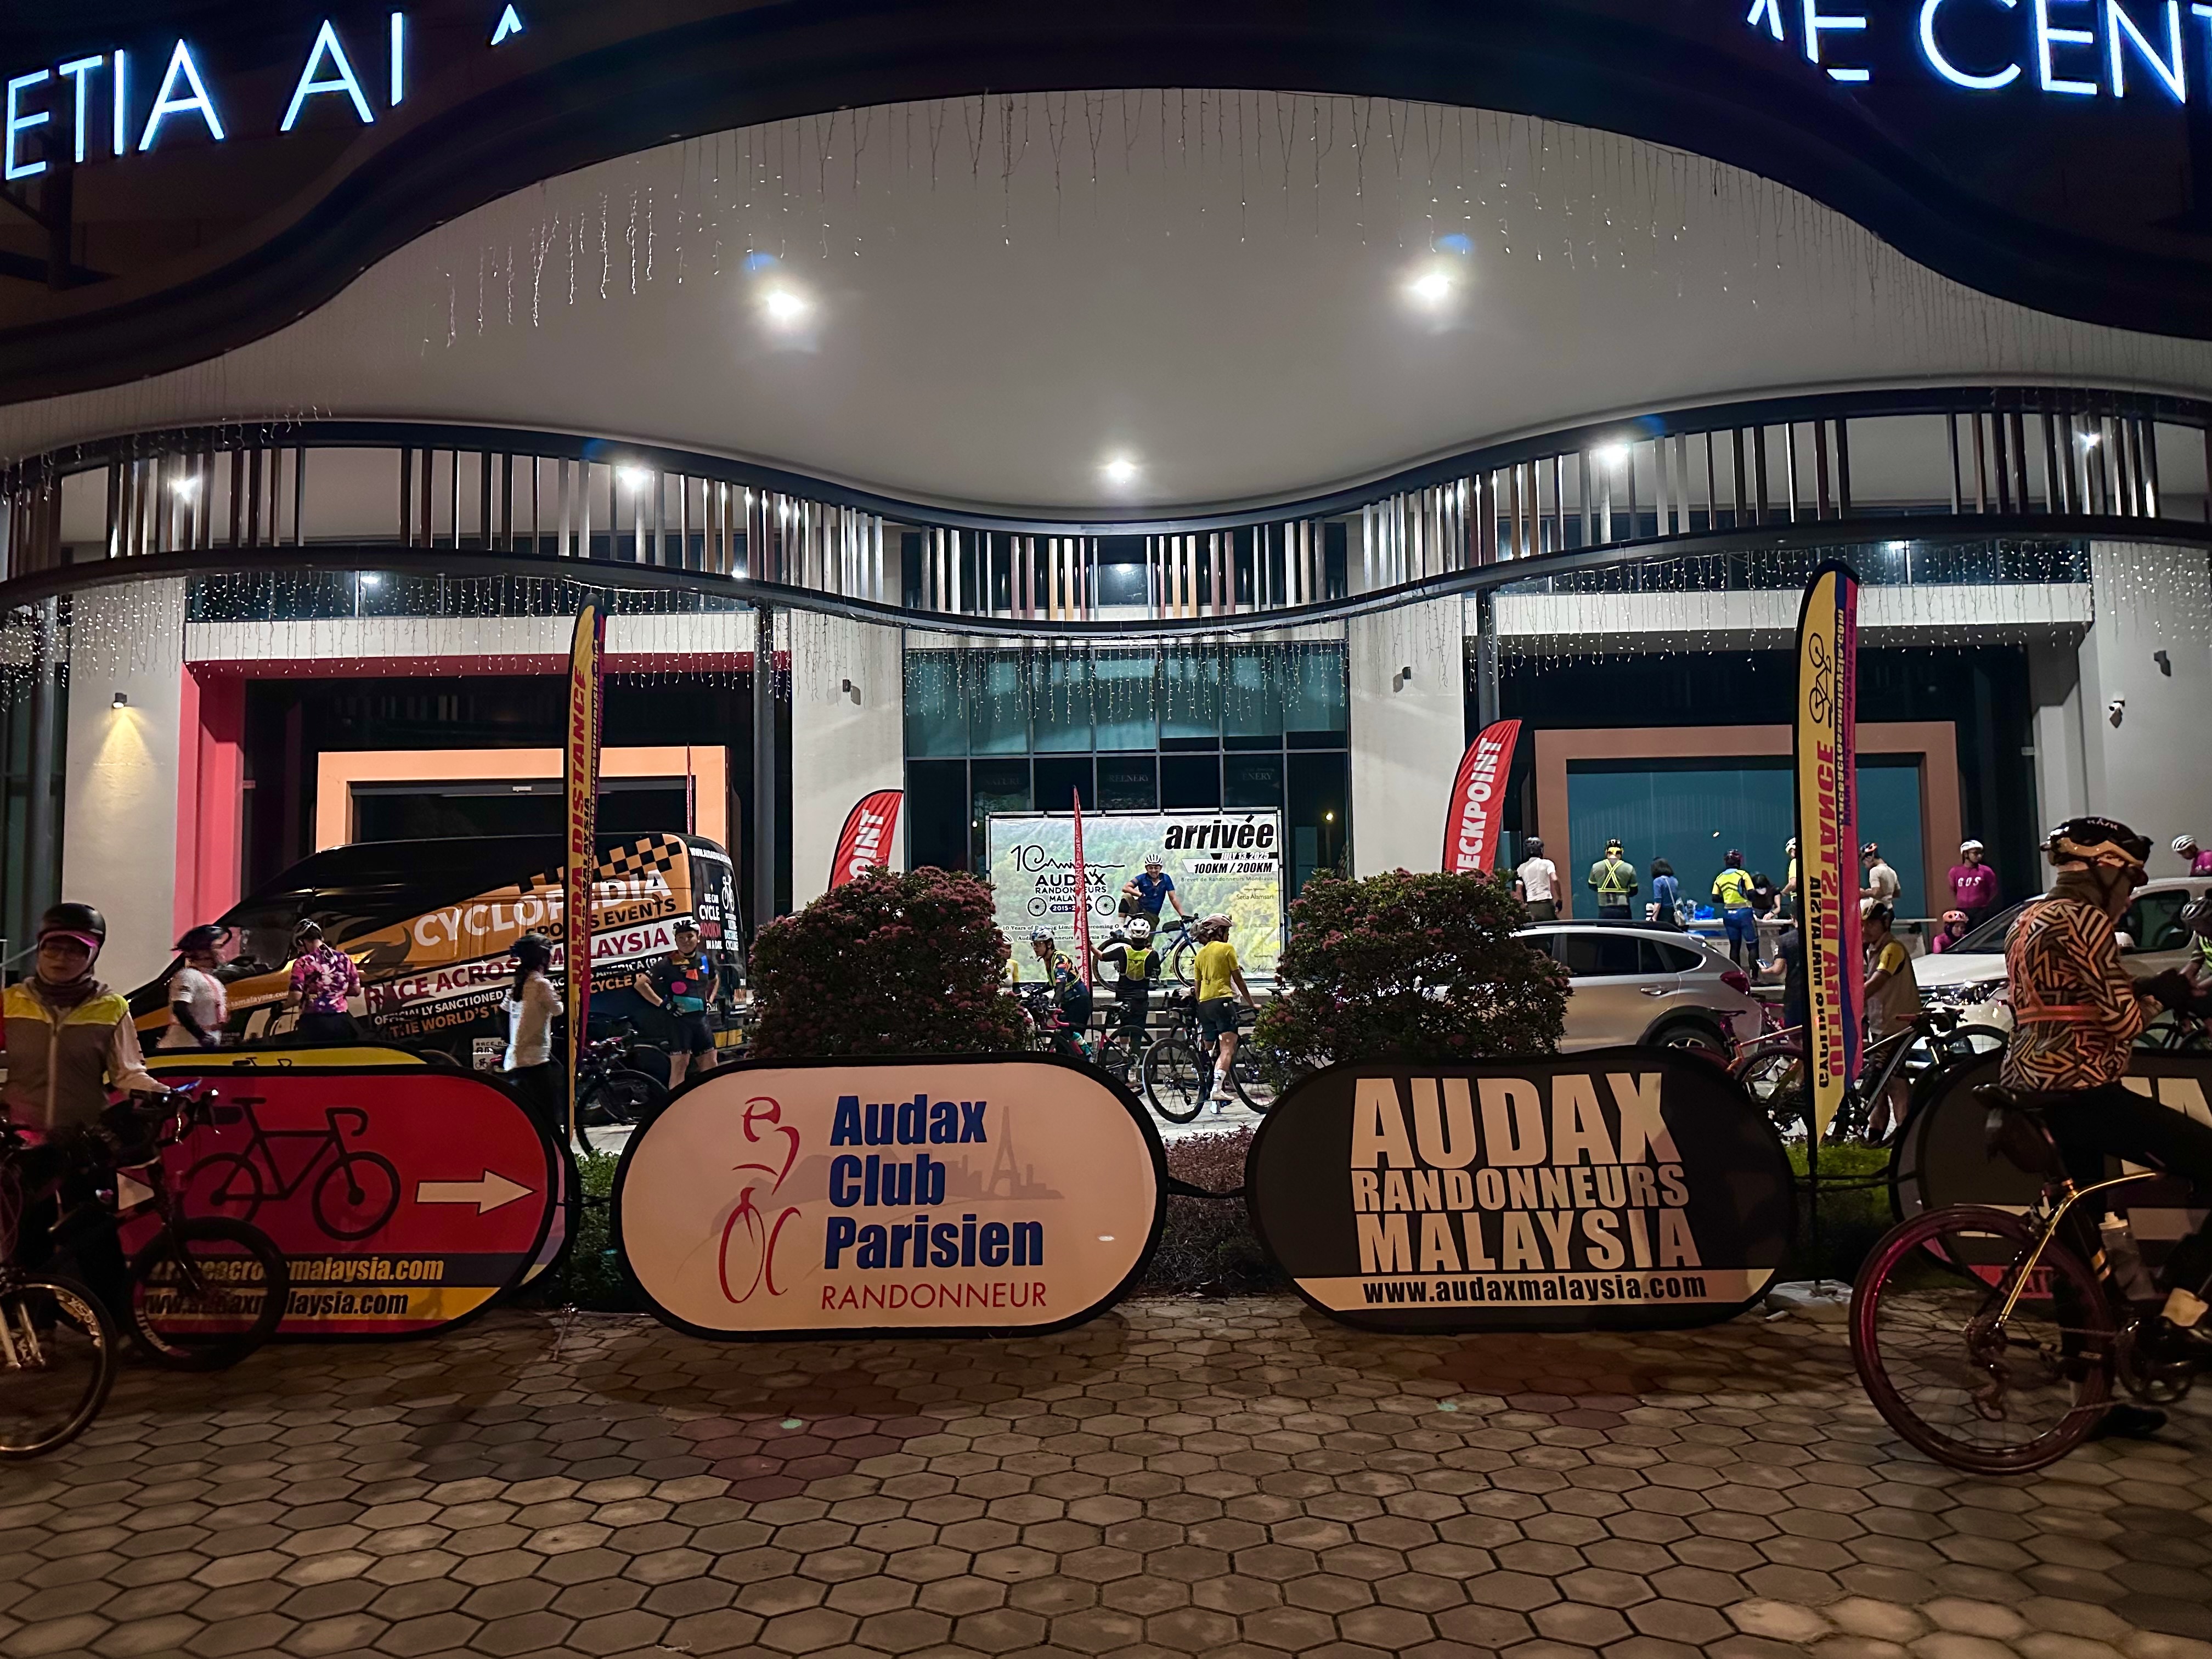
There was the usual queue at the finish as riders waited to collect complimentary food packs and finisher’s medals. I had to convince the person handing out the goodies that, despite my VIP number plate, I had paid to participate and was entitled to a medal.

A collection of vendors was present in the finish area, selling food and drinks. Things like burgers, murtabak (a stuffed flatbread), apam balik (a crispy pancake filled with roasted peanuts, sugar, creamy sweet corn, butter and folded in half), fried noodles, and a variety of coffees and juices.

The covered seating areas quickly filled up, so most of us sat at tables in the drizzle. The wet didn’t dampen anyone’s spirits. Everyone I spoke to enjoyed the ride. Staying cool in the rain is preferable to overheating in the sun.

G, V and I ate some murtabak and more apam balik (we had some before we started riding), checked if our plate numbers had come up in the lucky draw (not even my VIP number plate was a winner), and then headed home after a pleasant morning.

Thank you, MPAJ, MCC Ampang and EKVE for the opportunity to ride along the Klang Valley’s latest expressway.

ARM 10-Anniversary Permanent 100

Graphic courtesy of Audax Randonneurs Malaysia

Since the Pink Ride 8.0 on 12th January 2025 I had not ridden another metric century. In the forty-one days before 5th July 2025 I rode three times, covering a total of 106.5 km. 

So it makes perfect sense that on the 5th I signed up for the Audax Randonneurs Malaysia (ARM) 10-Anniversary Permanent 100 ride to be held on the 13th. There was a BRM200 that day as well. That distance is clearly beyond me.

ARM is a cycling club promoting long-distance cycling events (randonnées) in Malaysia, following the guidelines of Audax Club Parisien. Audax, meaning “bold” or “daring” in Latin, signifies the challenging nature of these endurance rides. 

My history with Audax Randonneurs Malaysia dates back to 2nd January 2016, when I rode the first ride organised by ARM. Since then, ARM has organised more than ninety Audax rides, including some of 1,000 km and more. These are the ones I rode:

DateRideMy Blog Post URL
January 2016BRM200https://alchemyrider.me/2016/01/05/audax-brm200-malaysia-2016/
September 2016BRM400https://alchemyrider.me/2016/09/22/audax-brm400-malaysia-2016-part-1/

https://alchemyrider.me/2016/09/22/audax-brm400-malaysia-2016-part-2/
January 2017BRM300https://alchemyrider.me/2017/01/03/audax-brm300-malaysia-2017/
January 2019Pink Ride 2.0
BRM200
https://alchemyrider.me/2019/01/15/brm200-pink-ride-2-0/
January 2020Pink Ride 3.0
BRM200
https://alchemyrider.me/2020/01/14/brm200-pink-ride-3-0/
January 2023Pink Ride 6.0 Permanent 100https://alchemyrider.me/2023/01/16/permanent-100-brm-200-pink-ride-6-0/
January 2024Pink Ride 7.0 Permanent 100https://alchemyrider.me/2024/01/23/audax-pink-ride-7-0/
January 2025Pink Ride 8.0 Permanent 100https://alchemyrider.me/2025/01/16/pink-ride-8-0/

My preparation for this ride consisted of a 27.4 km ride on Friday 10th and a 39.8 km ride on Saturday 11th. Not the best of physical preparations, but it had to do. For what it is worth, I did have a freshly-lubricated chain!

It was off to the Setia Alamsari Welcome Centre in Bangi on Saturday afternoon to collect my brevet card.

Photograph courtesy of SP Setia

My always supportive Biker Chick and I stayed at the Le’genda Hotel in the Union Square complex in Bangi.

We also stayed there before the Pink Ride 7.0 in January 2024. The Le’genda is a comfortable boutique hotel with lots of dining options nearby.

Staying at the Le’genda gave me at least one extra hour of sleep before I had to be up. I rode the 5 km from the hotel to the starting point at the Setia Alamsari Welcome Centre. I got there well in time for the 5:00 am flag off.

I should say “air horn off”. Which sounded at precisely 5:00 am. I rode this event solo, in the company of about two hundred others.

Photograph courtesy of Audax Randonneurs Malaysia

This was the Permanent 100 route.

Map courtesy of Ride With GPS

3 km from the start, we were off large divided roads and onto narrow rural roads like this.

Photograph courtesy of Google Street View

You have to imagine riding these roads in complete darkness. The cloudy sky blocked the light from the almost full moon. It was a relief to be riding amongst dozens of other cyclists, each lighting the way.

After 20 km or so, the group was spread out along the road. By then, we were in a built-up area, which means there were street lights. The street lights were increasingly useful as the cloudy sky started dropping rain. Just a drizzle at first, but it wasn’t long before it got heavier. Fortunately, the rain stopped after an hour.

By that time, we were back on rural and unlit roads. I am glad I fully charged my headlight before this ride.

Bitter experience has taught me to drink regularly. I have suffered more than a few times from the effects of dehydration. I carry one 24-oz bottle on my bike. Assuming the routes I ride frequently pass by petrol stations, mini markets, and restaurants. 

By KM 35, my bottle was almost empty. In the glow of my headlight, I saw this sign at KM 36.

Photograph courtesy of Google Street View

While keeping an eye out for the Petron station, I stopped to photograph the Sri Sendayan mosque at KM 38.5.

I never saw the Petron station because it is on the road that runs to the left and behind the mosque. If there was a sign at the junction just after the mosque pointing toward the Petron station, I missed it in the dark.

At that point, I was riding along the four-lane Jalan Felda Senayan through a built-up area. I was confident of finding a petrol station or a mini market somewhere there. That confidence faded at KM41 when the route turned right onto the rural Jalan Jimah Lama.

Fortunately, at KM 45, I came upon Warung Makan Lesong Batu, which is the only shop selling food and drink for miles around. I poured a carton of Milo down my throat and refilled my bottle with water.

Photograph courtesy of Google Street View

By that point, I had been riding on my own for some time. The Permanent 100 and BRM200 routes split at the Jalan Jimah Lama junction. 150 riders out of the 200 or so starters would continue along Jalan Felda Senayan.

The Permanent 100 route turned right just before the warung and quickly left onto Jalan Hijayu 1/29. A group of five cyclists made those turns as I was getting back on my bike to leave the warung. I thought about chasing after them, but came to my senses. I didn’t have bags of energy to burn.

The group disappeared into the distance. Jalan Hijayu 1/29 follows the Sungai Likut Besar for a couple of km. It was just past 7:00 am. It was getting light, so I relaxed and enjoyed the view..

Photograph courtesy of Google Street View

The only checkpoint on the Permanent 100 route was at Restoran Aniepha, 55 km into the ride. That is where I caught up with the five cyclists who were ahead of me. They were already set to ride on. After getting my brevet card stamped, I sat for a while and rested my feet. I was starting to get “hot foot.” My shoes must have been done up too tightly.

Photograph courtesy of Audax Randonneurs Malaysia

My next stop was at the Shell station in Sepang to drink a carton of chocolate milk, eat a Snickers bar, and visit the restroom.

The Sepang Shell station was at KM68. The weather had stayed overcast and cool. I was drinking and eating enough. I am sure it helped that I regularly sucked on Ricola herbal drops. I still have a persistent cough that I picked up six weeks ago. The “unique blend of 10 Swiss Alpine herbs” helped with my cough, and the sugar no doubt kept my energy level up.

The road out of Sepang Town towards Bangi is Jalan Sepang – Jenderam. That road has been in a state of constant construction for years. The plan is to expand it from two lanes to a divided four-lane. Some of the work is complete, but the new roadway is not yet open to motorised traffic.

However, you can cycle on it. 3.5 km from the Shell station, I was on fresh tarmac.

All good things come to an end. Fresh tarmac gave way to gravel at KM 73.9. That was still better than riding close to vehicles. That would have been even more dicey as the road shoulder was non-existent in places.

I had no choice but to get back onto the road amongst traffic at KM 75.6. Fortunately, the construction ended 1 km further on, so there was a reasonable road shoulder to ride on into Pekan Salak.

I needed to refill my bottle at the Petronas station in Pekan Salak. I had another chocolate milk while I was there. I needed the carbs to get over the series of hills on the way to the finish. Not least the 2 km climb from KM 81 with a maximum gradient of 9%.

My hydration and nutrition strategy paid off. I got to the finish just after 10:00 am. No flats. No cramps. I was pleased.

Map courtesy of Ride With GPS

 With my brevet card stamped and finisher’s medal in my pocket, I rested in the Welcome Centre A/C for a while before cycling the 5 km back to the hotel. 

A shower followed by a nap. Then dim sum at BACC Seafood, followed by churros at Chulop! A very nice ending to an excellent weekend.

Photograph courtesy of chulop.com

This is the slate of Audax rides for the rest of 2025.

Graphics courtesy of Audax Randonneurs Malaysia

The shortest ride is the Audax Merdeka Ride BRM200 on 16th August. I need more than one month to get ready for a 200 km ride.

Perhaps the Pink Ride 9.0 next January.

Image courtesy of WordPress AI

“Ride of Hope” in Southern Thailand – Day 4

Posted on

If anyone partied the previous night, it didn’t show. Everyone was checked out of the hotel and ready to ride at 6:30 a.m.

Photograph courtesy of ML

Most of the route from Hat Yai to Padang Besar is due south. I think I selected the wrong course on my Garmin to navigate. The map took us north out of Hat Yai along the same roads to Songkhla Lake. The detour added 12 km to our route. We lost more time because I had a flat tyre 21 km into the ride. Thank goodness we had a time buffer.

Map courtesy of Ride With GPS

It was a relief to get onto Route 4 heading in the right direction. As we have come to expect of Southern Thailand, the roads are good. With the occasional Wat along the way.

In this case, the Wat Hua Thanon near Sadao.

Photograph courtesy of Google Street View

It wasn’t as hot as the previous days. It was ‘only’ 30ºC but still very humid. We were all sweating a lot. We stopped at a Seven-11 to refill bottles and let the support vehicles catch up with us. We had lost them in the detour around Hat Yai.

Photograph courtesy of CKS

We needed another stop with 13 km to go to the Thailand-Malaysia border. It was 34ºC and shade was limited.

Photograph courtesy of CKS

It was an up-and-down 13 km with 125 metres of elevation to the border. A little sting in the tail of our four-day ride.

All that was left was the queue at Malaysian Immigration, where we had to tell the locals not to cut in front of us.

Photograph courtesy of ML

Despite the 12 km detour, we all arrived at the homestay in time for a shower before being driven to the KTM station by L and P.

We needn’t have rushed. Our train left Padang Besar fifty minutes late. Problems with the onboard signalling system caused the delay.

This message hit my mobile at 3:38 p.m. Late too, and ultimately wrong.

We arrived at Sentral Station at 9:10 p.m. Two hours and forty minutes late.

B and K arrived in Klang with our bikes two hours later. They got caught in heavy rain. As did S on his motorcycle after riding to Penang with TH. They got to Penang at around 5:00 p.m. We were all glad to hear that S got to Klang safely at 10:00 p.m.

Photograph courtesy of K

All that was left to do was to deliver the four KL guys’ bicycles to Pegasus Cycles. Which N did on Tuesday morning.

Photograph courtesy of N

That wrapped up our four-day adventure in Southern Thailand. 291 km in all.

Thank you, H and J, for arranging the travel and accommodation, and for the jerseys. Thank you, B, K and K, for the support throughout the four days. Thank you to all the cyclists for the camaraderie and the laughs.

Image courtesy of WordPress AI

“Ride of Hope” in Southern Thailand – Day 3

Posted on

Despite the late night for some, we started our sightseeing ride at 8:00 a.m. The route took us to Songkhla Lake and Samila Beach.

Map courtesy of Ride With GPS

Songkhla Lake is the largest natural lake in Thailand. We stopped on the southern Tinsulanonda Bridge for some photographs. The bridges linking Ko Yo island with the mainland are named after General Prem Tinsulanonda, a former Prime Minister of Thailand.

Photograph courtesy of LTH

Wat Laem Pho on Ko Yo Island was built in 1787 during the reign of King Rama III. The large golden Buddha image in the nirvana posture was constructed in 1994.

Photograph courtesy of KC

We rode over the northern Tinsulanonda Bridge and took a short ferry ride across the estuary where Songkhla Lake meets the Gulf of Thailand.

Photograph courtesy of KC

A kilometre from the Car Ferry City Side dock is the Golden Mermaid. An icon of Songkhla. This bronze statue was sculpted in 1966 by Jitr Baubus. The Mermaid was a main character in Phra Apaimance, a story written by Soonthorn Phu, the great poet of King Rama II. In this ancient Thai folk tale, a mermaid sat and combed her hair on a beautiful beach on a starry night. A young fisherman met and frightened her, and she fled into the sea. The fisherman waited for her to return, but she had disappeared forever.

We didn’t clamber onto the rock to get close to the statue.

Photograph courtesy of LTH

Samila Beach turns into Chalathat Beach as you head south.

It was hot again. 39ºC. We went looking for an air-conditioned place for a coffee. Instead, we found the Nong Keng restaurant. We ordered drinks. Then H looked at their menu and ordered lunch. It was a pleasant eighty minutes in the shade by the sea.

Photograph courtesy of ML

It was 37ºC when we left Nong Keng. We had about 30 km left to ride. Unsurprisingly, we needed another stop after cycling 15 km. A 7-Eleven at a PTT petrol station fit the bill.

Photograph courtesy of Google Street View

We got to the Centara hotel at 2:40 p.m. It was far too hot for a swim. Some had massages. I should have had one too. I had a knot in my right scapula that needed releasing. The need for sleep was strong, though.

I had planned to walk to the See Kim Yong Market to buy dried fruit and nuts.

Photograph courtesy of tourismthailand.org

The market, named after a wealthy individual who owned the original land in this area, is 400 metres from the Centara Hotel. The market closes at 6:00 p.m. I woke up at 6:45 p.m. Just in time to meet the others in the hotel lobby for dinner.

The Kai-Tai-Num restaurant is 3 km from the Centara Hotel. We went there in tuk-tuks. Nine of us unknowingly got into a party tuk-tuk. It was dark, and the tuk-tuk looked like any other. Then the flashing lights, the video, and the music started.

Six tweeters, six mid-range speakers and three subwoofers, all driven by three amplifiers, pump out a lot of sound. M and I were deaf in our right ears for a while.

Photograph courtesy of LCH

A waitress said “Sorry Ahhh” to H at the Kai-Tai-Num restaurant. Again, for serving us food that we had not ordered. I wonder if it is a ruse that some restaurants employ to boost their takings.

We discussed the following day’s departure time over dinner. We initially planned to start cycling at 7:30 a.m. That would give us some extra time to cope with any problems along the way and still arrive in Padang Besar in time to catch the 1:50 p.m. Malaysian time train. Fortunately, H remembered that Thailand is one hour behind Malaysia. We would have to leave at 6:30 a.m. Malaysian time to have the buffer time we wanted.

That would prove to be a wise decision.

“Ride of Hope” in Southern Thailand – Day 2

Posted on

Thai hospitality was on full display throughout our stay at the Navakiri Boutique Resort. The staff stored our bikes safely in their laundry room.

Photograph courtesy of LCH

The breakfast buffet opened early to accommodate our early departure. Our destination was Hat Yai.

Map courtesy of Ride With GPS

We were all present as planned at 8:30 a.m.

Photograph courtesy of LTH

As expected, the roads were excellent to ride on.

Photograph courtesy of CKS

I did give the group a short taste of gravel for variety’s sake.

Photograph courtesy of CKS

Immediately after this gravel section, we stopped at a Bangchak petrol station. L had a flat tire. caused by a staple rather than the gravel.

It took forty minutes to change the inner tube. First, we had to figure out how to unscrew the through axle. A rubber O-ring covered the indentations a hex key fits. It took a phone call to Pegasus Cycles to discover that a size 6 hex key pushed past the O-ring would do the trick.

The tubeless-ready tyre was a very tight fit on the rim, and it was a battle to get one side of the tyre free of the rim.

There was no shortage of observers!

Photograph courtesy of CKS

It was another 38ºC and high-humidity day. We struggled to find shade at times. B and K did a sterling job handing out a variety of ice-cold drinks every time we stopped.

Photograph courtesy of LTH

Our last stop before Hat Yai was this Delicafé at the Shell station on the Phet Kasem Frontage Road. I needed that iced latté.

Photograph courtesy of Google Street View

We had lunch at the Jae Lek restaurant before checking into the Centara Hotel. It would not be the first time a waitress said “Sorry Ahhh” to H because we were served and charged for more food than he had ordered.

It was a 91 km ride to the Centara Hotel. The hotel has a swimming pool, but I decided I needed a nap more than a swim. Some others had a massage. I showered and slept.

Photograph courtesy of CKS

We had a late lunch. Nevertheless, we ate a lot at Ar Restaurant that evening. The stewed goose was especially delicious.

Photograph courtesy of ML

There was some partying after dinner. That is all I can say. What happens in Hat Yai stays in Hat Yai!

“Ride of Hope” in Southern Thailand – Day 1

Posted on

In 2023, K asked if TH and I could help organise a charity ride to Penang. That is how I met the group from ECONFRAME®. A few R@SKLs went on a delightful multi-day ride from Teluk Intan to Penang with the group from Klang.

A few months ago, the idea of another charity ride arose. We chose to spend four days riding in Southern Thailand. Many hands contributed to the planning and execution of this trip. The daily routes were plotted. Train tickets were bought. Hotel rooms were booked. Cycling jerseys were designed and ordered. Support vehicles and drivers were lined up.

The long weekend began on Thursday with bicycles transported to Padang Besar by B and K in a pair of pickup trucks, accompanied by TH and S on motorcyclists.

Photographs courtesy of LTH

This update during the trip was a sign of things to come.

Photograph courtesy of LTH

The quartet was joined at the Chek Embun Homestay by a few others who also drove to Padang Besar. They all did a wonderful job stocking ice chests and preparing the bicycles.

The rest of us caught the 7:30 a.m. Friday ETS departure from KL Sentral to Padang Besar.

Photograph courtesy of ML

While we were on the train, the guys in Padang Besar went on a cave walk in Gua Kelam in Kaki Bukit.

Photographs courtesy of PC and S

L and P picked us up at Padang Besar KTM station. We changed at the homestay and were ready to ride at 1:30 p.m.

Photograph courtesy of LTH

The Day 1 route from Padang Besar to Satun was the shortest of all the daily rides. However, the 49 km ride did include the most challenging segment we would face.

Map courtesy of Ride With GPS

The climb to Wang Kelian is on slopes like this. Made even harder by the high humidity and 38ºC temperature.

Photograph courtesy of KC

This is the Wang Kelian climb in numbers.

Map courtesy of Ride With GPS

The view at the top is worth the effort.

Photographs are essential. That is the patriarch of H’s family. 85 years young.

From the summit of the climb it is a mostly downhill run to the Malaysian Immigration post at Wang Kelian.

Photograph courtesy of J

You go through the Wangprachan Boundary post to enter Thailand.

Photograph courtesy of CKS

The roads in Southern Thailand are wonderful to ride on.

30 km from the Malaysia-Thailand border is the Navakiri Boutique Resort in Satun.

That is a bar at the far end of the swimming pool. A bar that was well-patronised by the eleven of us who went for a swim.

Dinner was at the Coconut Gardens Restaurant. The restaurant is 850 metres from the resort. Close enough for most of us to make the trip in the bed of a pickup.

Photograph courtesy of LTH

Our first and not the last big meal of the trip.

Chasing Aerodynamic Gains

Posted on
Image courtesy of youtube.com

Slicing through the air like a speeding bullet. If only it were that easy for cyclists. Bullets are streamlined and aerodynamic, minimising their frontal area to reduce air resistance. A cyclist in a typical riding position has a much larger frontal area due to their body’s shape and size.

The power required to overcome aerodynamic drag on a bicycle increases with the cube of the speed. Doubling your speed requires eight times more power to overcome drag. This doesn’t account for other factors like friction and rolling resistance.

It is no wonder that reducing aerodynamic drag is such a big selling point for bicycle equipment designers and manufacturers. Many advertisements for bicycles and related gear claim wind tunnel testing shows power savings, measured in watts.

Photograph courtesy of ww2.aip.org

These advertisements sometimes do not tell you that the speeds commonly used in wind tunnel testing range between 40 and 48 kph (25 and 30 mph). The average reported ride speed on Strava for non-experienced cyclists is around 19.2 kph (11.9 mph). Experienced cyclists average 24.5 kph (15.2 mph). Recreational cyclists must temper their expectations of the number of watts they can save in real life.

What gains can you expect from various aero upgrades? Absolute numbers vary from one source to another. The figures in the table below from BikeRadar are generally in line with others I have seen. The products in the table were tested in the wind tunnel at the Silverstone Sports Engineering Hub, a leading test facility for cycling in the UK. Testing was done at a range of yaw angles (0, +5 and +10 degrees) to get a more realistic picture of how these upgrades perform in the real world.

The bike used in the tests was a Specialized S-Works Aethos on 28c Continental GP5000 TL tires. The aero upgrades tested are identified below the product category.

The power savings at 35kph are minimal for most items. I would save even fewer watts on my rides, which rarely touch 35kph.

The rider contributes a large portion of the total aerodynamic drag on a bicycle, typically around 75-80%. So it is no surprise that the biggest aero gains come from changing body position. Moving the hands from the hoods to an ‘aero hoods’ position or using clip-on aero bars saves the most watts.

Illustrations courtesy of silca.cc

Many recreational cyclists struggle to hold either of these positions for long. Nevertheless, optimising body position is the most cost-effective aero upgrade.

The easier but more expensive route is to buy a set of aero wheels or even an aero bike. Just remember that the marketing around aero wheels and aero bikes is often a little over the top. By all means, spend money on a fancy new aero bike. But for many recreational cyclists to ride faster, losing weight and becoming more flexible to improve their body position will be more beneficial.

Illustration courtesy of twospoke.com

Be Wary of the Integrated Cockpit

Posted on
Graphic courtesy of dynamicpuzzle.ro

In my previous post, I discussed why professional-level road bikes may not be the best bicycles for recreational cyclists.

High-end road bikes are designed for maximum aerodynamic efficiency. Thus, their low frame stack and long frame reach.

The pursuit of aerodynamic benefits has seen the increasing popularity of integrated cockpits. These systems combine the handlebars and stem into a single piece and are designed to reduce drag by minimising frontal area. These are the integrated cockpits used on the bikes above.

In this post I wrote about one of the downsides of integrated cockpits.  They use internal cable routing, which improves aerodynamics but complicates cable replacement.

Another downside is the high cost of replacing an integrated cockpit if the bike fit (such as the handlebar width or stem length) isn’t right for you. You may well get the right stem length and bar width when you buy a bike with an integrated cockpit. Manufacturers like Specialized and Pinarello have several stem length and bar width combinations to choose from.

If you later decide you want a differently shaped bar, your flexibility lessens, or you want a shorter stem, you must replace the entire integrated cockpit.

You can avoid the pain of installing a new integrated cockpit by paying your bike mechanic to do it. You will also have to foot the more considerable cost to buy a new integrated cockpit. This will be especially painful if you need a new Talon Ultra fast cockpit from Pinarello.

While integrated cockpits may look clean and modern, they come with trade-offs in adjustability and customisation. Not to mention the associated cost. If you’re considering a bike with this feature, understand the limitations and explore whether alternative setups are available.

The Bike You Can Buy and the Bike You Should Buy

Illustration courtesy of WordPress AI

Participants in almost any sport can buy the equipment that the professionals use.

A Sunday league player can wear the same football boots as his or her top goal-scoring idol.

Photographs courtesy of goal.com

A duffer can tee off with the same club a PGA Major tournament winner uses to drive a golf ball 300 yards.

Photographs courtesy of PGAClubTracker.com

A recreational tennis player can serve double faults with the same tennis racquet an ATP Grand Slam winner uses to serve aces.

Photographs courtesy stadiumtalk.com

Apart from sizing considerations, there is little to stop amateurs from using the same equipment that the professionals in most sports use. No physical adaptation is needed to use such sports equipment.

This is not true of road bicycles. People often buy bicycles that they need to fit their bodies to, rather than bikes that fit their bodies.

There are lots of reasons why cyclists buy pro-level bicycles. Owning a high-end road bike can be a way to express personal identity or status, particularly within cycling communities, or to signal passion for cycling and commitment to performance. Some individuals may be drawn to the technical aspects of pro-level road bikes, including the components and frame materials. Others are attracted to these bikes because they are often beautifully designed and crafted.

Unfortunately, riding a professional-level road bike is generally not recommended for amateurs. These bikes are designed for speed and efficiency, with a frame geometry that encourages an aggressive riding position. The handlebar and stem measurements of professional-level racing bicycles let the professional cyclist adopt an aggressive position that few recreational cyclists could endure for long.

Illustration courtesy of silca.cc

The average male professional cyclist is 27.4 years old and weighs between 66 and 68 kilos. He has a high level of flexibility. He prioritises flexibility in hamstrings, hip flexors, and lower back, alongside areas like shoulders and chest, to counteract the typical low and long cycling posture essential to bike racing success.

The average recreational cyclist is older, has a belly which gets in the way of achieving an aggressive riding position, and is not very flexible. The result is that many amateur cyclists on high-end road bikes end their rides with one or more of these complaints: upper back pain, lower back pain, neck pain, aching shoulders and sore hands.

Illustration courtesy of WordPress AI

The main difference between the bicycles the professionals ride and the bicycles most of us mere mortals should be riding is in two frame measurements. These measurements are frame stack and frame reach.

Frame stack refers to the vertical distance between the centre of the bottom bracket and the top of the head tube, while frame reach refers to the horizontal distance between the same points.

A taller frame stack equals a higher handlebar. Bar height can be increased using headset spacers and a positive-angle stem, but it is always better to get a frame that fits you rather than adding headset spacers to a too-low frame.

The longer the frame reach, the further forward the handlebars will be. You can swap the 110 mm or 100 mm stem that road bikes typically ship with for a shorter stem to bring the handlebars closer to you, but this will compromise how the bike handles. Again, it is better to start with a frame that fits you.

The table below shows the frame stack and frame reach for professional-level race bikes and frames with more relaxed geometry from the same manufacturers. The more relaxed geometry frames are usually marketed as Endurance bikes.

The measurements are millimetres for frames that fit a 180 cm tall rider.

Frame Reach and Stack measurements courtesy of the manufacturers’ websites

All the professional-level bicycles have a lower frame stack and/or a longer frame reach than the endurance bikes from the same manufacturer. The biggest differences are in the frame stack.

Despite the appeals of pro-level bicycles, the recreational rider would be wise to prioritise comfort over speed. That means foregoing the admittedly sexy pro-level race bikes in favour of a more forgiving endurance geometry.

Most recreational cyclists need a bicycle that allows them to adopt a more upright back angle than professional cyclists exhibit. In many cases, at least double the back angle. A taller frame stack and a shorter frame reach allow for a more upright position.

Illustrations courtesy of silca.cc

The main benefit for most recreational cyclists of owning a bicycle with a relaxed geometry instead of a race bicycle is greatly increased comfort. A secondary benefit is that an endurance bike is likely cheaper than a high-end race bike.

For happier cycling: Make your bicycle fit your body; don’t make your body fit your bicycle.

Image courtesy of WordPress AI

I Wouldn’t Want to Service a Modern Road Bike

Photograph courtesy of Getty Images on unsplash.com

I took a Bike Maintenance course in 2012 to learn how to service my bikes myself. On the final day of the course, we had to completely strip a bike down, including removing the fork, disassembling the chain rings etc., cleaning and lubricating all the parts, replacing cables as required, reassembling the bike and adjusting the shifting and brakes.

I still own a bicycle from that time, a 2010 Alchemy with mechanical shifting and brakes. I can still service that bike if I had to, although I gladly depend on my local bike shop to service my bikes for me now.

Bikes today are increasingly more difficult to service. I do not have the expertise or the tools to service a modern bicycle.

Advancements in modern road bikes make them more complex. Let us start from the top to compare my fifteen year-old bicycle with a modern one.

My bike uses externally routed cables to operate the brakes and gears.

Modern bikes use either partially or completely internally routed cables.

Photographs courtesy of sevencycles.com

Moving down the head tube to the brakes. My bike has rim brakes. Brakes on new bikes are exclusively disc. Often hydraulically operated.

Photographs courtesy of sram.com

Let’s now look at how these two advances make servicing more complicated.

When it comes to replacing cables on my bike, everything is visible so you can see what you are doing. The challenge with internal cables is that you have to thread them inside the frame blind, so to speak. Threading cables internally can be hindered by a tight curve around the bottom bracket.

A magnetic internal cable router is often needed.

Photograph courtesy of freewheel.co.uk

Replacing internally routed cables is more complicated when they are fully hidden. The headset often needs to be disassembled because the headset components can obstruct access to the cable path. 

Photograph courtesy of freewheel.co.uk

Then there are the brakes. Apart from infrequent cable replacement, all I need to do to service my rim brakes is to replace worn brake pads. Rim brake pads for road bikes are a standard shape. To replace them, undo the screw that holds each pad in its holder, slide the old pad out and slide a new pad into the holder and tighten the screw.

Photographs courtesy of sram.com

How difficult it is to replace mechanically operated disc brake cables depends on whether they are externally or internally routed.

Replacing disc brake pads is a more involved process. First, you must choose the type of brake pad: sintered, organic and semi-metal. Your choice depends on the type of riding you do. You also need the right shape pads for the disc brake caliper you have on your bike.

Then you to use a tool to push and hold the brake caliper pistons apart. Woe betide you if the pistons close without brake pads in place. You must also ensure that you do not touch the pad surfaces or the disc rotor. Getting oils on the pads or rotor will adversely affect braking performance.

Lastly, you need to bed in the new pads. The bedding in process heats up the pads and rotor, transferring an even layer of material from the disc pad onto the disc rotor. Failing to bed in your disc brakes will almost guarantee to result in vibration, noise, poor modulation, and loss of power.

The brake servicing process is much more complicated if you need to replace your hydraulic brake hoses or bleed your hydraulic brakes. Bleeding requires the correct type of fluid for the disc brakes on your bicycle: mineral oil or DOT fluid. The bleeding process is too long to describe here, but you get a sense of the steps involved from the number of parts in the Disc Brake Bleed kit pictured below.

Photographs courtesy of sram.com

Further down the bicycle are tyres. My bike has clincher tyres and inner tubes. Many new road bicycles, particularly higher-end models, ship with tubeless-ready tyres and wheelsets. Some bikes may ship with tubes in the tyres to simplify showroom setup, but the wheels and tyres are often tubeless-ready.

You can argue that tyres do not need service. However, a tubeless setup requires semi-regular maintenance to keep it performing at its best, as brakes do.

Tubeless tyre sealant gradually dries out. Manufacturer recommendations for sealant top-off intervals range between three and six months. It is also suggested that you take your tyre completely off the rim every twelve to eighteen months to scrape out the dried sealant.

The need to regularly top off the sealant, scrape out dried sealant and the fact some tubeless tyres are tricky to mount and/or need a dedicated tubeless inflator or air compressor to seat makes tubeless setup and maintenance inherently more onerous than using clincher tyres and inner tubes.

Photographs courtesy of bike radar.com & bicycling.com.

Last year, I wrote a post titled Tubed or Tubeless Tyres? The photographs below from that post illustrate how much more stuff you need to run tubeless tyres versus clincher tyres.

I’ll stick with my fifteen-year-old bicycle. My bike mechanic and I prefer the simplicity.

Photograph courtesy of WordPress AI