Monthly Archives: April 2025

The Bike You Can Buy and the Bike You Should Buy

Illustration courtesy of WordPress AI

Participants in almost any sport can buy the equipment that the professionals use.

A Sunday league player can wear the same football boots as his or her top goal-scoring idol.

Photographs courtesy of goal.com

A duffer can tee off with the same club a PGA Major tournament winner uses to drive a golf ball 300 yards.

Photographs courtesy of PGAClubTracker.com

A recreational tennis player can serve double faults with the same tennis racquet an ATP Grand Slam winner uses to serve aces.

Photographs courtesy stadiumtalk.com

Apart from sizing considerations, there is little to stop amateurs from using the same equipment that the professionals in most sports use. No physical adaptation is needed to use such sports equipment.

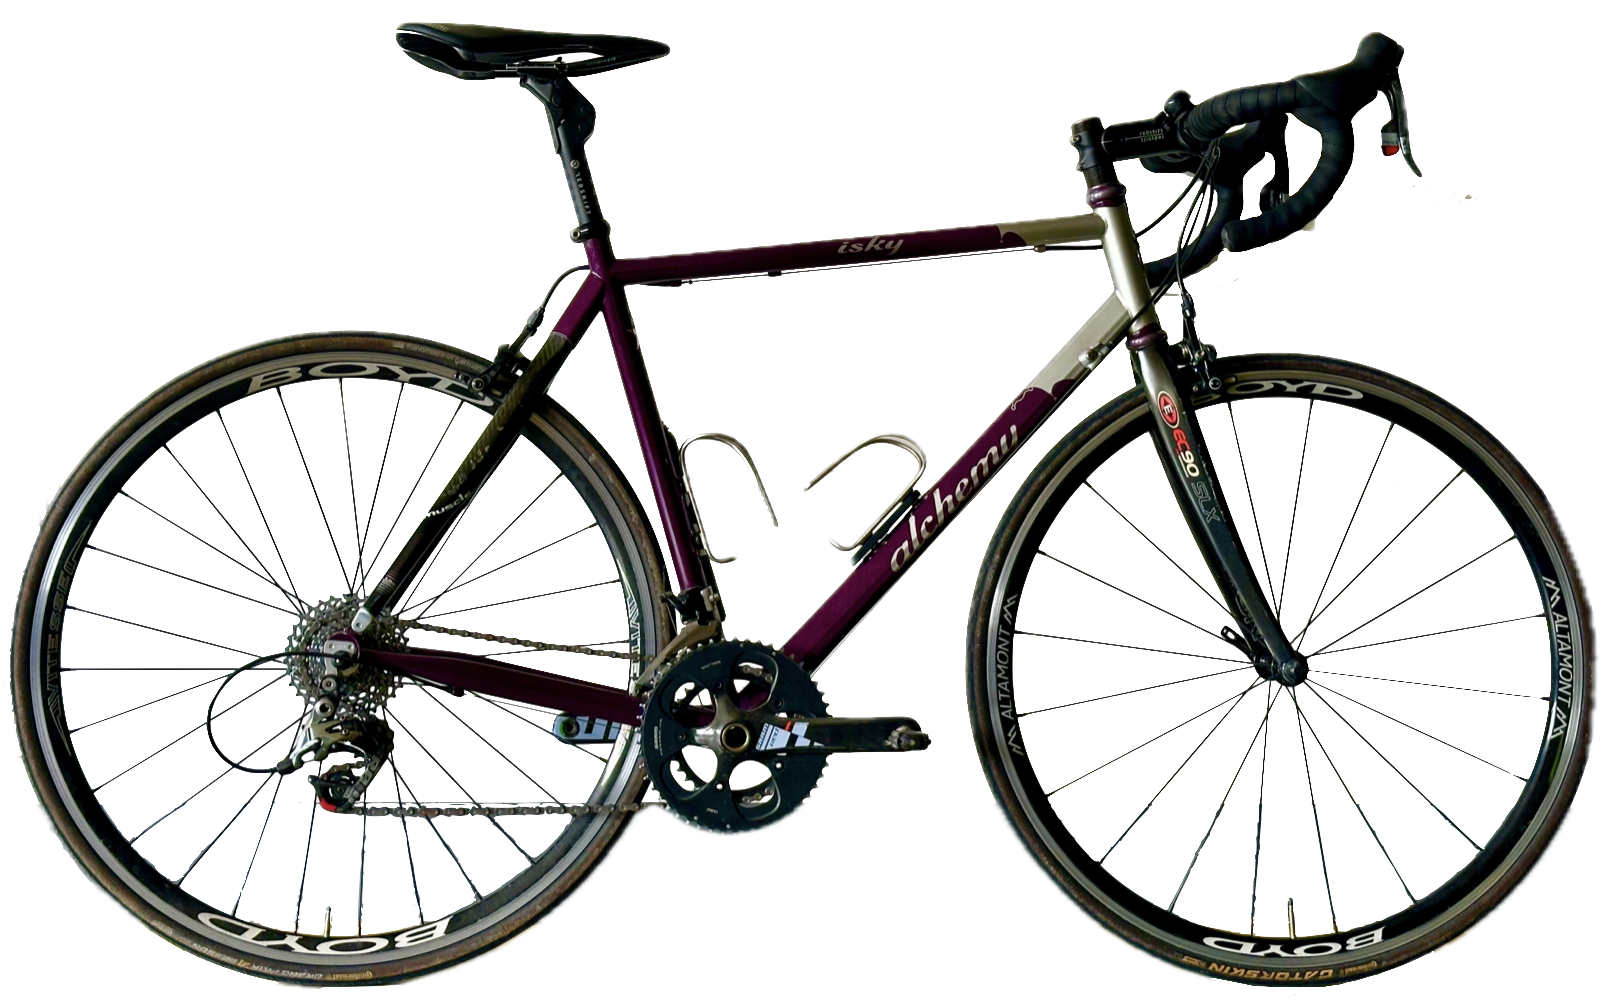
This is not true of road bicycles. People often buy bicycles that they need to fit their bodies to, rather than bikes that fit their bodies.

There are lots of reasons why cyclists buy pro-level bicycles. Owning a high-end road bike can be a way to express personal identity or status, particularly within cycling communities, or to signal passion for cycling and commitment to performance. Some individuals may be drawn to the technical aspects of pro-level road bikes, including the components and frame materials. Others are attracted to these bikes because they are often beautifully designed and crafted.

Unfortunately, riding a professional-level road bike is generally not recommended for amateurs. These bikes are designed for speed and efficiency, with a frame geometry that encourages an aggressive riding position. The handlebar and stem measurements of professional-level racing bicycles let the professional cyclist adopt an aggressive position that few recreational cyclists could endure for long.

Illustration courtesy of silca.cc

The average male professional cyclist is 27.4 years old and weighs between 66 and 68 kilos. He has a high level of flexibility. He prioritises flexibility in hamstrings, hip flexors, and lower back, alongside areas like shoulders and chest, to counteract the typical low and long cycling posture essential to bike racing success.

The average recreational cyclist is older, has a belly which gets in the way of achieving an aggressive riding position, and is not very flexible. The result is that many amateur cyclists on high-end road bikes end their rides with one or more of these complaints: upper back pain, lower back pain, neck pain, aching shoulders and sore hands.

Illustration courtesy of WordPress AI

The main difference between the bicycles the professionals ride and the bicycles most of us mere mortals should be riding is in two frame measurements. These measurements are frame stack and frame reach.

Frame stack refers to the vertical distance between the centre of the bottom bracket and the top of the head tube, while frame reach refers to the horizontal distance between the same points.

A taller frame stack equals a higher handlebar. Bar height can be increased using headset spacers and a positive-angle stem, but it is always better to get a frame that fits you rather than adding headset spacers to a too-low frame.

The longer the frame reach, the further forward the handlebars will be. You can swap the 110 mm or 100 mm stem that road bikes typically ship with for a shorter stem to bring the handlebars closer to you, but this will compromise how the bike handles. Again, it is better to start with a frame that fits you.

The table below shows the frame stack and frame reach for professional-level race bikes and frames with more relaxed geometry from the same manufacturers. The more relaxed geometry frames are usually marketed as Endurance bikes.

The measurements are millimetres for frames that fit a 180 cm tall rider.

Frame Reach and Stack measurements courtesy of the manufacturers’ websites

All the professional-level bicycles have a lower frame stack and/or a longer frame reach than the endurance bikes from the same manufacturer. The biggest differences are in the frame stack.

Despite the appeals of pro-level bicycles, the recreational rider would be wise to prioritise comfort over speed. That means foregoing the admittedly sexy pro-level race bikes in favour of a more forgiving endurance geometry.

Most recreational cyclists need a bicycle that allows them to adopt a more upright back angle than professional cyclists exhibit. In many cases, at least double the back angle. A taller frame stack and a shorter frame reach allow for a more upright position.

Illustrations courtesy of silca.cc

The main benefit for most recreational cyclists of owning a bicycle with a relaxed geometry instead of a race bicycle is greatly increased comfort. A secondary benefit is that an endurance bike is likely cheaper than a high-end race bike.

For happier cycling: Make your bicycle fit your body; don’t make your body fit your bicycle.

Image courtesy of WordPress AI

I Wouldn’t Want to Service a Modern Road Bike

Photograph courtesy of Getty Images on unsplash.com

I took a Bike Maintenance course in 2012 to learn how to service my bikes myself. On the final day of the course, we had to completely strip a bike down, including removing the fork, disassembling the chain rings etc., cleaning and lubricating all the parts, replacing cables as required, reassembling the bike and adjusting the shifting and brakes.

I still own a bicycle from that time, a 2010 Alchemy with mechanical shifting and brakes. I can still service that bike if I had to, although I gladly depend on my local bike shop to service my bikes for me now.

Bikes today are increasingly more difficult to service. I do not have the expertise or the tools to service a modern bicycle.

Advancements in modern road bikes make them more complex. Let us start from the top to compare my fifteen year-old bicycle with a modern one.

My bike uses externally routed cables to operate the brakes and gears.

Modern bikes use either partially or completely internally routed cables.

Photographs courtesy of sevencycles.com

Moving down the head tube to the brakes. My bike has rim brakes. Brakes on new bikes are exclusively disc. Often hydraulically operated.

Photographs courtesy of sram.com

Let’s now look at how these two advances make servicing more complicated.

When it comes to replacing cables on my bike, everything is visible so you can see what you are doing. The challenge with internal cables is that you have to thread them inside the frame blind, so to speak. Threading cables internally can be hindered by a tight curve around the bottom bracket.

A magnetic internal cable router is often needed.

Photograph courtesy of freewheel.co.uk

Replacing internally routed cables is more complicated when they are fully hidden. The headset often needs to be disassembled because the headset components can obstruct access to the cable path. 

Photograph courtesy of freewheel.co.uk

Then there are the brakes. Apart from infrequent cable replacement, all I need to do to service my rim brakes is to replace worn brake pads. Rim brake pads for road bikes are a standard shape. To replace them, undo the screw that holds each pad in its holder, slide the old pad out and slide a new pad into the holder and tighten the screw.

Photographs courtesy of sram.com

How difficult it is to replace mechanically operated disc brake cables depends on whether they are externally or internally routed.

Replacing disc brake pads is a more involved process. First, you must choose the type of brake pad: sintered, organic and semi-metal. Your choice depends on the type of riding you do. You also need the right shape pads for the disc brake caliper you have on your bike.

Then you to use a tool to push and hold the brake caliper pistons apart. Woe betide you if the pistons close without brake pads in place. You must also ensure that you do not touch the pad surfaces or the disc rotor. Getting oils on the pads or rotor will adversely affect braking performance.

Lastly, you need to bed in the new pads. The bedding in process heats up the pads and rotor, transferring an even layer of material from the disc pad onto the disc rotor. Failing to bed in your disc brakes will almost guarantee to result in vibration, noise, poor modulation, and loss of power.

The brake servicing process is much more complicated if you need to replace your hydraulic brake hoses or bleed your hydraulic brakes. Bleeding requires the correct type of fluid for the disc brakes on your bicycle: mineral oil or DOT fluid. The bleeding process is too long to describe here, but you get a sense of the steps involved from the number of parts in the Disc Brake Bleed kit pictured below.

Photographs courtesy of sram.com

Further down the bicycle are tyres. My bike has clincher tyres and inner tubes. Many new road bicycles, particularly higher-end models, ship with tubeless-ready tyres and wheelsets. Some bikes may ship with tubes in the tyres to simplify showroom setup, but the wheels and tyres are often tubeless-ready.

You can argue that tyres do not need service. However, a tubeless setup requires semi-regular maintenance to keep it performing at its best, as brakes do.

Tubeless tyre sealant gradually dries out. Manufacturer recommendations for sealant top-off intervals range between three and six months. It is also suggested that you take your tyre completely off the rim every twelve to eighteen months to scrape out the dried sealant.

The need to regularly top off the sealant, scrape out dried sealant and the fact some tubeless tyres are tricky to mount and/or need a dedicated tubeless inflator or air compressor to seat makes tubeless setup and maintenance inherently more onerous than using clincher tyres and inner tubes.

Photographs courtesy of bike radar.com & bicycling.com.

Last year, I wrote a post titled Tubed or Tubeless Tyres? The photographs below from that post illustrate how much more stuff you need to run tubeless tyres versus clincher tyres.

I’ll stick with my fifteen-year-old bicycle. My bike mechanic and I prefer the simplicity.

Photograph courtesy of WordPress AI

What Size Jersey Do I Buy?

Illustration courtesy of WordPress AI

An article titled We need to talk about why jersey sizes are getting smaller by Wade Wallace appeared on the Escape Collective website on 1 April 2025. It is a Member Exclusive article, so you need to sign up to Escape Collective to read it. Articles like this one, Member Podcasts and a Member Purchase Program that offers 25% off products from Cane Creek, and 20% off products from Ritchey, Silca, Mavic, Velocio and others make the annual USD99 subscription well worth it.

Back to Wade’s article. Despite the publication date, this is not an April Fool’s gag. Wade asks why fifteen-year-old size M cycling jerseys fit him the same as new size XL jerseys? Wade uses these photographs to prove his point.

Photograph courtesy of escape collective.com

He discusses several reasons for this size inflation. Modern fabric technology and fashion are two culprits.

The article generated 175 comments. Some of these touched on how jersey sizes are inconsistent from one manufacturer to another. I was intrigued and did some research.

I looked at the online size guides for men’s cycling jerseys from twenty-six brands. Some brands have different size guides for the various types of jerseys in their catalogues: short-sleeved, long-sleeved etc. Some brands even have size guides for each of the fits they offer for a particular jersey type: relaxed, enthusiast, pro and so on. 

I tried to compare like with like. The figures below are for men’s tight-fitting short-sleeved jerseys. There are indeed inconsistencies between manufacturers.

To start with not all brands offer sizes 2XS, XS, 2XL, 3XL, 4XL, 5XL and 6XL. All twenty-six offer sizes S to XL.

Attaquer offers the jersey in the smallest chest size of 74-79 cm. Decathlon offers the largest of 147-159 cm. Santini is the only brand with a size 6XL. Interestingly, Santini’s size 6XL is roughly equivalent to Decathlon’s size 3XL. You are starting to see the sizing inconsistencies between brands.

Data courtesy of the Brand’s respective websites

The chest measurements that each brand uses to differentiate the sizes they offer are definitely not standardised.

A cyclist with a chest measurement of 90 cm will need a size 2XS from PEdALED, Giordana or Panache. The same cyclist will need a size S from seven brands including Attaquer, Verge and Velobici. A 90 cm chest falls between sizes XS and S for seven other brands.

Data courtesy of the Brand’s respective websites

A cyclist with a chest measurement of 98 cm faces the same “What size am I in this brand’s jersey” conundrum. Depending on the brand, anything from size S to size L. In six cases a 98 cm chest falls between two sizes.

Data courtesy of the Brand’s respective websites

I thought the brand’s country of origin may have something to do with how their jerseys are sized. This is not the case.

Giordana, Santini, Castelli and Sportful are Italian brands designed and manufactured in Italy. Castelli and Sportful use identical sizing, perhaps because both brands belong to Manifattura Valcismon (MVC Group). Giordana and Santini use independent sizing schemes.

Data courtesy of the Brand’s respective websites

The same is true of the American brands Panache, Ostroy, Specialized, Pactino, Velocio and Ornot. Each American brand has its methodology for fitting chest measurements to their jersey sizes. I do note that Panache, Ostroy and Specialized use virtually identical chest measurements for their size L.

Data courtesy of the Brand’s respective websites

This inconsistency is also evident in the United Kingdom brands, although Velobici and Orro use common chest measurements in their size S, M, L and XL.

Data courtesy of the Brand’s respective websites

Another consideration is whether a cycling jersey accurately reflects its listed chest measurement, i.e. is it true-to-size? Online comments suggest that this is not always the case.

This means that the consumer cannot buy the same size cycling jersey from several brands and expect them to all fit the same.

What to do? Stay true to one brand. Or visit a physical store to try on a brand you are unfamiliar with. Or do your research before ordering a brand online for the first time. And expect to return a cycling jersey bought online because it doesn’t fit as expected.

Illustration courtesy of WordPress AI

Bicycle Tyre Upgrades: A Thing Since 1817

Clockwise from top left, photographs courtesy of bikeradar.com, lebelbicycles.com, cyclingnews.com and cyclingweekly.com

A web search for “Best Bicycle Upgrades” will produce suggestions with tyres at or close to the top of the list. It shouldn’t be surprising that tyre upgrades have been a “must have” since the bicycle was invented.

Illustration courtesy of bicyclehistory.net

Karl Drais invented his Laufmaschine (running machine) in 1817. Later known as a “draisine,” this vehicle had wooden wheels. Despite unpaved roads and solid wheels, Drais propelled his machine, Fred Flintstone fashion, nearly 16 kilometres in just over an hour.

Photograph courtesy of coimages.sciencemuseumgroup.org.uk

By 1866 Pierre Lallement received a US patent for a bicycle propelled by pedals attached to a slightly larger front wheel. These bicycles were called bone shakers because of the exceedingly uncomfortable ride caused by the stiff wrought-iron frame and wooden wheels surrounded by iron tyres.

Photograph courtesy of cars.bonhams.com

An upgrade, available since Charles Goodyear patented his vulcanisation process in 1844, was solid rubber tyres. Such tyres improved on solid wooden wheels or spoked wheels with iron rims, but they still gave a jarring ride.

Photograph courtesy of coimages.sciencemuseumgroup.org.uk

In 1885 John Kemp Starley and William Sutton introduced the Rover safety bicycle with a chain and sprocket drive and equally sized wheels. The Rover came with solid rubber tyres.

Photograph courtesy of heritage-print.com

Arguably the last major innovation in tyres came in 1887 when John Boyd Dunlop, in an attempt to smooth the bumpy ride of his son’s tricycle, nailed linen-wrapped inflated tubes to the solid wooden tricycle wheels. These were the first pneumatic, or air-filled, tyres.

The photograph above shows Johnny Dunlop riding his newly improved tricycle.

Photograph courtesy of progress-is-fine.blogspot.com

An improved version found immediate use among the growing number of enthusiastic bicycle riders. The first pneumatic tyre factory was started in 1889 to make tyres under Dunlop’s patent of 7th December 1888.

The photograph above shows Dunlop holding a bicycle fitted with pneumatic tyres.

Photograph courtesy of michelin.com

In 1891 André and Édouard Michelin introduced detachable pneumatic tyres for bicycles, and August Schrader invented his namesake Schrader valve. At the end of the 19th century, Etienne Sclaverand registered his patent for the Presta valve.

One can argue that the next step-change in bicycle tyres didn’t come until 1999 when Mavic introduced the first tubeless wheel and tyre system for mountain bikes. It was 2006 before Shimano and Hutchinson introduced a road tubeless standard. 

Photograph courtesy of cdn.mos.cms.futurecdn.net

The next bit of bicycle tyre innovation came when Marianne Vos showcased self-inflating tyre technology while winning the 2024 UCI Gravel World Championships. The Gravaa system uses tiny compressors within the wheel hubs to increase or decrease tyre pressure.

Despite these innovations bicycle tyres are what they were 135 years ago. They are air-filled tubes inflated via a valve. Admittedly bicycle tyres are better designed and constructed today.

Photograph courtesy of smarttirecompany.com

That may be about to change. The SMART Tire Company aims to commercialise an airless alloy tyre called METL (Martensite Elasticized Tubular Loading). METL was invented for space exploration. SMART is an acronym for Shape Memory Alloy Radial Technology.

METL promises to revolutionise bicycle tyres. Airless, never flat, elastic like rubber yet strong like titanium. At launch, these tyres are expected to cost USD150 each. The tread is rated for 13,000 km and retreads will be available for about USD10 per tyre.

The key phrase is “at launch.” The initial launch was expected to be in Q2 2022. That slipped to June and ,then Q4 2024. Today you can visit the SMART Tire Company’s website and add your name to a 2025 Wait List.

Photographs courtesy of smarttirecompany.com

I hope the SMART Tire Company does launch METL at an affordable price. That would be a proper tyre upgrade. Perhaps there will be an option for sidewalls that match your bike.